# About
Welcome to Yotta Labs, where we enable enterprises and AI-native teams to deploy inference and selective training workloads efficiently, without being locked into a single cloud provider or hardware.
### TL;DR
**Yotta Labs is building an interoperable AI infrastructure operating system that orchestrates workloads across multi-cloud and multi-silicon environments — unifying fragmented GPU capacity into a single execution fabric for production AI.**
### The Problem: Fragmented AI Compute
AI compute is no longer scarce — it is fragmented. Modern AI workloads are constrained by infrastructure fragmentation across:
* **Cloud providers** with incompatible APIs and pricing models
* **Geographic regions** with uneven capacity, electricity price, and availability
* **Silicon architectures**, including NVIDIA, AMD, and emerging accelerators, each with distinct software stacks and performance characteristics
As accelerators diversify and workloads scale, teams are forced to make early, irreversible infrastructure decisions — often optimizing for a single vendor at the cost of flexibility, utilization, and long-term efficiency.
The result is low GPU utilization, rising operational complexity, and slower deployment cycles for real-world AI systems.
### Our Solution: An Interoperable AI Infrastructure OS
Yotta Labs is building the systems layer that makes heterogeneous AI infrastructure work as one.
At its core, Yotta provides a **unified execution and orchestration control plane** that abstracts differences across clouds and GPU architectures, allowing AI workloads to be scheduled, deployed, and optimized consistently across diverse environments.
Instead of treating infrastructure heterogeneity as an edge case, Yotta is designed for it — enabling AI workloads to move fluidly across providers, regions, and silicon generations.
### What Yotta Enables
With Yotta, teams can:
* **Run production inference and selective training across multi-cloud environments** through a single control plane
* **Treat multi-silicon infrastructure as a first-class capability**, not a compatibility challenge
* **Improve GPU utilization and cost efficiency** by matching workloads to the right hardware at the right time
* **Avoid long-term vendor lock-in** while maintaining production-grade reliability and performance
Yotta is built for teams deploying real AI systems — not experiments, demos, or single-vendor pipelines.
### Core Capabilities
#### Multi-Cloud, Multi-Silicon Orchestration
Deploy and scale AI workloads across clouds and heterogeneous GPU architectures without rewriting infrastructure logic.
#### Execution-Layer Abstraction
Decouple AI workloads from vendor-specific hardware constraints, enabling consistent execution across NVIDIA, AMD, and emerging accelerators.
#### Hardware-Aware Scheduling
Place workloads based on real performance characteristics, availability, and utilization across diverse GPU fleets.
#### Production-First Design
Built for reliability, observability, and operational control required by enterprise and AI-native production environments.
### Why It Matters
The future of AI infrastructure is not defined by a single cloud or a single chip.
As accelerator ecosystems diversify and compute demand accelerates, the winning platforms will be those that treat **silicon as a variable, not a constraint**.
Yotta Labs is building the execution layer that allows AI workloads to outlive hardware cycles, adapt to new accelerators, and scale across an increasingly heterogeneous global compute landscape.
### Where We’re Headed
Our long-term vision is to make AI compute **interoperable, elastic, and efficient by default** — turning fragmented GPU infrastructure into a unified, schedulable resource for the next generation of AI applications.
Yotta is the operating system for that future.
# Mission
### Our Mission
**Yotta Labs’ mission is to make AI infrastructure interoperable across clouds and silicon — enabling teams to deploy and scale production AI workloads without being locked into a single hardware vendor or execution environment.**
We believe the next era of AI will be defined not by who owns the most compute, but by who can use heterogeneous compute most effectively.
### Why This Matters
AI infrastructure is entering a period of rapid hardware diversification.
New GPU architectures, accelerators, and silicon generations are emerging faster than traditional infrastructure platforms can adapt. While this diversity expands raw compute supply, it also introduces fragmentation — forcing teams to commit early to specific vendors, software stacks, and deployment paths.
This lock-in slows innovation, limits utilization, and makes AI systems fragile in the face of changing hardware and market conditions.
Yotta exists to remove these constraints.
### Our Guiding Principles
#### Interoperability Over Lock-In
AI workloads should not be bound to a single cloud provider or hardware vendor. Infrastructure should enable choice, flexibility, and long-term portability.
#### Silicon-Agnostic by Design
Hardware diversity is the future of AI compute. Yotta is built to treat silicon as a variable — not a prerequisite — allowing workloads to operate across heterogeneous accelerators as first-class citizens.
#### Execution-Layer Control
True interoperability requires control at the execution layer. Yotta focuses on orchestration, scheduling, and runtime intelligence where real performance and cost decisions are made.
#### Production First
AI infrastructure must be reliable, observable, and operationally sound. Yotta is designed for real-world deployment, not experimental pipelines or single-vendor demos.
### What Success Looks Like
When Yotta succeeds:
* AI teams can deploy workloads without redesigning infrastructure for every new GPU or cloud
* New silicon can be adopted incrementally, without disrupting production systems
* Compute utilization improves as workloads flow to the most suitable hardware
* AI systems become more resilient, portable, and economically efficient
Infrastructure fades into the background — and execution becomes the focus.
### Our Long-Term Vision
As AI accelerators continue to diversify, the platforms that endure will be those that unify execution across hardware generations and provider boundaries.
Yotta Labs is building the operating system for that world — one where AI workloads move freely across clouds and silicon, and infrastructure adapts to innovation, not the other way around.
# FAQs
Find quick answers to the most common questions about Yotta Labs — organized by topic.
# Getting Started
What is Yotta Labs and what problem does it solve?
Yotta Labs is building the interoperable AI infrastructure layer for a world where compute is fragmented and hardware is increasingly diverse.
As AI demand grows, GPU capacity is spread across different clouds, regions, providers, and data centers—while new accelerators and architectures (NVIDIA, AMD, and more) make the stack even harder to standardize. This fragmentation creates major inefficiencies: underutilized compute, operational complexity, higher costs, and slower iteration cycles for teams shipping AI.
Our mission is to unify this fragmented compute into a single, intelligent system—enabling AI workloads to run efficiently across multi-cloud and multi-silicon environments.
Yotta Labs helps developers and enterprises access, orchestrate, and optimize compute across heterogeneous infrastructure, so they can scale AI faster with better performance and cost efficiency.
How do I sign up or create an account?
To create an account, click **Launch Console** on the Yotta Labs website. From there, you can sign up using your **email address** or log in with a supported third-party provider.
Currently, Yotta Labs supports third-party login via **Google** and **GitHub**.
What can I build or run on Yotta Labs?
Yotta Labs supports a wide range of AI workloads across **Pods (containers)** and **GPU Virtual Machines**, including:
* **LLM inference** (production APIs, batch inference, evaluation)
* **Fine-tuning & training** (from small experiments to multi-GPU workloads)
* **Computer vision pipelines** (image/video processing, detection, segmentation)
* **Generative AI workflows** (ComfyUI, Stable Diffusion, image generation)
* **Data preprocessing & ETL** (feature extraction, embedding generation)
* **Research and experimentation** (reproducible environments for academia and labs)
Whether you prefer a container-native workflow (Pods) or full OS-level control (VMs), Yotta makes it easy to launch GPU compute and scale as your needs grow.
Can I change my email or login method later?
At the moment, your login method is tied to the authentication option you used when creating your account (Email, Google, or GitHub).
If you need to change your email address or switch login methods, please contact support and we’ll help you update your account access.
I didn't receive a verification email — what should I do?
If you didn’t receive your verification email, please try the following:
1. **Check your spam/junk folder**
2. Make sure you entered the **correct email address**
3. Wait a few minutes and try again (email delivery may be delayed)
4. If you’re using a corporate email, check whether your email security filters are blocking it
If you still don’t see it, please contact support and we’ll help you verify your account manually.
# Billing & Pricing
How does usage-based pricing work?
Yotta Labs uses **usage-based pricing**, meaning you only pay for the compute resources you actually consume—based on your selected GPU/CPU configuration and how long your workload runs.
There are **no long-term commitments** or minimum contracts required. You can start, scale, and stop anytime based on your needs.
What billing units and metering metrics are used?
Yotta Labs bills compute and storage usage with **per-second precision**.
* **GPU compute** is metered and charged **by the second**
* **Storage** usage is also metered and charged **by the second**
How do I view or export my invoices?
You can view and export your invoices directly from the **Billing** page.
1. Scroll to the bottom and find **Billing History**
2. Select the service you want to review, such as **Pods**, **Virtual Machines**, or **Serverless**
3. In the top-right corner, choose a time granularity (**Day / Week / Month**) and set a date range
4. Click **Export** to download your invoice as a **P**
Are there free tiers, credits, or trial options?
Yes. New users receive **$2 in free credits** to get started on Yotta Labs.
If you’re a **researcher**, you can also apply for additional support through our **Research Credit Program**: How can I top up my compute credits?
You can top up your compute credits anytime from the **Billing** page in the Yotta Console.
1. Go to **Billing**
2. Select the **amount of credits** you’d like to purchase
3. Click **Pay Now** to complete your payment
Once the payment is successful, your credit balance will be updated and available for use immediately.
# Compute
What is a Pod?
A **Pod** is a container-based compute environment with GPUs on Yotta Labs, designed for running AI workloads quickly and reproducibly.
Pods run on **containers**, which means you can choose from **official, ready-to-use images** provided by Yotta Labs (pre-configured for common AI workflows), or you can **build and use your own custom Docker image** for full control over your runtime, dependencies, and environment.
What is a Virtual Machine?
A **Virtual Machine (VM)** on Yotta Labs is a **GPU-powered VM instance** that gives you a more traditional server environment.
It comes with a **basic operating system** and **CUDA pre-installed**, and you’re free to install and configure everything else yourself—such as frameworks (PyTorch/TensorFlow), drivers, libraries, and your own software stack.
What is the difference between Pods and VMs?
**Pods** are best when you want a **container-native workflow** with quick setup and portable environments.
**VMs** are best when you want **full OS-level control** and prefer managing the software stack yourself.
In general:
* Choose **Pods** for faster iteration and containerized workflows
* Choose **VMs** for maximum flexibility and full system customization
How do I create a Pod or VM?
You can create a Pod or VM directly in the **Yotta Console**.
1. Click **Launch Console**
2. Go to **Compute**
3. Choose **Pods** or **Virtual Machines**
4. Select your desired configuration (GPU / CPU / memory / region)
5. Click **Create** to launch your instance
How can I access the Pod/VM I created?
We offer two access methods:
* **Jupyter Notebook**: Go to the instance page and click **IDE** under the **Connect** column to open the built-in Jupyter environment.
* **SSH**: Use the **private key associated with your Yotta account** to connect to your Pod or VM via **SSH**.
How can I access my private key?
You can find your public and private keys under **Settings → Access Keys** in the Yotta Console.
Download your **private key** to your local machine, then use it to **SSH into your on-demand Pod or VM**.
Can I use my own container image for Pods?
Yes. Pods support both:
* **Official images** (ready to use)
* **Custom images** you build and maintain yourself
This makes it easy to standardize environments across teams and keep workloads reproducible.
What is included by default on a VM?
Yotta VMs come with:
* A **basic operating system**
* **CUDA pre-installed**
You are responsible for installing any additional software you need, such as:
* PyTorch / TensorFlow
* vLLM / SGLang
* System libraries and dependencies
* Your own application code and services
Is data persistent on Pods and VMs?
Persistence depends on the storage option you choose.
In general:
* If you use **ephemeral storage**, data may not persist after the instance is terminated.
* For long-running projects and reusable datasets/models, we recommend using **persistent storage**.
How is Pod/VM usage billed?
Yotta Labs uses **usage-based pricing**. You only pay for the compute resources you actually consume.
Compute usage is metered with **per-second precision**, and there are **no long-term commitments** required.
# Support & Resources
Where can I get help or open a support ticket?
If you need help, you can reach the Yotta Labs team through our documentation and support channels.
For most setup and troubleshooting questions, we recommend starting with the **Quickstart** and product docs.
If you still need assistance, please contact support to open a ticket and include your **instance type (Pod/VM)**, **region**, and any relevant **error messages** so we can help faster.
Where are tutorials, examples, and SDK references?
You can find tutorials and step-by-step guides in our **Quickstart** documentation:\
For API endpoints, authentication, and SDK/API references, see our **API Spec**:\
How do I request new features?
We love hearing product feedback. If you’d like to request a new feature or improvement, please reach out to the Yotta Labs team with:
* What you’re trying to achieve (use case)
* The workflow you want to improve
* Any screenshots or examples (if applicable)
* Priority / impact (nice-to-have vs must-have)
We review feature requests regularly and use them to guide our roadmap.
# Platform Features
What types of AI workloads can Yotta Labs run?
Yotta Labs can run all types of AI workloads, including model training, inference, data processing, and experimentation.
What frameworks and models are supported?
Yotta Labs supports major AI frameworks including PyTorch and integrates seamlessly with Hugging Face Transformers and other popular pretrained models. Users can train, fine-tune, or run inference on a wide range of models without extra configuration. You can create your own by launching private templates as well. See our [**Templates**](https://console.yottalabs.ai/compute/templates).
What logging and monitoring tools are included?
Yotta Labs provides built‑in logs at the container and system level accessible via the console or API, helping users debug and monitor workloads.
What APIs are available and how do I authenticate?
* Yotta Labs provides APIs for ssh connection to manage resources, submit workloads, and monitor jobs.
* Authentication is handled via API keys, which can be generated from the Yotta console and passed in request headers.
Is data persistent across sessions?
Persistence depends on your storage choice; for long-term datasets/models use persistent storage options.See Pods-> Deploy->Persistent Storage.
# Quickstart
## Get an account
1. Use your email/Google account/Github account to [sign up here](https://console.yottalabs.ai/signup)
2. Verify your email address
## Add a payment method
1. Navigate to the [Billing page](https://console.yottalabs.ai/billing)
2. Choose the credit you'd like to pay
3. Click **Pay now** and add a card
4. You can view the bill on the Billing page.
## Deploy a Pod
Once your account is ready, it’s time to deploy your first Pod:
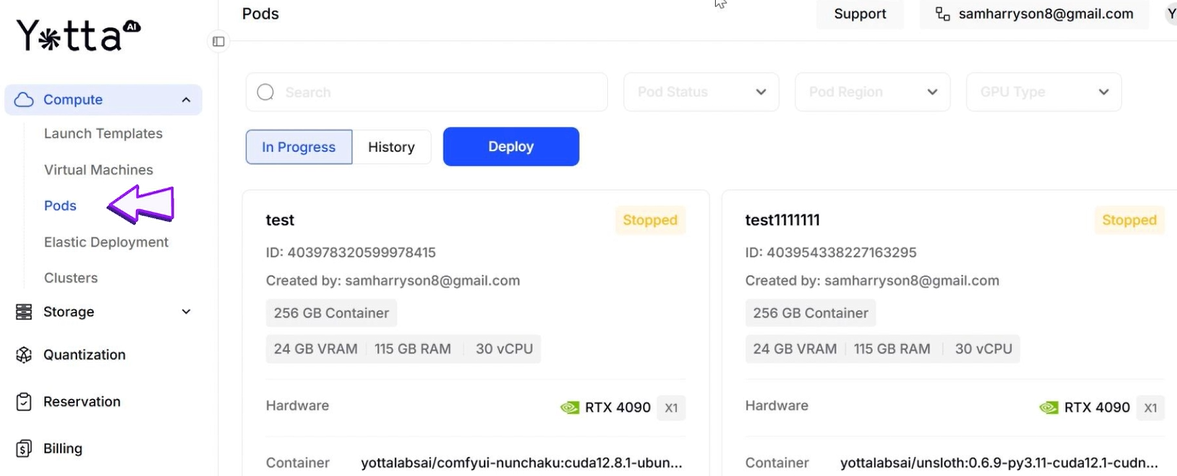
1. Navigate to the [**Pods** page](https://console.yottalabs.ai/compute/pods) in the web interface.
2. Click the **Deploy** button.
3. From the list of available GPUs, choose **RTX 4090**.
4. In the **Pod Name** field, enter "quickstart"
5. Keep the default settings for **Pod Template**, **GPU Count**, and **Instance Pricing**.
6. Hit **Deploy** to launch your Pod. After a few seconds, you’ll be redirected back to the Pods page.
7. For more guide, check this doc for [GPU pods](/products/gpu-pods)
## Explore the Pod
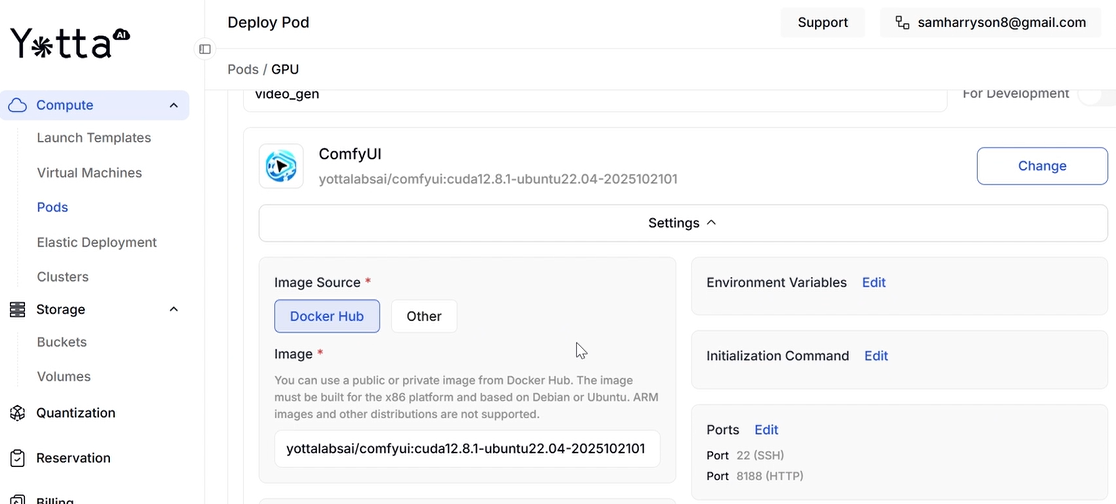
1. **Image Source\&Image:** This section defines the Operating System and Software Stack that will run on your GPU. Docker Hub is the most common option. It pulls pre-built software environments (containers) from the public Docker registry.
2. **Container Storage:** This is the Temporary Workspace (also known as "Root Storage").
* Size Slider: This is the disk space available for your OS, installed libraries, and temporary files.
* Cost: 256 GB is free, but extra space costs $0.00005 per GB per hour.
3. **Persistent Storage:** This is your virtual hard drive that survives even if the GPU pod is deleted. Ceph / S3: These are different storage protocols.
* Ceph usually acts like a normal folder on your machine where you can save data permanently.
* S3 connects to cloud "buckets" (like AWS S3) for massive datasets.
## Running Code via JupyterLab
1. Return to the Pods page and click **Connect**
2. Choose **Jupyter Lab -> :8888** service. Click on the Arrow Out Box icon.
3. Under the Notebook header, choose the Python 3 (ipykernel) environment.
4. Enter `print("Hello, world!")` into the first cell.
5. Press the Play button (or `Shift + Enter`) to execute. Success! You’ve officially deployed and executed code on your RunPod instance.
## Clean up
1. **Access Pod Settings:** Return to the Pods dashboard and select your active instance.
2. **Delete Operations:** Click the three-dot icon->Terminate.
3. **Confirm Deletion:** Confirmation in the following pop-up.
4. **Suspend Operations:** Click the Pause button.
## What's next?
1. Create [API keys](/api-and-sdk/api-keys) to manage your infrastructure through code.
2. Deep dive into the various [pricing policies](/products/billing) available for different GPU tiers.
3. Transition to [serverless](/products/serverless) computing to develop robust, production-grade AI applications.
4. See our [FAQ page](/company/faqs).
# GPU Pods
Pods are the core compute units on Yotta Platform. They allow users to deploy, manage, and connect to isolated GPU workloads across various hardware through the Console or the API interface.
## 💻 Managing Pods via Console
#### Pod Page Overview
By default, the system displays Pods with an **In Progress** status, which includes the following states:
* **Preparing**: Resources are being prepared
* **Initializing**: Resources are being allocated and the Pod is being deployed
* **Running**: The Pod is running
* **Stopping**: The Pod is being paused and resources are being reclaimed
* **Stopped**: The Pod has been paused
* **Terminating**: The Pod is being terminated and resources are being reclaimed
* **Terminated**: The Pod has been terminated
* **Failed**: The Pod failed to deploy. Common causes include:
* **Insufficient system resources**
* **Invalid image configuration**
* There are buttons you can use at the bottom:
* :link: `Connect` You can connect your machine to specific ports, such as 8888 for Jupyter Notebook. We currently support both **SSH** and **HTTP** ports.
* :notepad\_spiral: `Log` You can check the container logs to view its current status and identify any errors or issues.
* :chart\_with\_upwards\_trend:`Metrics` This provides real-time monitoring of GPU, CPU, memory, and storage usage to help you track system performance and resource utilization.
* Click the **History** tab to view Pods that have completed within the last 24 hours, which includes:
* `Terminated` – The Pod has been deleted.
* `Failed` – Deployment failed. Common causes:
* Insufficient system resources
* Invalid image configuration
* There is a search bar where you can use Pod name to find your Pod (fuzzy search supported). You can also use **Pod Status** or **GPU Type** to filter Pods.
## ⚙️ Deploying a Pod
#### Step-by-Step Guide
* **Navigate to:** `Compute → Pods`
* **Click Deploy** (top right). You’ll enter the **GPU Selection** page.
* **Select GPU Type**
* Choose a GPU model suitable for your workload.
* **Configure Pod**
* Fill in required parameters (fields marked with **`*`** are mandatory).
**Image Requirements**
Click **Edit** next to image name to further configure your image. We provided a list of official images compiled by Yotta Labs. Also, we allow users to select custom images including both **Public Images** and **Private Images**.
Here are a few requirements if you want to build your custom image:
* Must be compiled for **x86** architecture
* Must be **Debian/Ubuntu**
5. **Deploy**\
Click **Deploy** to complete the process.
## 💾 **System Volume**
The System Volume would automatically mount a list of system directories on the created Pod. This ensures that software, configurations, and data stored within these directories are persistent even if the Pod is edited or restarted.
#### **Supported Directories**
Read and write operations to the following directories will be persistent:
Directory
Brief Description
/home
User home directories; user-level configs and data.
/root
Root user home directory; scripts and temp data.
/var
Variable files (logs, caches, runtime data).
/run
Runtime status files (PIDs, sockets).
/etc
System and service configuration files.
/usr
System-level apps, libraries, and runtime components.
#### **Size Requirements**
To ensure that the Pod can launch and run smoothly, we recommend using the following rule to decide the size of your system volume:
> The size of the system volume needs to ≥ Image Size × 3
**Example:**
* **Image:** PyTorch base image (10 GiB)
* **Recommended System Volume Size:** At least 30 GiB
{% hint style="info" %}
The "**For Development**" button is automatically turned on when you are creating a pod.
You can find it and change the settings beside the pod name bar.
System volume is set to 100GB by default.
{% endhint %}
#### **Recommended Use Cases:**
* **Preserving Environments:** Retaining toolchains or dependencies (e.g., pip packages) after a Pod rebuild.
* **Persisting Configurations:** Saving changes made in `/etc`.
* **Retaining Logs:** Keeping logs in `/var` for a specific period.
## 🔌 Connecting to Your Pod
Once the Pod is launched:
* Click the **Connect** button on the Pod card to view exposed services.
* Availability depends on the **port configuration** defined at deployment.
* When the container port is **Ready**, the status will update automatically.
## 📜 Viewing Logs
* Click **Logs** on the Pod card to view both:
* **System Logs** (platform-level)
* **Container Logs** (application-level)
This helps with debugging deployment or runtime issues.
## 🧊 Pausing or Terminating Pods
#### 🔸 Pause
If you only need to suspend temporarily:
* Click **Pause** on the Pod card.
* Only **Volume** storage will continue to incur charges.
* You can **Run** to restart anytime.
* Pods can be **edited** while paused.
#### 🔸 Terminate
If you want to remove the Pod completely:
* Click the **“...”** on the Pod card → choose **Terminate**.
* The Pod will be **permanently deleted** and **no longer billed**.
* Terminated Pods **cannot be edited or restarted**.
## ✏️ Editing a Pod
1. Go to **Compute → Pods** and locate the Pod.
2. Click **Pause** and wait until the Pod enters **Stopped** state.
3. Click **“...” → Edit**, modify configurations, and save.
4. Click **Run** to restart the Pod with the new settings.
## 📈 Pod Status Reference
| Status | Description |
| --------------- | ---------------------------------------------------------- |
| **Initialize** | Resource allocation in progress; Pod deploying |
| **Running** | Pod is running |
| **Stopping** | Pausing in progress; resources reclaiming |
| **Stopped** | Pod is paused |
| **Terminating** | Termination in progress; resources reclaiming |
| **Terminated** | Pod fully terminated |
| **Failed** | Deployment failed (insufficient resources / invalid image) |
## 💰 Pricing & Billing
#### Formula
```
Hourly Pod cost = (GPU unit price per hour × number of GPUs) +
(Container Storage unit price per GB per hour × GB exceeding the free quota)
```
**Charges:**
* Your balance will be deducted once a Pod starts running.
* Once your balance drops to near $0, all running Pods will be terminated.
* If you no longer need a running Pod, you can Pause or Terminate it.
***
## 🧩 Managing Pods via OpenAPI
You can also manage Pods programmatically via Yotta Labs’ **OpenAPI**.
#### API Reference
* [📘 API & SDK Documentation](https://docs.yottalabs.ai/api-and-sdk/api-guides)
> **Tip:**\
> Always review the API documentation before calling endpoints to avoid common request errors (invalid parameters, insufficient balance, etc.).
## 🧱 Example Use Cases
* **Automated Pod Deployment** via Python SDK
* **Monitoring Pod Logs** using API polling
* **Scaling Workloads** across multiple GPU types
* **Integrating with CI/CD** to trigger training jobs automatically
***
## 🪄 Best Practices
* Use **Pause** instead of **Terminate** for short-term downtime.
* Monitor balance regularly to prevent auto-termination.
* Always verify image compatibility (x86 / Ubuntu-based).
* For debugging, prefer checking container logs first.
***
## 🧩 Related Docs
* [Pod API Reference](https://docs.yottalabs.ai/api-and-sdk/api-guides)
* [Billing](https://docs.yottalabs.ai/products/billing)
# Serverless
### Overview
Serverless is a flexible orchestration feature provided by the Yotta SaaS platform that enables users to quickly create, scale, and manage GPU-powered workloads.\
It is designed to deliver **elastic scaling**, **multi-region deployment**, and **disaster recovery**, ensuring that your applications remain highly available, fault-tolerant, and performant.
### Key Features
* 🧩 Custom Image Deployment\
Launch **Pods** directly from your own container images to instantly start the computing environment you need.
* ⚙️ Multi-Worker Deployment\
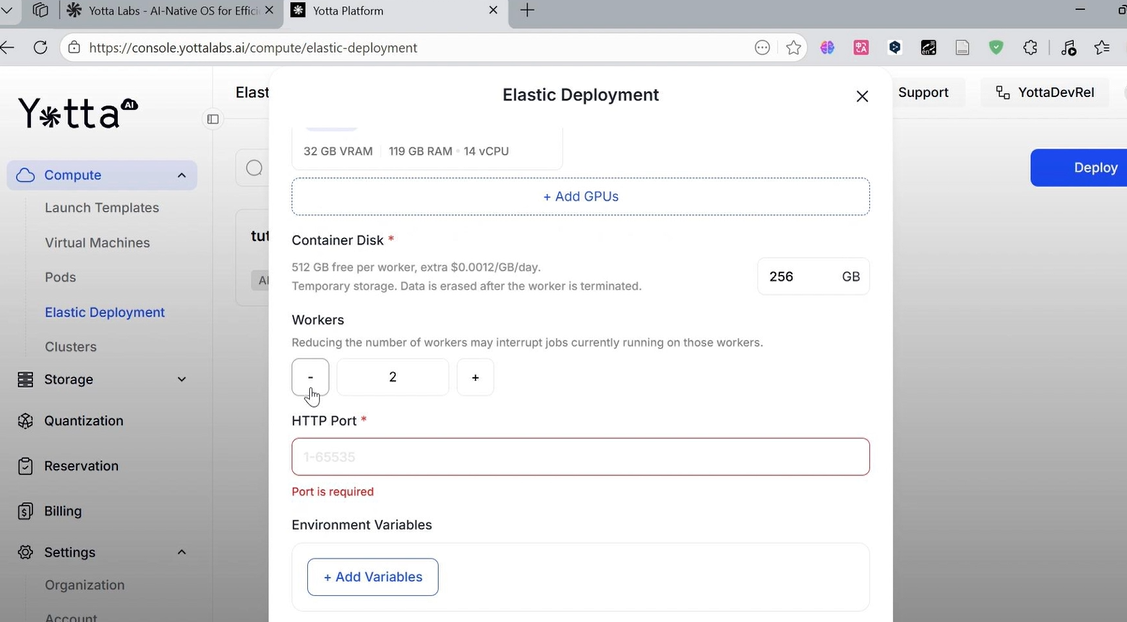
Create multiple **Worker Instances** with a single click to handle high-concurrency or large-scale computational workloads.
* 🌍 Multi-Region Scheduling\
Pods can automatically distribute across different **Regions**, enabling cross-region deployment and improving overall system stability and fault tolerance.
* 📈 Elastic Scaling\
Adjust the number of **Workers** at any time based on workload demand — scale up for high-load periods and scale down to reduce cost.
### Typical Use Cases
* **AI Training & Inference**\
Deploy multiple workers across regions to accelerate distributed AI workloads and improve throughput.
* **High-Availability Service Deployment**\
Distribute services across multiple regions to eliminate single points of failure.
* **Data Processing & Computation**\
Dynamically expand worker nodes to support distributed processing and failover resilience.
### Core Advantages
* 🌍 **Cross-Region Elastic Distribution**\
Supports multi-region resource scheduling for high availability and global workload balancing.
* 🛡 **Built-In Disaster Recovery**\
Automatically fails over to available regions in case of a regional outage, ensuring continuous business operations.
### Summary
Serverless service provides Yotta users with a powerful, flexible way to launch, scale, and manage distributed GPU workloads across multiple regions.\
Whether for AI model training, inference services, or large-scale data processing, Serverless ensures **performance, reliability, and efficiency** at global scale.
# Service Mode
We provide **three Service Modes** for Serverless:
### **ALB**
* The system automatically allocates a dedicated **Gateway (ALB)** for this deployment type, responsible for routing external requests to multiple Worker instances based on defined policies, enabling high availability and high-concurrency access.
* The Gateway supports **load balancing, rate limiting, and authentication**, and only forwards **HTTP** requests.
* Users can securely access their deployed services through the unified ALB entry point, without needing to manage the number or distribution of underlying Workers.
#### **Queue**
* The Queue mode provides **high-availability, scalable asynchronous task processing**.
* Built on a microservices architecture, it supports dynamic scaling and is ideal for workloads that require processing a large volume of async tasks.
* Based on a reliable message-queue mechanism, Queue ensures **stability and durability** during task transmission and execution.
* Once a task is completed, the system automatically sends the results back to your service (**UserBackend**) via callback.
#### **Custom**
* The system directly deploys **Workers** without exposing any external interfaces.
* Services and tasks running inside the Workers are **not directly accessible** to the user.
# Launching Serverless Tasks
### ALB Mode
* Navigate to **Compute → Serverless** in the left menu.
* Click the **Deploy** button in the top-right corner to start the deployment wizard.
* In the configuration form:
* Fill in all required fields (marked with \*)
* Optionally set additional parameters for custom needs
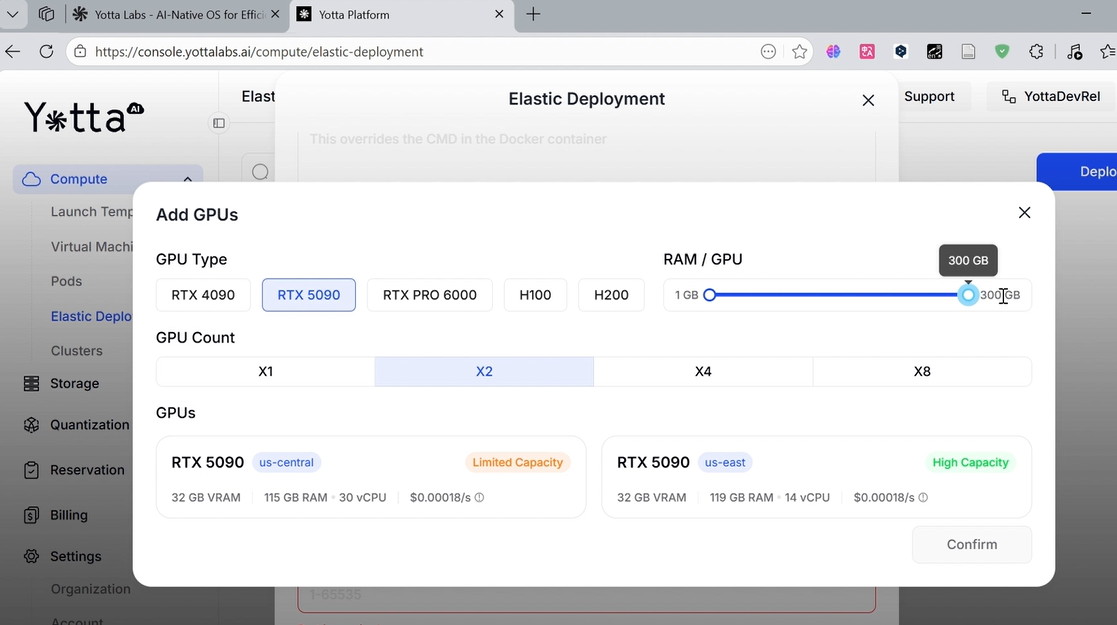
* Click **Add GPU** to select the GPU type for your workload
{% hint style="warning" %}
**You should put your service port in the HTTP Port field. The worker will be in Running status only when the port is ready.**
{% endhint %}
{% hint style="success" %}
**Recommendation:** choose GPUs from multiple regions to maximize redundancy and disaster recovery
{% endhint %}
* Click **Deploy** to launch your serverless task.
### Queue Mode
{% hint style="warning" %}
You should put the port used for your service health check in the HTTP Port field. The worker will be in Running status only when the port is ready.
{% endhint %}
### Custom Mode
Similarly to the ALB mode and Queue mode, you can choose Custom mode to hook up your serverless task with your own infrastructure (e.g. API Gateway, Queue)
# Managing Serverless Tasks
* Open the Yotta Console and navigate to: **Compute → Serverless**
* The page lists all **In Progress** Serverlesss with the following statuses:
Status
Description
Initializing
Resources are being provisioned
Running
Deployment is active and accessible via endpoint
Stopping
Resources are being reclaimed
Stopped
Deployment is paused
* You can search tasks by name (fuzzy search supported).
* Click a serverless task card to view its **details**.
# Accessing Serverless Tasks
{% hint style="info" %}
Only tasks in the **Running** state can be accessed.
{% endhint %}
* Click the **Running** card to open the detailed page and find the endpoint URL.
Example: Access via `curl`
{% hint style="warning" %}
Each request must include the header: `Authorization: Bearer `\
API keys can be found in **Settings → Access Keys**.
See more details in [API keys doc](https://docs.yottalabs.ai/api-and-sdk/api-keys)
{% endhint %}
```bash
curl --location 'https://2wmczkcst63e.yottadeos.com/v1/chat/completions' \
--header 'Content-Type: application/json' \
--header 'Authorization: Bearer ' \
--data '{
"temperature": 0.5,
"top_p": 0.9,
"max_tokens": 256,
"frequency_penalty": 0.3,
"presence_penalty": 0.2,
"repetition_penalty": 1.2,
"model": "meta-llama/Llama-3.2-3B-Instruct",
"messages": [
{
"role": "user",
"content": "Explain what is AI infrastructure."
}
],
"stream": false
}'
```
{% hint style="info" %}
The base URL is unique to your task (e.g. `https://2t5y1srid9mo.yottadeos.com`). Replace the `localhost` in the URL of your local deployment to get the full URL (e.g. in the above example, it would be `https://2t5y1srid9mo.yottadeos.com/v1/chat/completions`) of your service managed by the serverless task.
{% endhint %}
# Editing Settings
{% hint style="warning" %}
Only deployments in the **Stopped** state can be edited.
{% endhint %}
* To edit:
* Click the **⋮ (Menu)** on the top-right corner of the card.
* Select **View Config** to open the configuration modal.
* Scroll to the bottom of the page and you will see the **Edit** button
* Modify parameters as needed and click **Save**.
* Restart the deployment via the **Run** button to apply the changes.
# Scaling Workers
There are two ways to adjust workers' number to scale in/out your task. All scaling changes will be applied immediately to running deployments.
* **From the card’s top-right menu**: select **Scale Workers**. Adjust the number of workers on the detail page and save.
* **From the Details page’s top-right menu**: Click the **Menu** and select **Scale Workers**. Then, adjust the number of workers on the detail page and save.
{% hint style="success" %}
Scaling operations apply immediately to running deployments.
{% endhint %}
# Pricing & Billing
Serverless charges are calculated **hourly**, based on the actual compute and storage resources consumed.
$$
Total\ Cost= \sum(GPU\_{rate} \times GPU\_{count} + Storage\_{rate}\times Storage\_{size})
$$
#### Billing Formula
Each hour’s cost includes:
* GPU usage cost
* Storage cost
Note: We don't have extra charge for network bandwidth
#### Example
If a user deploys the following resources:
* **2 Workers**, each configured with:
* GPU: H100 × 2
* Disk: 100 GB × 2
* H100 GPU unit price: **$1.85 / GPU / hour**
* Disk unit price: **$0.001 / GB / hour**
**Total hourly cost = (2 × 2 × $1.85) + (200 × $0.001 + 200 × $0.001) = $7.4 + $0.4= $7.8 / hour**
#### Billing Characteristics
* **Pay-as-you-go:** Billing stops immediately once resources are released.
* **Unified multi-region billing:** The system aggregates resource usage across all regions.
* **Transparent reporting:** Detailed per-worker billing breakdowns are available in the **Details** page of each **Serverless**.
#### Deductions and Balance Policy
* Charges are deducted as soon as an Serverless starts running.
* When your **account balance approaches $0**, all running Serverlesss will be automatically terminated.
#### Viewing Billing Details
* Navigate to **Billing** from the left menu.
* The Billing page displays all Serverless usage and cost details, including per-worker hourly charges and historical summaries.
# Queue-based
### Key Features
#### 🚀 Elastic Scaling
Queue Mode automatically adjusts the number of active workers based on incoming request volume. When queue load increases, additional workers are provisioned; when demand decreases, excess workers are automatically terminated to save costs.
#### 💰 Transparent Pricing
* **Per-second billing**: Pay only for actual compute time use.
* **No idle charges**: Workers only incur costs while actively processing requests
For more details in price and billing, see [Pricing & Billing | Yotta Labs](https://docs.yottalabs.ai/products/serverless/pricing-and-billing)
### Architecture
#### Queue System
The intelligent queue sits at the center of the architecture, managing:
* Request buffering during traffic spikes
* Load distribution across available workers
* Health checks and automatic failover
* Priority-based request handling
#### Worker Management
* **On-demand provisioning**: Workers spin up in seconds when needed
* **Resource isolation**: Each worker operates in a dedicated, secure environment
* **Status monitoring**: Real-time visibility into worker health and performance
### Getting Started
**1. Configure Your Container**
See [Launching a Deployment | Yotta Labs](https://docs.yottalabs.ai/products/serverless/launching-a-deployment)
**2.View/Edit/Clone Configurations**
It would guide you back to configuration setting page. Try cloning or editing by clicking buttons at the bottom (editing is only available when paused/terminated).
**3.Scale Workers**
❗️After you scale workers, price would change accordingly.
**4.Terminate/Run Deployment**
* Terminate
❗️Every time you click `pause` to terminate, the original service would stop. Once restarted, new worker IDs will be assigned, and uptime will reset, counting from zero again.If no volume is mounted, all temporary files and caches will be lost. Resuming the serverless will require reloading the container image and re-downloading the model.
* Run
**5.Terminate Worker /See log**
:exclamation:When there is only one worker in your configuration, you cannot stop any worker using the terminate button shown above. If you'd like to stop it, please pause the deployment.
# Launch Templates
Launch Templates are pre-configured environments designed to get your GPU workloads up and running instantly. Instead of manually configuring images, environment variables, and storage every time, you can select a template to deploy a optimized stack in seconds.
### What are Launch Templates?
A Launch Template acts as a "blueprint" for your Pod. It bundles together:
* A Docker Image: Pre-installed with specific frameworks (e.g., PyTorch, Unsloth).
* Resource Configurations: Optimized default settings for storage and connectivity.
* Environment Setup: Ready-to-use tools like JupyterLab or SSH access.
***
### Official Templates
You can find the official available templates under the Official tab in the Launch Templates library.
* [Pytorch 2.9.0](https://console.yottalabs.ai/compute/templates/34) / [Pytorch 2.8.0](https://console.yottalabs.ai/compute/templates/1)
* [Unsloth](https://console.yottalabs.ai/compute/templates/36)
* [Miles](https://console.yottalabs.ai/compute/templates/35)
* [Skyrl](https://console.yottalabs.ai/compute/templates/37)
* [ComfyUI](https://console.yottalabs.ai/compute/templates/2) / [ComfyUI-nunchaku](https://console.yottalabs.ai/compute/templates/3)
* [Qwen](https://console.yottalabs.ai/compute/templates/5)
* [Wan 2.2](https://console.yottalabs.ai/compute/templates/7) / [Wan2.1](https://console.yottalabs.ai/compute/templates/6)
* [FLUX-1.dev](https://console.yottalabs.ai/compute/templates/4)
* [Crowdcent](https://console.yottalabs.ai/compute/templates/67)
***
### Customization
#### Private Templates
If the official templates don't meet your specific needs, you can switch to the Private tab to access templates you have created or shared within your organization.
#### Create Your Own
Want to standardize your own workflow?
1. Go to the Launch Templates side panel.
2. Click **Create**.
3. Define your custom Docker image, environment variables, and default port mappings. See our doc for[ Custom images](/products/custom-images).
4. Save it for one-click deployment in the future.
***
### Accessing Your Templates
1. Choose a template
2. Click **Deploy**
3. You will be navigated to **Pods** page.
4. Start a pod. Follow this [guide](/products/gpu-pods) if your need help with how to start a pod.
# Custom Images
### Overview
Yotta provides a collection of **official**, **GPU-optimized base images** designed to help developers quickly build and launch compute environments for AI training, inference, and experimentation. Each image comes preconfigured with essential libraries, tools, and services—including **Python**, **JupyterLab**, and **SSH**—so you can begin working immediately with minimal setup.
You can further customize these images through secondary builds to add your own dependencies, frameworks, or configurations. Alternatively, you may bring your own container image as the base; just ensure that SSH is enabled for Pod access. Both approaches are covered in the sections below.
### Option 1: From Yotta's Official Base Images
#### Base Image Information
**Image name:**
```bash
yottalabsai/pytorch:2.8.0-py3.11-cuda12.8.1-cudnn-devel-ubuntu22.04-2025081902
```
This image is built on top of:
```bash
nvidia/cuda:11.7.1-cudnn8-devel-ubuntu20.04
```
Preinstalled Components:
* Python 3.10
* JupyterLab
* SSH
* Common developer utilities
#### Key Features
* ✅ **GPU-Ready Environment**\
Preconfigured with CUDA 11.7 and cuDNN 8 to ensure smooth GPU acceleration out of the box.
* ✅ **Preinstalled Python & JupyterLab**\
Includes Python 3.10, pip, and JupyterLab for immediate notebook-based development.
* ✅ **Integrated SSH**\
Provides remote shell access for debugging, code editing, file transfers, and automation.
* ✅ **Auto-Start Script**\
A built-in `/start.sh` script automatically initializes required services (SSH, JupyterLab, etc.) at container startup.
#### Environment Variables
Variable
Description
JUPYTER_PASSWORD
Sets the login password for Jupyter. If not provided, JupyterLab will fail to start.
{% hint style="warning" %}
**Important:** Ensure you set the required environment variables (especially `JUPYTER_PASSWORD`) before launching the container. Missing values will prevent JupyterLab from initializing correctly.
{% endhint %}
#### Exposed Ports
Your deployment must expose the following ports:
Port
Description
22
SSH service port — required for remote login.
8888
JupyterLab web interface port — required for browser access.
{% hint style="info" %}
These ports must be exposed; Without them, SSH and JupyterLab access will not be accessible.
{% endhint %}
#### Building a Custom Image
You can extend Yotta’s base images to install additional dependencies, frameworks, or internal tools.
#### Example Dockerfile
```dockerfile
FROM yottalabsai/pytorch:2.8.0-py3.11-cuda12.8.1-cudnn-devel-ubuntu22.04-2025081902
# Add custom dependencies or your own code
RUN pip install -U pip && \
pip install pandas matplotlib
```
{% hint style="info" %}
💡 **Tip:** Extend the image to install additional ML libraries, enterprise tools, private model weights, or custom startup logic—without modifying the base environment.
{% endhint %}
#### Important Notes
⚠️ **Do Not Modify `/start.sh`**\
This script handles initialization for all services (SSH, Jupyter, etc.). Modifying or overriding it will cause the container to fail to start.
⚠️ **Set `JUPYTER_PASSWORD`**\
Required for secure and successful JupyterLab initialization.
⚠️ **Expose Ports 22 and 8888**\
Mandatory for remote access and Jupyter web UI.
### Option 2: From Your Own Images
If you prefer to use your own base image, you must ensure that **SSH is properly installed and enabled**.\
The following example extends the latest vLLM image—simply replace the first line with your own base image.
```dockerfile
# Replace this base image with your own image
FROM vllm/vllm-openai:latest
# Set environment variables to avoid interactive prompts during installation
ENV DEBIAN_FRONTEND=noninteractive
# Install OpenSSH server
RUN apt-get update \
&& apt-get install -y openssh-server \
&& apt-get clean \
&& mkdir -p /run/sshd \
&& chmod 755 /run/sshd
```
### Using a Custom Image in the Yotta Console
After building and pushing your custom image to your registry:
1. Log in to the **Yotta Console**.
2. Navigate to **Compute → Serverless** or **Pod Management**.
3. Select **Deploy**, then choose **Custom Image**.
4. Enter the image name and configuration.
5. Launch the Pod.
{% hint style="warning" %}
**Important:** If your base image does not automatically start `sshd`, add the following to your **Initialization Command**
`/usr/sbin/sshd -D &`
Then append any other commands you need.
{% endhint %}
Your Pod will now run using your custom-built image — with full SSH and JupyterLab access.
### Summary
Yotta’s **Official Base Images** provide a optimized, GPU-ready foundation for AI workloads. By extending these images, developers can easily extend these images or bring their own, as long as SSH is enabled. Following the guidelines above ensures full compatibility with Yotta **Pods** and **Serverless**, enabling smooth development workflows with JupyterLab, SSH, and GPU acceleration.
# Virtual Machines
# Launching a Virtual Machine
### Overview
YottaLabs provides an intuitive interface for launching virtual machines with powerful GPU resources. Whether you're training machine learning models, running scientific simulations, or performing data analysis, this platform makes it easy to configure the exact resources you need.
***
#### 1. Region Selector
**What it does:** Selects the geographic location where your virtual machine will be hosted.
**Why it matters:**
* **Latency**: Choose a region close to you for faster response times
* **Availability**: Different regions may have different GPU availability
***
#### 2. Network Storage
**What it does:** Configures persistent network-attached storage for your virtual machine.
**Storage types typically include:**
* **Standard SSD**: Good for general purpose workloads
* **High-performance SSD**: For I/O intensive applications
* **Archive storage**: For infrequently accessed data
**Why it matters:**Your instance's local storage is ephemeral (lost when instance stops)!
***
#### 3. VRAM Slider
**What it does:** Filters instance types based on GPU memory (VRAM) requirements.
**Why it matters:**
* Different models require different amounts of GPU memory
* Training large language models needs 40GB+ VRAM
* Small computer vision models might only need 8-16GB
**Example use cases:**
* **1-8 GB**: Small datasets, inference, light training
* **16-24 GB**: Medium neural networks, most computer vision tasks
* **40-80 GB**: Large language models, high-resolution image processing
* **80+ GB**: Multi-GPU training, extremely large models
***
#### 4. RAM Slider
**What it does:** Filters instance types based on system RAM .
{% hint style="info" %}
**VRAM vs RAM**
RAM is the CPU's general-purpose workspace for running the OS and apps, while VRAM is the GPU's high-speed dedicated memory used exclusively for rendering textures, 3D graphics, and video frames. Essentially, RAM manages the "logic" of your computer, whereas VRAM handles the "visuals."
**For deep learning, a good rule of thumb is 2-4x your VRAM in system RAM.**
{% endhint %}
**Why it matters:**
* Data preprocessing often happens in system RAM
* Large datasets need to fit in memory
* Some applications are RAM-intensive even without GPUs
***
#### Provider Selection
Choose different GPU providers:
***
### GPU Configuration
#### Multi-GPU Selection Buttons
* Not all code can utilize multiple GPUs without modification
* You'll need to implement data parallelism or model parallelism
* PyTorch: Use `DataParallel` or `DistributedDataParallel`
* TensorFlow: Use distribution strategies
* Monitor GPU utilization - don't pay for GPUs you're not using!
***
#### Operating System Selection
**What it does:** Selects the operating system for your virtual machine.
**Ubuntu 22.04 LTS**: Long-term support, most stabled configurations
**Ubuntu 22.04 LTS** (shown above):
* **LTS** = Long Term Support (5 years of updates)
* Well-supported by AI/ML tools
* Most documentation assumes Ubuntu
* Native NVIDIA CUDA support
***
# Mounting Block Volume
#### I. Mounting a Brand New Block Volume
When mounting a brand-new block device (without any data), follow these steps:
**1. Check the Current Block Devices**
Before mounting, confirm the block devices already present on the system.
```
lsblk
```
Use `lsblk` to view all block devices and their mount statuses, for example `/dev/vdb`.
***
**2. Format the Block Device**
Use the code below to format your block device:
```
mkfs.ext4 /dev/
```
* ``: name of the block device, e.g., `vdb`
* Example file system: `ext4`
* ❗️ If the device already contains data, **do not** format it or data would be lost.
***
#### II. Mounting an Existing Block Volume with Data
Whether the device is newly formatted or contains existing data, **the following steps for mounting are the same.**
**1. Verify the Block Device Name**
After successfully mounting, the block device typically appears as something like:
```
/dev/vdb
```
**2. Create a Mount Directory**
Create a directory to mount the disk:
```
mkdir /mnt/
```
* ``: The name of the directory you wish to use, e.g., `data`.
**3. Mount the Block Device**
Mount the block device to the specified directory:
```
mount /dev/ /mnt/
```
e.g.
```
mount /dev/vdb /mnt/data
```
***
#### III. (Recommended) Configure Auto-Mount on Boot
To ensure the Block Volume is automatically mounted after system reboots, add it to the `/etc/fstab` file.
**Add fstab Configuration**
```
echo "/dev/ /mnt/ ext4 defaults,nofail 0 0" >> /etc/fstab
```
e.g.
```
echo "/dev/vdb /mnt/data ext4 defaults,nofail 0 0" >> /etc/fstab
```
| **PARAMETER** | **DESCRIPTION** |
| ------------- | ------------------------------------------------------------------ |
| **defaults** | Use default mount parameters |
| **nofail** | Even if the disk does not exist, it does not affect system startup |
| **0 0** | Do not perform **dump** and **fsck** checks |
# Quantization
## Overview
Quatization aims at transforming high-precision large models (such as FLUX.1-dev) from Hugging Face into a compressed INT4 format using the SVDQuant algorithm.
**A Simple Example:**
Suppose you have data ranging from 0 to 100, and you want to represent it using **8-bit integers** (range 0-255):
* Original: 3.14159 → Quantized to 8-bit: 3
* Original: 27.82 → Quantized to 8-bit: 28
* Original: 99.9 → Quantized to 8-bit: 100
**The formula:**
```
quantized_value = original_value / scale_factor
scale_factor = original_max / quantizer_max = 100 / 255 ≈ 0.39
```
Memory usage drops from 32-bit float (4 bytes) to 8-bit integer (1 byte)—**75% compression**. Simple and effective.
## Configuration Parameters
* **Model source:** Use models hosted on Hugging Face Hub/ Model Scope .
* **URL:** The full link to the model repository
* *Example*: `https://huggingface.co/black-forest-labs/FLUX.1-dev`
* :exclamation:Currently, only models based on the FLUX-1.dev architecture are supported
* **Access Token:** Your personal Hugging Face User Access Token (with `Read` permission).
* get access to them from hugging face hub/model scope account settings.
* **Architecture:** The target model architecture for quantization (FLUX.1-dev).
* **Prompt:** Example input texts or prompts that can be used to calibrate or test the model during quantization.
* Helps the quantization algorithm maintain accuracy on common inputs.
* Filled in automatically for you.
* **Precision:**The target numerical precision for the model.
* **INT4 (4-bit Integer):** Uses a uniform grid. It divides the dynamic range into 16 equal steps. This linear approach often struggles with the "non-uniform distribution"(long-tail distribution) typically found in deep learning models.It offers **excellent universal compatibility**, supported by almost all modern NVIDIA RTX GPUs.It makes total sense to optimize your model around INT4, where the ecosystem is currently centered at.
* **NVFP4 (4-bit Floating Point):** Uses an exponential distribution, typically structured with 1 sign bit, 2 exponent bits, and 1 mantissa bit (E2M1). This structure provides higher precision for values near zero (where most weights are concentrated) while using the exponent bits to better capture "outliers." It is a flagship feature of **the NVIDIA Blackwell architecture**.Once Blackwell reaches critical mass globally, FP4-native models will dominate too.
* **Algorithm:** The method used for quantization. **SVDQUANT** is automatically selected.Check the links for more information on SVDQUANT :arrow\_down:
* [Website](https://hanlab.mit.edu/projects/svdquant)
* [Github](https://github.com/nunchaku-ai/nunchaku)
* [Paper](https://arxiv.org/abs/2411.05007)
* **Output Model:** output model name.
## Deploy
* Click the deploy button on the right side of the page.
* Check your in-progress/history tasks here.
# Storage
### Buckets vs. Volumes — Choosing the Right Storage
Both Buckets and Volumes provide persistent storage, but they serve fundamentally different purposes. Use the table below to decide which is right for your use case.
| | **Buckets** | **Volumes** |
| ------------------------------- | ----------------------------------------------------------------------------------- | -------------------------------------------------------------------------------------------------- |
| **Underlying protocol** | S3 / Walrus (object storage) | Ceph, R2, or Vendor (block / file storage) |
| **How you access data** | Via API or HTTP requests | Mounted as a local directory path inside your container (e.g., `/home/user/data`) |
| **Feels like** | A cloud drive / network file share accessed through code | A hard disk physically attached to your machine |
| **Best for** | Datasets, model weight archives, media outputs, AI workflow artifacts, static files | Active training checkpoints, databases, code, config files, anything requiring frequent read/write |
| **On-chain verification** | ✅ Every file has a verifiable ID and tracked history on Walrus | ❌ Not applicable |
| **File size limit (UI upload)** | Max 20 MB per file, max 500 files per upload | No per-file limit (block device, size set at volume creation) |
| **Capacity model** | Usage-based (pay for what you store) | Pre-provisioned in GB at creation time (1–10,240 GB) |
| **Typical use cases** | Training datasets, model releases, generated images/videos/audio, log archives | In-progress model checkpoints, fine-tuning data staging, application databases, shared code repos |
**Rule of thumb:**
* If your workload needs to **read or write files rapidly and repeatedly** during a training or inference job → use a **Volume**.
* If you need to **store and share large files** between jobs, archive outputs, or serve data via HTTP → use a **Bucket**.
# Buckets
### Navigating to Buckets
***
### Buckets List Page
After selecting **Buckets** from the navigation, you will land on the Buckets List page. This page displays all existing buckets associated with your account and provides controls for creating new ones.
#### Table Columns
| COLUMN | DESCRIPTION |
| ------------------ | ------------------------------------------------------------------------------------------ |
| **Name** | The unique name of the bucket. |
| **Storage Source** | The underlying storage protocol used by this bucket. |
| **Region** | **Global** indicates the bucket is not restricted to a specific geographic location. |
| **Size** | The total amount of data currently stored in the bucket, displayed in human-readable units |
| **Action** | Find the **Delete** button here(red trash-can icon). |
> ⚠️ Warning: This action is irreversible. Deleted data cannot be recovered. It is recommended to verify that the bucket is empty before clicking delete.
***
### + Creating a New Bucket
Click the **+ Create** button in the top-right corner of the Buckets List page to open the Create dialog.
#### Dialog Fields
| FIELD | REQUIRED | DESCRIPTION |
| ------------------ | -------- | --------------------------------------------------------------------------------------------------------------------------------------------------- |
| **Name** | ✅ Yes | A unique identifier for your bucket. Choose a descriptive name that reflects the purpose of the bucket (e.g., `my-project-assets`, `user-uploads`). |
| **Storage Source** | ✅ Yes | A dropdown for selecting the storage backend. Click to expand the options. Currently, **Walrus** is the only available choice. |
***
### Bucket Detail Page
Clicking the name of any bucket in the list opens the **Bucket Detail** page. This page shows all files stored within that specific bucket and provides tools to upload new files.
#### Table Columns
| COLUMN | DESCRIPTION |
| ---------------------- | --------------------------------------------------------------------------------------------------------------------------------------- |
| **Name** | The file name as stored on the Walrus network. |
| **View On Blockchain** | A link that allows you to inspect the file's record on the underlying blockchain, providing on-chain verification of the stored object. |
| **Type** | The MIME type or file format of the stored file |
| **Last Modified** | The timestamp indicating when the file was last updated or uploaded. |
| **Size** | The file size in human-readable units. |
| **Action** | Controls for managing individual files within the bucket (e.g., delete). |
***
### Uploading Files
To upload files into a bucket, navigate to the desired bucket by clicking its name, then click the **Upload** button.
#### Upload Dialog
The dialog contains a drag-and-drop area with the following constraints:
| CONSTRAINT | LIMIT |
| ------------------------ | ------------- |
| Maximum files per upload | **500 files** |
| Maximum size per file | **20 MB** |
### Complete Workflow Summary
The following summarizes the end-to-end flow for using the Buckets feature:
1. Navigate to **Storage > Buckets** using the left sidebar.
2. Review existing buckets in the list table, noting their name, storage source, region, and current size.
3. Click **+ Create** to add a new bucket, providing a name and selecting **Walrus** as the storage source.
4. Click a bucket name to open its detail view.
5. Click **Upload** to open the upload dialog, select or drag in your files, and confirm with **OK**.
6. Use the **View On Blockchain** column to verify file integrity on-chain.
7. Use the **delete icon** (trash can) in the Action column to remove a bucket when it is no longer needed.
***
# Volumes
### Volumes List Page
| Tab | Description |
| ------------------- | --------------------------------------------------------------------------------------------------------------------------------------------------------------------------------------------------------------------------------------------------------------------------------------------------------------------------------------------------------------------------------------------------------------------------------------------------------------------------------------------------------------------- |
| **Network Storage** |
High-performance Ceph-backed block storage. Pre-provisioned in GB and mounted into Pods or VMs as a local file system. Best for active workloads with frequent read/write operations.
Best for:
Model training checkpoints written and read repeatedly during a job
Databases and persistent application state
Shared scripts, configuration files, and code between sessions
Any workload requiring low-latency, high-throughput file I/O
|
| **Cloud Storage** | S3-compatible object storage. Usage-based pricing with no fixed capacity. Best for large datasets and model files accessed via API. |
| **System Volume** | System-managed volumes automatically created by the platform when you create a pod or a virtual machine. **These cannot be manually created or deleted by the user.** |
#### Table Columns
| Column | Description |
| ------------------- | ------------------------------------------------------------------------------------------------------------------------------------------------------------------- |
| **Name** | The unique name of the volume as entered at creation. |
| **Instance Type** | The workload type this volume is associated with: `Pod` or `Virtual Machine`. |
| **Size** | For Network Storage: shows used capacity vs. total provisioned capacity (e.g., `0 B / 256GB`). |
| **Cost** | The accumulated cost incurred by this volume since creation (e.g., `$0.00`). |
| **Monthly Pricing** | The projected monthly cost based on the volume's provisioned size and the applicable rate (e.g., `$6.984` for a 100 GB Network Storage volume at $0.0698/GB/Month). |
| **Volume Type** | The specific storage variant or hardware type. Displays `–` if not applicable. |
| **Region** | The geographic region where the volume is provisioned (e.g., `us-east-3`). |
| **Mount Status** | Indicates whether the volume is currently attached to a running instance. Displays `Unmounted` (in red) when not attached to any workload. |
#### + Create Button
* **Location:** Top-right corner of the Volumes List page.
* **Function:** Clicking this button reveals a dropdown menu with two options:
* **Network Storage** — opens the Create Network Storage dialog.
* **Cloud Storage** — opens the Create Cloud Storage dialog.
> **Note:** System Volumes cannot be manually created. They are provisioned automatically by the platform.
### Creating a Network Storage Volume
Click **+ Create** → **Network Storage** to open the Create Network Storage dialog.
| Field | Required | Description |
| ------------ | ------------- | ----------------------------------------------------------------------------------------------------------------------------------------------------------------------- |
| **Name** | ✅ Yes | A unique name for this volume. |
| **Workload** | ✅ Yes | The type of compute instance this volume will be used with. Select `Pod` or `Virtual Machine`. ***This setting determines which instance types can mount the volume.*** |
| **Region** | ✅ Yes | The geographic region where the volume will be provisioned. Available options: `us-east-3`, `us-east-4`. |
| **Size** | ✅ Yes | The pre-provisioned capacity in GB. Enter a numeric value in the input field. The projected monthly cost updates dynamically as you type. |
| **Pricing** | — (read-only) | Displays the rate ($0.0698 / GB / Month) and the projected monthly total based on the size entered. |
#### Dialog Buttons
| Button | Description |
| ----------- | ----------------------------------------------------------------------------------------------------------------------------------------- |
| **Cancel** | Closes the dialog without creating a volume. No changes are made. |
| **Confirm** | Provisions the new Network Storage volume with the specified configuration. The volume will appear in the Network Storage tab once ready. |
***
### Creating a Cloud Storage Volume
Click **+ Create** → **Cloud Storage** to open the Create Cloud Storage dialog.
#### Dialog Fields (Cloud Storage)
| Field | Required | Description |
| ------------ | ------------- | ------------------------------------------------------------------------------------------------------------------------------ |
| **Name** | ✅ Yes | A unique name for this volume. Use lowercase letters, numbers, and hyphens (e.g., `dataset-store`). |
| **Workload** | ✅ Yes | The type of compute instance this volume is intended for. Currently only **Pod** is available. |
| **Pricing** | — (read-only) | Displays the fixed rate of $0.0493 / GB / Month. No size needs to be configured — you are billed only for actual storage used. |
#### Dialog Buttons
| Button | Description |
| ----------- | --------------------------------------------------------------------------------------------------------- |
| **Cancel** | Closes the dialog without creating a volume. No changes are made. |
| **Confirm** | Creates the Cloud Storage volume. It will appear in the Cloud Storage tab, ready to be attached to a Pod. |
***
### Attaching a Volume to a Pod or VM
A volume only becomes active when it is attached to a running compute instance.
You configure this through the **Persistent Storage** setting when launching a Pod or Virtual Machine.
* Navigate to **GPU Pods** or **Virtual Machines** and begin configuring a new instance.
* In the launch configuration screen, locate the **Persistent Storage** section and enable the checkbox.
* Select the **Storage Type**:
* Network Storage volumes (block/file storage).
* Cloud Storage volumes (object storage).
* Set the **Mount Path** — the absolute directory path inside your container where the volume will be accessible (e.g., `/data` or `/workspace/checkpoints`).
* Launch the instance. The volume will be mounted at the specified path and the **Mount Status** in the Volumes list will update accordingly.
# AI Gateway
If you've ever wished you could try out the latest AI models — text generation, image synthesis, video creation — without having to juggle five different API keys, five different docs, and five differ
AI Gateway on Yottalabs is a unified API aggregator that brings together models from Google DeepMind, ByteDance, Z.AI, and more under one roof.
The category tabs at the top of the model list let you quickly filter models by type — choose from `All`, `LLM`, `Text-To-Image`, `Text-To-Video`, `Image-To-Video`, or browse by `Publishers` using the dropdown.
Simply click any tab to instantly narrow down the model catalog to what's relevant for your use case.
#### **Nano Banana Pro**
***Google DeepMind*** *`Text-To-Image`*
Nano Banana Pro is Google DeepMind's text-to-image model built for precision and versatility. Where a lot of image models struggle with complex, multi-element prompts or lose consistency across styles, Nano Banana Pro holds its ground — structural details stay sharp, fine visual elements render cleanly, and it handles everything from cinematic portraits to marketing assets well.
***
#### :banana:**Playground**
The Playground is your zero-setup sandbox. No API key configuration, no environment setup — just type a prompt and run it!
* **Prompt**: Write in natural language. The more context you give it, the more controlled the output.
* **Template 1 — Portrait / Character**
```
A [photo style] of a [subject description], wearing [clothing details],
[action/pose]. The background is [environment description].
Lighting is [lighting type], creating a [mood/atmosphere] feel.
Shot with [lens/camera style], [color grade].
```
*Example:*
> A cinematic photograph of a young black woman wearing a casual t-shirt and shorts, standing still with a colorful beach cocktail in hand, grinning broadly at the camera. The background features a sun-drenched Hawaiian beach scattered with tropical flowers and coconuts.
>
> Lighting: bright, warm natural sunlight, creating an upbeat and joyful atmosphere.
>
> Lens: wide-angle, capturing the full environment around the subject to amplify the sense of openness and surprise.
>
> Color grade: oversaturated, vivid tropical palette — punchy greens, electric blues, warm yellows. High energy, vacation editorial style.
>
>
* **Template 2 — Scene / Environment**
```
A [render style] of [location/environment], during [time of day / weather].
[Key visual elements present in the scene].
The atmosphere is [descriptive mood].
Color palette: [dominant colors]. Style reference: [art style or director/photographer].
```
*Example:*
> A photorealistic render of an abandoned greenhouse interior, during golden hour after light rain. Overgrown vines crawl across rusted iron frames, and puddles reflect warm light from broken roof panels. The atmosphere is quiet and melancholic. Color palette: amber, moss green, pale rust. Style reference: Gregory Crewdson.
>
>
* **Template 3 — Product / Marketing Visual**
```
A clean [shot type] of [product name/description] placed on [surface/background].
[Props or surrounding elements if any].
Lighting: [lighting setup].
The overall tone is [brand tone: minimal / bold / luxury / playful].
No text, no watermark.
```
*Example:*
> A clean overhead shot of a matte black coffee cup placed on a white marble surface. A single sprig of dried lavender rests beside it. Lighting: soft diffused natural light from the left. The overall tone is minimal and premium. No text, no watermark.
>
>
**Quick Reference — Power Words by Category**
| Category | Options |
| ----------- | ---------------------------------------------------------------------------- |
| Photo style | cinematic, photorealistic, editorial, documentary, long-exposure |
| Lighting | golden hour, blue hour, hard rim light, soft diffused, neon-lit, candlelit |
| Mood | ethereal, gritty, melancholic, energetic, sterile, nostalgic |
| Color grade | desaturated, warm analog, high contrast B\&W, teal & orange, pastel washed |
| Composition | wide establishing shot, tight close-up, bird's eye, Dutch angle, symmetrical |
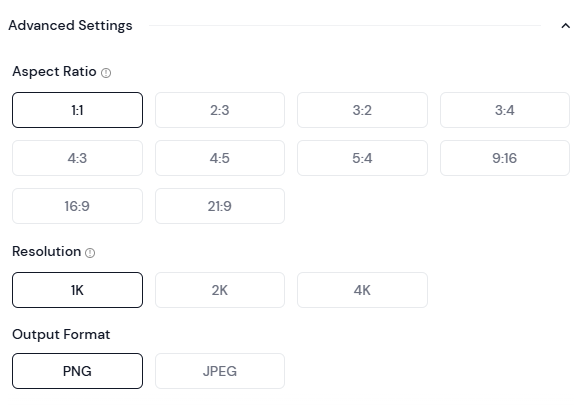
* **Advanced Settings**: Expand this section to adjust parameters like output dimensions, sampling steps, or guidance scale, depending on what the provider exposes. Useful when you want to push quality or constrain style.
* **Aspect Ratio** defines the shape of your image. `1:1` for social square posts, `9:16` for mobile/Stories, `16:9` for presentations and banners, `2:3` for portrait editorial, `21:9` for cinematic widescreen, and several others in between. The selected ratio is highlighted in black — default is `1:1`.
* **Resolution** sets the output quality: `1K`, `2K`, or `4K`. Higher resolution means more detail and larger file size. For quick prototyping, 1K is fine. For anything going into production — print, large-format display, or high-DPI screens — go 2K or 4K.
* **Output Format** is straightforward: `PNG` for lossless quality with transparency support, `JPEG` for smaller file sizes when you don't need a transparent background. **When in doubt, PNG is the safer default.**
* **Run**: Hit **Run** to generate.
* **Output & Download**: Generated images render directly in the panel. Use the download icon in the top-right corner of the output to save your result locally.
* **Pricing**: Cost is shown transparently beneath the output — currently **$0.14 per image**. What you see is what you pay.
***
#### :banana:**Providers**
Different providers may vary in latency, throughput, or price. You don't need to manage any of this manually — Yotta Labs automatically routes your requests to the most suitable provider based on your prompt and parameters.
***
#### :banana:**API**
If you're integrating Nano Banana Pro into your own application, the API tab is your starting point. Authentication is handled via an `X-API-KEY` header — grab your key from your account settings and you're good to go.
{% stepper %}
{% step %}
**Copy the SDK Code**
Head to the **API** tab on the Nano Banana Pro model page. Copy the full Python SDK code provided.
{% endstep %}
{% step %}
**Save It Locally**
Open any text editor (Notepad, VS Code, or anything you have on hand). Paste the code in, then make two edits before saving:
* Replace `"MY API Key"` with your actual API key from the Dashboard. See our official doc for API key [here](https://docs.yottalabs.ai/api-and-sdk/api-keys)
* Replace the default prompt with your own
Save the file as `run.py` in a folder of your choice, for example:
```
D:\yottalabs\run.py
```
{% endstep %}
{% step %}
**Run It from the Command Line**
Open **Command Prompt** (search "cmd" in the Windows Start menu). Navigate to the folder where you saved the file, then run it:
```bash
cd D:\yottalabs
python run.py
```
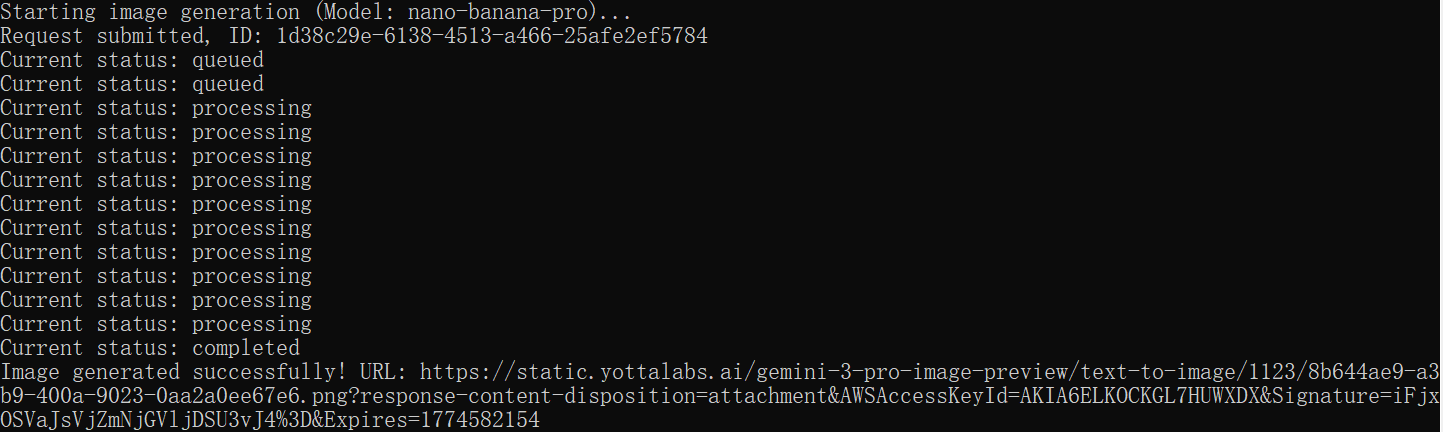
You'll see status updates printed in the terminal as the job processes:
{% endstep %}
{% step %}
**Copy the Output URL and Save Image**
Once the job completes, the terminal prints a URL starting with `https://`. Select and copy the full URL.
Paste the URL into your browser and hit Enter. The image will load directly in the browser.
{% endstep %}
{% endstepper %}
### 🤖 Claude Sonnet
**Anthropic** `LLM`
Claude Sonnet is Anthropic's balanced large language model — sharp enough for nuanced reasoning and long-document analysis, fast enough for real-time applications. It excels at structured outputs, multi-step instruction following, code generation, and conversational tasks where both quality and latency matter. Via AI Gateway, it's accessible through the same unified API surface as every other model, with no per-provider credential setup required.
***
#### 🍌 Playground
The Playground lets you send chat messages and inspect Claude Sonnet's responses in real time — no API key, no environment setup.
**Key input fields:**
| Field | Description |
| ----------------- | --------------------------------------------------------------------------------------------------------------------------------------------------------------------------------- |
| **System Prompt** | Set the model's role, behavior, and tone. Example: *"You are a senior product manager. Be concise and use bullet points."* Leave blank to use Claude's default assistant persona. |
| **User Message** | Your query or instruction. Multi-turn conversation is supported — previous turns are preserved in context automatically. |
| **Max Tokens** | Controls maximum response length. 256–512 for quick answers; 2048+ for long-form drafts or analysis. |
| **Temperature** | `0` for deterministic, fact-grounded responses. `0.7–1.0` for more varied, creative outputs. Default: `1.0`. |
**Prompt templates:**
```
Template — Structured Analysis:
"Analyze [topic or document] and return your response in the following format:
1. Summary (2–3 sentences)
2. Key findings (bullet list)
3. Risks or gaps (bullet list)
4. Recommended next step (1 sentence)"
```
> **Example:** Analyze the following product spec and return your response in the format above. Focus on technical feasibility and missing user stories. \[Paste spec here]
```
Template — Code Generation:
"Write a [language] function that [does X].
Requirements:
- [Requirement 1]
- [Requirement 2]
Include inline comments and a usage example at the bottom."
```
> **Tip:** For long document tasks, paste the full content into the User Message field. Claude Sonnet supports a 200K token context window — enough for most large files.
***
#### 🍌 Providers
Requests to Claude Sonnet are routed through Anthropic's inference endpoints. AI Gateway handles authentication and rate limit management automatically — no Anthropic API key is required on your end.
***
#### 🍌 API
**Quickstart:**
1. Get your `X-API-KEY` from the Dashboard
2. Copy the SDK code from the **API** tab on the model page
3. Set your system prompt and user message
4. Run and parse the response
```python
import anthropic
client = anthropic.Anthropic(
api_key="YOUR_YOTTALABS_API_KEY",
base_url="https://api.yottalabs.ai"
)
message = client.messages.create(
model="claude-sonnet-4-20250514",
max_tokens=1024,
messages=[
{"role": "user", "content": "Summarize the key risks in this contract: [paste text]"}
]
)
print(message.content[0].text)
```
> Authentication uses the same `X-API-KEY` header pattern as all other Gateway models. Set `base_url` to route through Yottalabs instead of Anthropic directly.
***
### 🎬 Kling v3 Standard
**KlingAI** `Text-To-Video`
Kling v3 Standard is KlingAI's text-to-video model designed for efficient, scalable video generation. It produces high-quality clips with stable motion and solid prompt adherence, while keeping generation speed and cost practical. The model supports common aspect ratios and flexible duration settings, making it well-suited for social media content, marketing materials, and everyday creative production.
***
#### 🍌 Playground
**Key settings:**
| Setting | Description |
| ---------------------------- | ---------------------------------------------------------------------------------------------------------------------------------------------------------- |
| **Multi Shot** | Toggle on to segment your prompt into multiple consecutive shots. Best for narrative or multi-scene descriptions. Toggle off for a single continuous clip. |
| **Shot Type — Intelligence** | The model interprets your prompt and autonomously assigns shot pacing, framing, and transitions. Recommended for most users. |
| **Shot Type — Customize** | Manually define shot type, camera movement, and duration per segment. For users who need precise directorial control. |
| **Prompt** | Describe scene, characters, action, camera movement, and dialogue. The more specific, the closer the output matches your intent. |
| **Aspect Ratio** | `16:9` for landscape/YouTube, `9:16` for Reels/TikTok, `1:1` for square posts. |
| **Duration** | Output length in seconds. Cost scales directly with duration. |
**Prompt structure:**
```
Template:
"[Location / environment]. [Subject description and clothing].
[Camera movement]. [Subject action or dialogue].
The mood is [mood]. Lighting: [lighting type]."
```
> **Example:** European villa outdoor terrace scene. A dining table covered with a blue-and-white checkered tablecloth. A young white woman sits barefoot beside the table, wearing a blue-and-white striped short-sleeve shirt, khaki shorts, and a brown belt. Opposite her sits a young white man in a white T-shirt. The camera slowly pushes in. The woman gently swirls a glass of juice, gazing toward the distant woods, and says, "These trees will turn yellow in a month, won't they?"
{% file src="/files/kroubtBR50cgKrepsRcV" %}
**Pricing:**
| Mode | Standard rate | Gateway rate |
| ---------- | ------------- | ------------ |
| No audio | $0.084 / s | $0.0714 / s |
| With audio | $0.126 / s | $0.1071 / s |
***
#### 🍌 Providers
Kling v3 Standard is served through KlingAI's inference endpoints. AI Gateway routes requests automatically and handles authentication on your behalf — no KlingAI account or API key is needed.
***
#### 🍌 API
Submit your prompt and parameters → receive a job ID → poll the status endpoint → retrieve the completed video URL.
> Video generation is asynchronous. The API returns a job ID on submission; poll the status endpoint until the state is `completed`, then retrieve the video URL from the response.
```python
import time
from typing import Dict, Any, List, Optional
import requests
# Global Configuration
BASE_URL = "https://gateway.yottalabs.ai/api/maas"
MODEL = "kling-v3-std-text"
API_KEY = "MY API Key"
class VideoGenClient:
def __init__(self, base_url: str, api_key: str):
"""
Initialize the Video Generation Client
:param base_url: Base API URL (e.g., http://example.com)
:param api_key: Authentication API Key
"""
self.base_url = base_url.rstrip('/')
self.api_key = api_key
self.headers = {
"Content-Type": "application/json",
"X-API-KEY": self.api_key
}
def submit_generation(self, model: str, parameters: Dict[str, Any], providers: Optional[List[str]] = None) -> str:
"""
Submit an asynchronous text-to-video generation request
:param model: Model slug (e.g., 'kling-v3-std-text', 'kling-v3-pro-text')
:param parameters: Generation parameters including:
- prompt (str, required when multi_shot=False): Text description of the video content to generate.
Used when multi_shot is False or not set.
- duration (int, optional): Video duration in seconds, range: 3-15 (e.g., 4, 5, 10).
When using multi_prompt mode, this value must equal the sum of all shot durations in multi_prompt
- aspect_ratio (str, optional): Output video aspect ratio, e.g., '16:9', '9:16', '1:1'
- multi_shot (bool, optional): Whether to enable multi-shot/multi-scene generation.
When True, 'shot_type' and 'multi_prompt' are required; 'prompt' is ignored.
- generate_audio (bool, optional): Whether to generate audio/sound effects for the video
- cfg_scale (str/float, optional): CFG (Classifier Free Guidance) scale, controls prompt adherence, range:0-1(e.g., '0.5')
- shot_type (str, optional): Shot mode for multi-shot generation. Required when multi_shot=True.
Enum value: ['customize', 'intelligence'].
- multi_prompt (list, optional): Multi-shot prompt configuration, list of dicts with:
- index (int): Shot sequence number (1-based)
- prompt (str): Text prompt for this shot
- duration (str/int): Duration of this shot in seconds
Required when multi_shot=True and shot_type='customize'.
Note:
- Supports up to 6 storyboards, with a minimum of 1 storyboard.
- The maximum length of the prompt for each storyboard 500 characters.
- The duration of each storyboard should not exceed the total duration, but should not be less than 1.
- The sum of all shot durations must equal the top-level 'duration' parameter
:param providers: (Optional) List of specified Provider slugs, e.g., ['kling']
:return: requestId
"""
url = f"{self.base_url}/text-to-video/generations"
payload = {
"model": model,
"parameters": parameters
}
if providers:
payload["providers"] = providers
response = requests.post(url, headers=self.headers, json=payload)
response.raise_for_status()
result = response.json()
if result.get("code") == 10000:
return result["data"]["request_id"]
else:
raise Exception(f"Submission failed: {result.get('message')} (Code: {result.get('code')})")
def get_status(self, request_id: str) -> Dict[str, Any]:
"""
Query generation status and result
:param request_id: Request ID
:return: Dictionary containing status, output_url, and duration (upon success)
"""
url = f"{self.base_url}/text-to-video/generations/{request_id}"
response = requests.get(url, headers=self.headers)
response.raise_for_status()
result = response.json()
if result.get("code") == 10000:
return result["data"]
else:
raise Exception(f"Query failed: {result.get('message')} (Code: {result.get('code')})")
def generate_and_wait(self, model: str, parameters: Dict[str, Any], providers: Optional[List[str]] = None,
polling_interval: int = 3, timeout: int = 300) -> Dict[str, Any]:
request_id = self.submit_generation(model, parameters, providers)
print(f"Request submitted, ID: {request_id}")
start_time = time.time()
while time.time() - start_time < timeout:
data = self.get_status(request_id)
status = data.get("status")
print(f"Current status: {status}")
if status == "completed":
return {
"output_url": data.get("output_url"),
"duration": data.get("duration")
}
elif status == "failed":
raise Exception("Generation failed")
elif status == "cancelled":
raise Exception("Request cancelled")
time.sleep(polling_interval)
raise Exception("Generation timed out")
if __name__ == "__main__":
# --- Usage Example ---
client = VideoGenClient(BASE_URL, API_KEY)
try:
params = {
"duration": 4,
"multi_shot": True,
"aspect_ratio": "16:9",
"generate_audio": True,
"cfg_scale": "0.5",
"shot_type": "customize",
"multi_prompt": [
{
"index": 1,
"prompt": "profile shot of black man driving a truck, cinematic handheld",
"duration": "1"
},
{
"index": 2,
"prompt": "frontal macro shot of black man driving a truck, cinematic handheld",
"duration": "1"
},
{
"index": 3,
"prompt": "macro shot of hands on the steering wheel, cinematic handheld",
"duration": "1"
},
{
"index": 4,
"prompt": "macro shot of a weathered picture of a young black child laying on the passenger side seat, cinematic handheld",
"duration": "1"
}
]
}
# Submit and wait for completion
print(f"Starting video generation (Model: {MODEL})...")
result = client.generate_and_wait(
model=MODEL,
parameters=params,
providers=["kling"]
)
print(f"Video generated successfully!")
print(f"URL: {result['output_url']}")
except Exception as e:
print(f"An error occurred: {e}")
```
***
### 🐴 HappyHorse-1.0
**Alibaba** `Image-To-Video`
HappyHorse-1.0 in Image-to-Video mode animates a single still image according to your text prompt. Upload a photo — product, portrait, scene — and describe the motion you want: camera pull-back, subject gesture, environmental movement. The model preserves visual consistency from the source image while introducing controlled, natural motion. Ideal for bringing static product shots, editorial photos, or concept renders to life.
***
#### 🍌 Playground
**Key settings:**
| Setting | Description |
| ----------------------------- | ----------------------------------------------------------------------------------------------------------------------------------------------------------------------------------------------------- |
| **Source Image** *(required)* | Upload the still image you want to animate. Supports JPG and PNG. The model uses this as the visual anchor — output frames will closely match the source in color, composition, and subject identity. |
| **Prompt** | Describe the motion and camera behavior to apply. Focus on what should move and how — avoid re-describing what's already visible in the image. |
| **Duration** | Output clip length in seconds. 3–5s works best for subtle animations; longer clips benefit from more explicit motion descriptions. |
| **Aspect Ratio** | Defaults to match source image dimensions. Can be overridden in Advanced Settings if cropping is acceptable. |
**Prompt structure:**
```
Template:
"[Camera movement]. [Subject motion description].
[Environmental or atmospheric motion if any].
The overall feel is [mood or style]."
```
> **Example (product):** The camera slowly orbits clockwise around the perfume bottle. Soft light catches the glass facets as they rotate. The background bokeh shifts gently. Elegant, luxury brand feel.
> **Example (portrait):** Slight breeze lifts the subject's hair. Her gaze shifts subtly left. The camera holds steady with a very slow zoom in. Cinematic, golden hour warmth.
{% file src="/files/n8kfBBWSU5farX3Fayw8" %}
> **Tip:** Do not describe the subject's appearance in the prompt — that's already defined by the source image. Use the prompt exclusively for motion direction and camera behavior.
***
#### 🍌 Providers
HappyHorse inference is routed automatically through AI Gateway. No separate credentials required. The **Providers** tab shows available routing options and their current status.
***
#### 🍌 API
The Image-to-Video API accepts a base64-encoded image or a publicly accessible image URL alongside the text prompt. The response is asynchronous — poll the job status endpoint to retrieve the final video URL once generation is complete.
```python
import time
from typing import Dict, Any, List, Optional
import requests
# Global Configuration
BASE_URL = "https://gateway.yottalabs.ai/api/maas"
MODEL = "happyhorse-1.0-i2v"
API_KEY = "MY API Key"
class VideoGenClient:
def __init__(self, base_url: str, api_key: str):
"""
Initialize the Video Generation Client
:param base_url: Base API URL (e.g., http://example.com)
:param api_key: Authentication API Key
"""
self.base_url = base_url.rstrip('/')
self.api_key = api_key
self.headers = {
"Content-Type": "application/json",
"X-API-KEY": self.api_key
}
def submit_generation(self, model: str, parameters: Dict[str, Any], providers: Optional[List[str]] = None) -> str:
"""
All parameters should be provided in the parameters dict, including:
- prompt: Text prompt describing the desired video, required; maximum 2500 Chinese characters or 5000 non-Chinese characters. Exceeding the limit will be automatically truncated.
- duration: Video duration in seconds, range is [3, 15]
- seed: Random seed, range is [0, 2147483647]
- resolution: Video resolution, range is ['1080p', '720p']
- first_frame (required): URL of the first frame image
Format: jpeg, jpg, png
Size: single image no more than 10MB
Aspect ratio: 1:2.5~2.5:1
Resolution: width ≥ 300 pixels, height ≥ 300 pixels
Submit an asynchronous text-to-video generation request
:param model: Model slug (e.g., 'happyhorse-1.0-i2v')
:param parameters: Generation parameters (e.g., {'prompt': '...', 'aspect_ratio': '16:9'})
:param providers: (Optional) List of specified Provider slugs
:return: requestId
"""
url = f"{self.base_url}/image-to-video/generations"
payload = {
"model": model,
"parameters": parameters
}
if providers:
payload["providers"] = providers
response = requests.post(url, headers=self.headers, json=payload)
response.raise_for_status()
result = response.json()
if result.get("code") == 10000:
return result["data"]["request_id"]
else:
raise Exception(f"Submission failed: {result.get('message')} (Code: {result.get('code')})")
def get_status(self, request_id: str) -> Dict[str, Any]:
"""
Query generation status and result
:param request_id: Request ID
:return: Dictionary containing status, output_url, and duration (upon success)
"""
url = f"{self.base_url}/text-to-video/generations/{request_id}"
response = requests.get(url, headers=self.headers)
response.raise_for_status()
result = response.json()
if result.get("code") == 10000:
return result["data"]
else:
raise Exception(f"Query failed: {result.get('message')} (Code: {result.get('code')})")
def generate_and_wait(self, model: str, parameters: Dict[str, Any], providers: Optional[List[str]] = None,
polling_interval: int = 3, timeout: int = 300) -> Dict[str, Any]:
"""
Submit request and poll until completion
:return: Dictionary containing output_url and duration on success
"""
request_id = self.submit_generation(model, parameters, providers)
print(f"Request submitted, ID: {request_id}")
start_time = time.time()
while time.time() - start_time < timeout:
data = self.get_status(request_id)
status = data.get("status")
print(f"Current status: {status}")
if status == "completed":
return {
"output_url": data.get("output_url"),
"duration": data.get("duration")
}
elif status == "failed":
raise Exception("Generation failed")
elif status == "cancelled":
raise Exception("Request cancelled")
time.sleep(polling_interval)
raise Exception("Generation timed out")
if __name__ == "__main__":
# --- Usage Example ---
client = VideoGenClient(BASE_URL, API_KEY)
try:
params = {
"prompt": '''Wide-angle cinematic shot, high-altitude scene above the clouds. A hot air balloon is flying steadily through the sky.
The camera slowly pushes forward, gradually dollying in toward a cat inside the balloon basket as the main subject.
The cat’s fur is strongly affected by high-altitude wind, continuously flowing and fluttering with clear motion dynamics. During the camera push-in, the cat naturally turns its head, observing the surrounding vast sky and landscape.
In the background, rolling green hills and drifting clouds move slowly backward, creating strong parallax and deep spatial perspective.
Dynamic natural lighting with shifting cloud shadows and soft light variation across the scene. High frame rate motion, smooth cinematic movement.
Visual style: Studio Ghibli-inspired animation style, hand-drawn aesthetic, cinematic composition, highly detailed, soft and dreamy atmosphere.''',
"first_frame":"https://ml-static.yottalabs.ai/videos/gatex/demo/image-to-video/Example8-first.png",
"resolution": "1080p",
"seed": 1234,
"duration": 5
}
# Submit and wait for completion
print(f"Starting video generation (Model: {MODEL})...")
result = client.generate_and_wait(
model=MODEL,
parameters=params,
providers=["alibaba"]
)
print(f"Video generated successfully!")
print(f"URL: {result['output_url']}")
except Exception as e:
print(f"An error occurred: {e}")
```
***
### ✂️ WAN
**Alibaba** `Video Edit`
WAN is a video editing model that applies text-directed modifications to an existing video clip. Rather than generating from scratch, it takes your source footage and transforms specific visual elements based on your prompt — style transfer, subject re-clothing, background replacement, atmospheric changes, or motion enhancement. Source footage structure and timing are preserved; only the targeted visual elements are altered.
***
#### 🍌 Playground
**Key settings:**
| Setting | Description |
| ----------------------------- | ------------------------------------------------------------------------------------------------------------------------------------------------------------------------------------------------ |
| **Source Video** *(required)* | Upload the video clip you want to edit. The model preserves original motion, timing, and scene structure. Recommended: clean, well-lit footage with minimal camera shake for best edit fidelity. |
| **Edit Prompt** | Describe what you want changed, not what should stay the same. Be specific about the target element and the desired transformation. |
| **Strength / Intensity** | Controls how aggressively the edit is applied. Lower values make subtle adjustments; higher values apply stronger transformations that may diverge more from the source. |
| **Preserve Motion** | When enabled, edits are constrained to visual appearance only — subject motion trajectory is not altered. Recommended on for most editing tasks. |
**Prompt structure:**
```
Template:
"Change [target element] to [desired result].
Keep [elements that must stay the same] unchanged.
[Optional: style or quality descriptor]."
```
> **Example (style transfer):** Re-render this clip in the style of a 1970s film — add grain, warm color cast, slight vignette, and soft focus on edges. Keep all motion and subject positioning unchanged.
> **Example (wardrobe edit):** Change the subject's outfit to a tailored navy blue blazer and white dress shirt. Keep the background, lighting, and all motion exactly as in the original.
> **Example (background replacement):** Replace the background with a snowy mountain landscape at dusk. Maintain the original foreground subject and all motion. Lighting on the subject should reflect the new environment.
> **Tip:** WAN works best on clips under 30 seconds with a single dominant subject. For multi-scene videos, split into segments and process each separately for more consistent results.
***
#### 🍌 Providers
WAN is served through its dedicated inference infrastructure, accessed via AI Gateway. No separate account or API key is required. Gateway automatically manages routing, retries, and load balancing.
***
#### 🍌 API
The Video Edit API accepts the source video as a base64-encoded payload or a pre-signed URL. Submit the edit prompt and parameters; generation is asynchronous. Retrieve the edited video URL from the completion callback or by polling the job status endpoint.
***
### 🎯 HappyHorse-1.0
**Alibaba** `Reference-To-Video`
HappyHorse-1.0 in Reference-to-Video mode generates a new video from scratch using multiple reference images as visual anchors. Unlike Image-to-Video (which animates a single source), Reference-to-Video synthesizes an entirely new scene while maintaining identity and visual consistency across your uploaded references — matching subject appearance, garment details, accessory design, and stylistic elements simultaneously. Best suited for fashion, e-commerce, and branded content production.
***
#### 🍌 Playground
**Key settings:**
| Setting | Description |
| ---------------------------- | ---------------------------------------------------------------------------------------------------------------------------------------------------------------------------------------------------------------------------------------- |
| **Reference Images** | Upload up to 3 reference images (Image1, Image2, Image3). Recommended: **Image1** → primary subject or garment, **Image2** → accessory or prop, **Image3** → pose, gesture, or detail reference. |
| **Prompt (with image tags)** | Write a scene description and embed image tags inline to specify which reference corresponds to which element. Example: *"A woman in a red cheongsam, \[Image1]. Her tassel earrings, \[Image3], sway as she unfolds a fan, \[Image2]."* |
| **Image URL input** | Reference images can also be supplied via public URLs instead of direct uploads — useful for assets already hosted in a CDN or library. |
| **Duration & Aspect Ratio** | Set in Advanced Settings. The generated video is a new synthesis — not constrained to the dimensions of any input image. |
**Prompt structure:**
```
Template:
"A [subject description], [Image1].
The camera [opening shot description].
It then [next shot], capturing [detail], [Image3],
[action or movement], [Image2].
Finally, [closing shot and mood].
[Style descriptor]."
```
> **Example:** A woman in a red cheongsam, \[Image1]. The camera begins with a side medium shot, outlining the fitted tailoring and her elegant S-shaped silhouette. It then cuts to a low-angle shot, capturing the delicate movement of her tassel earrings, \[Image3], swaying gently as she raises her hand and unfolds a folding fan, \[Image2]. Finally, the camera pushes into a close-up of her face, lingering on the subtle charm in her fingertips lightly touching the fan ribs and the graceful flow of her gaze. Multiple perspectives comprehensively showcase the refined elegance and timeless oriental beauty.
**Image tag placement guide:**
| Tag | Recommended role | Where to place in prompt |
| ------ | ------------------------- | ------------------------------------------ |
| Image1 | Primary subject / garment | After first subject mention |
| Image2 | Prop / accessory | When the prop is first described in action |
| Image3 | Detail / gesture / pose | At the detail shot description |
> **Important:** Tag order in the prompt must match upload order in the Media panel. Mismatched ordering (e.g. Image1 tag referring to the Image3 upload) will produce inconsistent results. Always verify tag-to-image correspondence before running.
**Pricing:** Billed per request. A 5-second output costs approximately **$1.08**. The exact cost is shown beneath the output panel before and after generation.
***
#### 🍌 Providers
HappyHorse Reference-to-Video requests are routed through AI Gateway's managed inference layer. No separate HappyHorse credentials needed. The **Providers** tab shows real-time routing status and available fallback endpoints.
***
#### 🍌 API
**Quickstart:**
1. Get your `X-API-KEY` from the Dashboard
2. Upload reference images or prepare public image URLs
3. Submit prompt string with `[Image1]`, `[Image2]`, `[Image3]` tags embedded
4. Poll the returned job ID for completion status
5. Retrieve and download the video URL from the completed job response
> The API accepts reference images as an array of base64 strings or public URLs, paired with the prompt. Generation is asynchronous — use the job ID returned on submission to poll for completion.
# Pricing
### 1. Overview
AI Gateway aggregates various types of models, including LLM language models, text-to-image models, and text-to-video models. The billing logic for each type of model has differences.
* LLM models are billed based on the number of tokens consumed, divided into two dimensions: input and output;Some LLM models (such as GLM series) support context caching, with cached tokens billed at a lower cached unit price.
* Text-to-image models are generally billed based on the number of images generated; some models have tiered pricing based on resolution, like 1k, 2k or 4k.
* Image/Text-to-video models are billed based on the duration (in seconds) of the generated video. Some also has tier pricing based on resolution and existence of audio.
### 2. Model Pricing Examples
Below are the reference values for the pricing field of the currently integrated models (prices are in USD, with token-based models priced at USD per million tokens):
| Model | type | input | output | cached | Remarks |
| ----------------- | ----- | ----- | ------ | ------ | ----------------------- |
| claude sonnet 4.6 | token | $3.00 | $15.00 | | |
| glm 5 | token | $0.95 | $3.04 | $0.19 | Support context caching |
| Seedream 4.5 | image | | $0.38 | | |
### 3. Common Questions
**Q: Why don't image generation models use token billing?**
The computational resource consumption of image generation models mainly depends on image resolution and generation quantity, with little correlation to the number of prompt text tokens. Therefore, the original providers all charge based on "per image." Some models (such as DALL·E 3) have different pricing for different resolutions, expressed through the resolution\_tiers array.
**Q: Can per\_image and resolution\_tiers coexist?**
No. They are mutually exclusive: use per\_image if all model resolutions have the same price; use resolution\_tiers if different resolutions have different prices. If both exist simultaneously, the data layer should validate and report an error.
# AI Explorer
## Overview
**AI Explorer** is an intuitive and user-friendly interface within the **Yotta Platform**, designed to provide an interactive environment for experimenting with a variety of **AI models**. This feature enables users—whether developers, researchers, or AI enthusiasts—to test and explore different AI models by adjusting parameters and observing the results in real-time. By offering this dynamic environment, **AI Explorer** allows for deep exploration and experimentation, making it an essential tool for anyone looking to gain insights into the capabilities and potential of cutting-edge AI technology.
## Key Features
* **Interactive Playground**:\
AI Explorer acts as a powerful playground for interacting with advanced **Large Language Models (LLMs)**. Users can input text-based queries or commands and receive AI-generated responses instantly. This real-time interaction makes it a valuable tool for learning, prototyping, and refining AI-based applications. The user-friendly interface makes it accessible to both beginners and seasoned professionals, providing a seamless experience across various tasks.
* **Parameter Customization**:\
One of the standout features of AI Explorer is its ability to fine-tune the model's responses. By adjusting **customizable parameters**, users can optimize the AI’s behavior according to their specific needs. Parameters such as **temperature**, **top-p**, **max tokens**, and others allow users to control the level of randomness, creativity, and coherence in the AI's responses, ensuring that outputs are suited to the user’s goals. Whether you're working on a creative project or solving a technical problem, this customization ensures the AI responds in the most effective way possible.
* **Model Selection**:\
AI Explorer gives users the flexibility to choose from a wide variety of models available on the **Yotta Platform**. This diverse selection enables users to explore different types of models optimized for various tasks such as **text generation**, **image creation**, and even **audio generation**. With the ability to compare multiple models, users can evaluate their performance, capabilities, and behaviors under different scenarios, helping them choose the best model for their specific use case.
* **Response Visualization**:\
The responses from the selected AI model are displayed in a clean and structured format, allowing users to analyze the output effectively. In addition to the generated text or content, AI Explorer provides valuable **token usage** and **response speed metrics**, giving users insights into the efficiency and computational cost of their queries. This feature is particularly useful for developers looking to optimize their usage and ensure the most efficient application of AI models.
## Supported Types of LLMs
* **Text Generation**:\
AI Explorer includes powerful models for **text generation**, enabling users to generate creative content, summaries, dialogue, or structured data based on their text inputs. Whether it's for writing assistance, chatbots, or content generation, these models are capable of producing coherent and contextually relevant outputs.
* **Image Generation**:\
With integrated **image generation** capabilities, users can create stunning visuals from textual descriptions. Whether for graphic design, concept visualization, or creative projects, this feature lets users turn their words into high-quality images, adjusting parameters like resolution, style, and complexity to fine-tune the results.
* **Audio Generation**:\
In addition to text and images, **AI Explorer** also supports **audio generation**. This feature allows users to generate speech, music, or sound effects from text-based inputs, making it a versatile tool for a wide range of applications such as podcasting, sound design, and AI-driven voice assistants. The ability to adjust parameters for tone, pace, and voice style ensures that the generated audio fits the user’s exact specifications.
# Text Generation
Yotta Labs AI Explorer - Text Generation, a powerful and flexible platform designed for text generation tasks. Easily generate custom text content by selecting from multiple advanced models and fine-t
## Features
1. **Model Selection**: **Yotta Labs AI Explorer** offers several model choices to suit different text generation requirements, such as:
* **Llama 3.1 8B Instruct**: A robust model designed for detailed text generation, perfect for complex creative tasks.
* **Llama 3.2 3B Instruct**: A lighter model that balances speed and performance.
* **Mistral 7B Instruct**: A more advanced model tailored for specialized text generation, providing greater processing power.
2. **Adjustable Parameters**: Once a model is selected, you can fine-tune the generated output with the following parameters:
* **Temperature**: Controls the randomness of the response. Lower values generate more deterministic outputs, while higher values encourage creativity and unpredictability.
* **Top P**: Adjusts the diversity of the output. A higher value promotes more creative and diverse content.
* **Max Tokens**: Limits the number of tokens (words/characters) the model generates in a single response.
* **Frequency Penalty**: Reduces the likelihood of repeating words or phrases within the generated text.
* **Presence Penalty**: Encourages the model to introduce new concepts, preventing monotony.
* **Repetition Penalty**: Further discourages repetition of phrases, ensuring that the generated content remains varied and fresh.
3. **Text Generation**: Users can input a **system prompt** to guide the model’s text generation. This can range from simple instructions to complex creative tasks, enabling the generation of tailored content like stories, articles, or professional text.
4. **Flexible Usage**: Whether you're working on content creation, idea exploration, or integrating AI into your project, **Yotta Labs AI Explorer** provides unlimited possibilities. Customize the output settings and generate text that fits your specific needs, from structured responses to highly creative outputs.
AI Explorer / Text
choose a AI text model
Input text to text
# Image Generation
Yotta Labs AI Explorer - Image Generation is a powerful platform that allows you to create images from textual descriptions. With advanced AI models, you can transform your ideas into unique visuals,
## Features
1. **Model Selection**: Choose from a variety of models for generating images:
* **FLUX.1 dev**: A development model designed for high-quality image generation.
* **FLUX.1 Schnell**: A faster alternative for quick image generation.
* **SANA**: Ideal for more specialized or intricate image creation tasks.
2. **Image Generation Process**:
* **Text Input**: Simply describe the image you want to generate, and the model will convert your description into a visual output.
* **Height and Width**: Adjust the height and width of the image to your preferred dimensions.
* **Steps**: The number of steps determines the level of detail in the generated image. More steps result in more detailed and refined images.
* **Guidance Scale**: Controls how closely the model follows your description. A higher guidance scale ensures the generated image matches your description more accurately.
* **Seed**: The seed value randomizes the image generation process, allowing you to produce unique variations each time. Changing the seed will create different visual outputs even with the same description.
3. **Flexible Usage**: Whether you're creating digital art, designing concepts, or generating images for various applications, **Yotta Labs AI Explorer - Image Generation** provides the flexibility to create high-quality visuals that perfectly match your vision. You can adjust key parameters like model selection and guidance scale to fine-tune your results.
4. **User-Friendly Interface**: The intuitive interface allows you to easily input text descriptions and tweak settings to generate the images you need. It's designed to be accessible for both beginners and advanced users, making it a versatile tool for various creative projects
AI Explorer / Image
choose a AI image model
Input text to image
# Audio Generation
Coming soon...
# Pricing
Each user will have $xxx of free quota every day. Once the quota is exceeded, we will deduct from your balance.
## Text Generation Model Pricing
* **Llama 3.1 8B**: $0.08 per 1M tokens
* **Llama 3.2 3B**: $0.04 per 1M tokens
* **Mistral 7B**: $0.20 per 1M tokens
## Image Generation Model Pricing
The price for generating an image depends on both the **size** of the image and the **step** parameter used. The following price structure assumes that the image will be **1024x1024 pixels** (about **1M pixels**) and that **25 steps** will be used. The actual charge for your image generation will vary based on the **image size** and the number of **steps**.
**Base Rate for Image Generation:**
* **FLUX.1 dev**: $0.025 per 1M Pixels @ 25 Steps
* **FLUX.1 Schnell**: $0.018 per 1M Pixels @ 25 Steps
* **FLUX.1 Schnell Int4**: $0.008 per 1M Pixels @ 25 Steps
* **SANA**: $0.004 per 1M Pixels @ 25 Steps
* **SANA Int4**: $0.001 per 1M Pixels @ 25 Steps
**Pricing Formula:**
The cost is determined by multiplying the **Base Rate** by the **adjusted size** of the image and the **number of steps** used.
* **Image Size**: The cost scales with the width and height of the image. For example:
* For **512x512 pixels** (a quarter of 1024x1024): The cost would be **Base Rate \* (512/1024) \* (512/1024) \* (steps/25)**.
* For **2048x2048 pixels** (four times the size of 1024x1024): The cost would be **Base Rate \* (2048/1024) \* (2048/1024) \* (steps/25)**.
* **Step Adjustment**: The price also scales based on the number of steps:
* **25 steps**: No adjustment needed (multiplier = 1).
* **50 steps**: The multiplier is **2** (i.e., steps/25 = 50/25 = 2).
**Example Calculation:**
Let’s say you want to generate an image using the **FLUX.1 dev** model with **512x512 pixels** and **50 steps**:
* The **Base Rate** for **FLUX.1 dev** is **$0.025 per 1M Pixels @ 25 Steps**.
* **Width and height** are both 512, which is half the size of 1024, so the image scaling factor would be **(512/1024) \* (512/1024) = 0.25**.
* **Step adjustment**: Since you're using 50 steps, the step multiplier would be **2** (i.e., steps/25 = 50/25 = 2).
Thus, the total cost would be:
**$0.025 \* 0.25 \* 0.25 \* 2 = $0.003125 per image**.
# Inference
# Serverless Inference with LLM
This tutorial walks you through deploying an open-source LLM (Qwen2.5-7B-Instruct) as a serverless inference endpoint on YottaLabs using vLLM. By the end, you will have a live OpenAI-compatible API endpoint running on a GPU in the cloud.
## What You Will Build
A serverless vLLM endpoint on YottaLabs that:
* Runs **Qwen2.5-7B-Instruct** on an NVIDIA RTX 5090 (32 GB VRAM)
* Exposes an **OpenAI-compatible** `/v1/chat/completions` API
* Scales workers on demand via the YottaLabs platform
* Can be called from any HTTP client or the OpenAI Python SDK
## Prerequisites
* A YottaLabs account with an API key (`x-api-key`)
* `curl` installed locally (or any HTTP client)
* For gated models (e.g. Llama 3.1): a Hugging Face token with approved access. Qwen2.5 is fully open and requires no token.
## Architecture Overview
```
Your Client
│
│ POST /v2/serverless/{id}/tasks
▼
YottaLabs Platform ──────────────────────────────────────────────────┐
│ │
│ Routes request to an available worker │
▼ │
Worker (RTX 5090 GPU) │
│ │
│ vLLM serving Qwen2.5-7B-Instruct │
│ OpenAI-compatible API on port 8000 │
│ │
└──────────────────────────────────────────────────────────────────┘
```
YottaLabs Serverless has two service modes relevant to LLM inference:
* **ALB mode**: Requests are proxied directly to the worker in real time. Best for synchronous, low-latency calls.
* **QUEUE mode**: Requests are queued and results are returned asynchronously (via polling or webhook). Best for long-running or batch tasks.
This tutorial uses **QUEUE mode**, which is the standard mode for the Serverless v2 API.
{% stepper %}
{% step %}
#### Create a Serverless Endpoint
Send a `POST` request to `/v2/serverless` to create your endpoint. This provisions a worker container running `vllm/vllm-openai:latest` and starts the vLLM server.
```bash
curl --http1.1 -X POST https://api.yottalabs.ai/v2/serverless \
-H "x-api-key: YOUR_API_KEY" \
-H "Content-Type: application/json" \
-d '{
"name": "vllm-qwen25-7b",
"image": "vllm/vllm-openai:latest",
"serviceMode": "QUEUE",
"workers": 1,
"containerVolumeInGb": 50,
"resources": [
{
"region": "us-east",
"gpuType": "NVIDIA_RTX_5090_32G",
"gpuCount": 1
}
],
"expose": {
"port": 8000,
"protocol": "http"
},
"initializationCommand": "vllm serve Qwen/Qwen2.5-7B-Instruct --host 0.0.0.0 --port 8000 --gpu-memory-utilization 0.90"
}'
```
**Key parameters explained:**
| Parameter | Value | Notes |
| ------------------------ | ------------------------- | ----------------------------------------------------------- |
| `image` | `vllm/vllm-openai:latest` | Official vLLM Docker image with OpenAI-compatible server |
| `serviceMode` | `QUEUE` | Async task queue mode for serverless inference |
| `gpuType` | `NVIDIA_RTX_5090_32G` | 32 GB VRAM, sufficient for 7B models in bf16 |
| `containerVolumeInGb` | `50` | Disk space for model weights download (\~15 GB for 7B) |
| `initializationCommand` | `vllm serve ...` | Starts the vLLM OpenAI server on port 8000 |
| `gpu-memory-utilization` | `0.90` | Use 90% of VRAM for the KV cache; leave headroom for the OS |
{% hint style="info" %}
Use `--http1.1` with curl to avoid HTTP/2 protocol errors on some network configurations.
{% endhint %}
**Example response:**
```json
{
"code": 10000,
"message": "success",
"data": {
"id": 12345,
"name": "vllm-qwen25-7b",
"status": "INITIALIZING",
"serviceMode": "QUEUE",
"image": "vllm/vllm-openai:latest"
}
}
```
Save the `id` field — you will need it for all subsequent requests.
{% endstep %}
{% step %}
#### Wait for the Endpoint to Be Ready
The worker needs time to pull the Docker image and download model weights from Hugging Face. Poll the endpoint status until it shows `RUNNING`.
```bash
curl --http1.1 https://api.yottalabs.ai/v2/serverless \
-H "x-api-key: YOUR_API_KEY"
```
Look for `"status": "RUNNING"` in the response for your endpoint. This typically takes **3–8 minutes** on first launch (model weights are \~15 GB). Subsequent starts are faster if weights are cached.
You can also monitor the worker logs from the YottaLabs console. A successful startup looks like this:
```
INFO: Route: /v1/chat/completions, Methods: POST
INFO: Route: /v1/completions, Methods: POST
INFO: Route: /v1/models, Methods: GET
INFO: Application startup complete.
```
{% endstep %}
{% step %}
#### Call the Inference Endpoint
Once the endpoint is `RUNNING`, you will find its domain in the endpoint details (e.g. `39q67x443xvy.yottadeos.com`). Call it directly using your YottaLabs API key as a Bearer token:
```bash
curl --http1.1 -X POST https://YOUR_ENDPOINT_DOMAIN/v1/chat/completions \
-H "Content-Type: application/json" \
-H "Authorization: Bearer YOUR_API_KEY" \
-d '{
"model": "Qwen/Qwen2.5-7B-Instruct",
"messages": [
{"role": "system", "content": "You are a helpful assistant."},
{"role": "user", "content": "Explain what vLLM is in two sentences."}
],
"max_tokens": 256,
"temperature": 0.7
}'
```
{% hint style="info" %}
The endpoint domain sits behind a YottaLabs gateway. Use `Authorization: Bearer YOUR_API_KEY` — the same key used for `x-api-key` on the platform API.
{% endhint %}
**Example response:**
```json
{
"id": "chatcmpl-1f2af1e9d880fb3a08712b428e176a85",
"object": "chat.completion",
"model": "Qwen/Qwen2.5-7B-Instruct",
"choices": [
{
"index": 0,
"message": {
"role": "assistant",
"content": "vLLM is an open-source library designed to accelerate large language models by improving inference speed and efficiency on GPUs. It supports popular frameworks like Hugging Face Transformers and aims to make LLMs more accessible for real-time applications."
},
"finish_reason": "stop"
}
],
"usage": {
"prompt_tokens": 30,
"completion_tokens": 63,
"total_tokens": 93
}
}
```
The response is a standard OpenAI chat completion object, fully compatible with any tool in the OpenAI ecosystem.
{% endstep %}
{% step %}
#### Using the OpenAI Python SDK
Call your endpoint with the OpenAI SDK by overriding `base_url` and passing your API key:
```python
from openai import OpenAI
client = OpenAI(
base_url="https://YOUR_ENDPOINT_DOMAIN/v1",
api_key="YOUR_API_KEY", # YottaLabs API key, used as Bearer token
)
response = client.chat.completions.create(
model="Qwen/Qwen2.5-7B-Instruct",
messages=[
{"role": "system", "content": "You are a helpful assistant."},
{"role": "user", "content": "What is PagedAttention?"},
],
max_tokens=256,
temperature=0.7,
)
print(response.choices[0].message.content)
```
{% endstep %}
{% endstepper %}
## Managing Your Endpoint
**List all endpoints:**
```bash
curl --http1.1 https://api.yottalabs.ai/v2/serverless \
-H "x-api-key: YOUR_API_KEY"
```
**Stop an endpoint (pause billing):**
```bash
curl --http1.1 -X POST https://api.yottalabs.ai/v2/serverless/12345/stop \
-H "x-api-key: YOUR_API_KEY"
```
**Restart a stopped endpoint:**
```bash
curl --http1.1 -X POST https://api.yottalabs.ai/v2/serverless/12345/start \
-H "x-api-key: YOUR_API_KEY"
```
**Scale workers:**
```bash
curl --http1.1 -X POST https://api.yottalabs.ai/v2/serverless/12345/workers \
-H "x-api-key: YOUR_API_KEY" \
-H "Content-Type: application/json" \
-d '{"workers": 2}'
```
## Common Issues and Fixes
python: command not found in worker logs
The `vllm/vllm-openai` image uses `python3`, not `python`. Use `vllm serve ...` directly as the initialization command instead of `python -m vllm...`.
403 Forbidden when downloading model weights
The model is gated and requires HuggingFace access approval. Either:
* Visit the model page on HuggingFace and request access, then add `HF_TOKEN` to `envVars`
* Switch to an open model like `Qwen/Qwen2.5-7B-Instruct` which requires no token
gpu type [X] not supported
Use the exact GPU type codes from the YottaLabs API. Common ones:
| Display Name | API Code |
| -------------- | --------------------- |
| RTX 4090 24 GB | `NVIDIA_RTX_4090_24G` |
| RTX 5090 32 GB | `NVIDIA_RTX_5090_32G` |
| A100 80 GB | `NVIDIA_A100_80G` |
| H100 80 GB | `NVIDIA_H100_80G` |
HTTP/2 stream error with curl
Add `--http1.1` to your curl command to force HTTP/1.1.
## GPU and Model Selection Guide
| Model | VRAM Required | Recommended GPU |
| ----------------------------- | ------------- | ------------------ |
| Qwen2.5-7B-Instruct (bf16) | \~16 GB | RTX 4090, RTX 5090 |
| Llama-3.1-8B-Instruct (bf16) | \~16 GB | RTX 4090, RTX 5090 |
| Qwen2.5-14B-Instruct (bf16) | \~30 GB | RTX 5090, A100 40G |
| Llama-3.1-70B-Instruct (bf16) | \~140 GB | 2× A100 80G, H100 |
For models larger than your single GPU's VRAM, set `gpuCount` to 2 or more and add `--tensor-parallel-size 2` to the vLLM initialization command.
## Next Steps
* **Streaming responses**: Add `"stream": true` to the `input` payload and use a webhook to handle chunked responses
* **Quantized models**: Use AWQ or GPTQ variants (e.g. `Qwen/Qwen2.5-7B-Instruct-AWQ`) to reduce VRAM usage and increase throughput
* **Larger models**: Set `gpuCount: 2` and `--tensor-parallel-size 2` to run 14B or 70B models across multiple GPUs
* **Custom models**: Set `imageRegistry` and `credentialId` to pull from a private registry with your own fine-tuned model
# Serverless Inference with Image Generation models
This tutorial walks you through deploying **FLUX.1-Dev** — a high-quality text-to-image model by Black Forest Labs — as a production-ready serverless endpoint on YottaLabs. The deployment uses the official YottaLabs ComfyUI runtime image, requiring zero custom Docker builds.
***
### What You Will Build
A serverless FLUX.1-Dev endpoint on YottaLabs that:
* Runs **FLUX.1-Dev** on an NVIDIA RTX 5090 (32 GB VRAM)
* Serves a **ComfyUI HTTP API** on port 8188
* Accepts text prompts and returns **Base64-encoded images**
* Can be called from any HTTP client or Python script
***
### Prerequisites
* A YottaLabs account with an API key (`x-api-key`)
* A Hugging Face token (`HF_TOKEN`) with read access approved for:
* `black-forest-labs/FLUX.1-dev`
* `comfyanonymous/flux_text_encoders`
* `curl` and `jq` installed locally
> **Approving HuggingFace access:** Visit and click **Request access**. Approval is typically granted within a few minutes.
***
### Architecture Overview
```
Your Client
│
│ POST /v1/chat/completions (with prompt)
▼
YottaLabs Gateway (Bearer token auth)
│
▼
Worker (RTX 5090)
│
├── /start.sh
│ ├── Downloads FLUX.1-Dev weights from HuggingFace (~24 GB)
│ └── Starts ComfyUI on port 8188
│
└── ComfyUI API
├── POST /prompt → submit generation job
├── GET /history/{id} → poll for result
└── GET /view?... → fetch image bytes → Base64
```
The official YottaLabs image handles everything inside the container automatically: model downloading, text encoder setup, and ComfyUI startup. You only need to submit prompts via the ComfyUI HTTP API.
***
### Step 1 — Create the Serverless Endpoint
```bash
curl --http1.1 -X POST https://api.yottalabs.ai/v2/serverless \
-H "x-api-key: YOUR_API_KEY" \
-H "Content-Type: application/json" \
-d '{
"name": "flux-dev-comfyui",
"image": "yottalabsai/flux1.dev:comfyui-cuda12.8.1-ubuntu22.04-2025102101",
"serviceMode": "ALB",
"workers": 1,
"containerVolumeInGb": 100,
"resources": [
{
"region": "us-east",
"gpuType": "NVIDIA_RTX_5090_32G",
"gpuCount": 1
}
],
"expose": {
"port": 8188,
"protocol": "http"
},
"envVars": [
{"key": "HF_TOKEN", "value": "YOUR_HF_TOKEN"},
{"key": "ENABLE_FLUX_VAE", "value": "true"},
{"key": "FLUX_MODEL_DIR", "value": "/home/ubuntu/ComfyUI/models"}
],
"initializationCommand": "sudo -E /start.sh"
}'
```
**Key parameters explained:**
| Parameter | Value | Notes |
| ----------------------- | ----------------------------------- | ----------------------------------------------------------- |
| `image` | `yottalabsai/flux1.dev:comfyui-...` | Official YottaLabs FLUX image with ComfyUI runtime |
| `serviceMode` | `ALB` | Direct proxy mode — requests go straight to ComfyUI |
| `containerVolumeInGb` | `100` | FLUX.1-Dev weights + text encoders are \~24 GB total |
| `expose.port` | `8188` | ComfyUI's default HTTP port |
| `HF_TOKEN` | your token | Required to download gated FLUX.1-Dev weights |
| `ENABLE_FLUX_VAE` | `true` | Downloads and loads the VAE (`ae.safetensors`) |
| `initializationCommand` | `sudo -E /start.sh` | Runs the official startup script (model download + ComfyUI) |
Save the `id` and `domain` from the response — you will need them for all subsequent calls.
***
### Step 2 — Wait for the Endpoint to Be Ready
The first startup takes **10–20 minutes** because the container must download \~24 GB of model weights from HuggingFace. Subsequent starts are fast if weights are already cached on persistent storage.
**Check the endpoint status:**
```bash
curl --http1.1 https://api.yottalabs.ai/v2/serverless \
-H "x-api-key: YOUR_API_KEY" | python3 -m json.tool
```
Wait for `"status": "RUNNING"`.
**Then verify ComfyUI is up by checking system stats:**
```bash
curl --http1.1 https://YOUR_ENDPOINT_DOMAIN/system_stats \
-H "Authorization: Bearer YOUR_API_KEY"
```
A healthy response looks like:
```json
{
"system": {
"os": "posix",
"python_version": "3.12.x",
"embedded_python": false
},
"devices": [
{
"name": "NVIDIA GeForce RTX 5090",
"type": "cuda",
"vram_total": 34359738368,
"vram_free": 28000000000
}
]
}
```
**Check the model download log if startup is taking long:**
```bash
curl --http1.1 https://YOUR_ENDPOINT_DOMAIN/view?filename=flux_download.log \
-H "Authorization: Bearer YOUR_API_KEY"
```
***
### Step 3 — Submit an Image Generation Request
ComfyUI uses a **workflow JSON** format to describe the generation pipeline. Below is a minimal FLUX.1-Dev workflow that takes a text prompt and generates a 1024×1024 image.
#### 3.1 — The Workflow Payload
Save this as `flux_workflow.json`:
```json
{
"prompt": {
"6": {
"class_type": "CLIPTextEncode",
"inputs": {
"clip": ["11", 0],
"text": "a cinematic portrait of an astronaut on the moon, golden hour, highly detailed"
}
},
"8": {
"class_type": "VAEDecode",
"inputs": {
"samples": ["13", 0],
"vae": ["10", 0]
}
},
"9": {
"class_type": "SaveImage",
"inputs": {
"filename_prefix": "flux_output",
"images": ["8", 0]
}
},
"10": {
"class_type": "VAELoader",
"inputs": {
"vae_name": "ae.safetensors"
}
},
"11": {
"class_type": "DualCLIPLoader",
"inputs": {
"clip_name1": "t5xxl_fp8_e4m3fn_scaled.safetensors",
"clip_name2": "clip_l.safetensors",
"type": "flux"
}
},
"12": {
"class_type": "UNETLoader",
"inputs": {
"unet_name": "flux1-dev.safetensors",
"weight_dtype": "fp8_e4m3fn"
}
},
"13": {
"class_type": "KSampler",
"inputs": {
"cfg": 1.0,
"denoise": 1.0,
"latent_image": ["14", 0],
"model": ["12", 0],
"negative": ["15", 0],
"positive": ["6", 0],
"sampler_name": "euler",
"scheduler": "simple",
"seed": 42,
"steps": 20
}
},
"14": {
"class_type": "EmptyLatentImage",
"inputs": {
"batch_size": 1,
"height": 1024,
"width": 1024
}
},
"15": {
"class_type": "CLIPTextEncode",
"inputs": {
"clip": ["11", 0],
"text": ""
}
}
}
}
```
#### 3.2 — Submit the Prompt
```bash
curl --http1.1 -X POST https://YOUR_ENDPOINT_DOMAIN/prompt \
-H "Authorization: Bearer YOUR_API_KEY" \
-H "Content-Type: application/json" \
-d @flux_workflow.json
```
**Response:**
```json
{
"prompt_id": "a1b2c3d4-e5f6-7890-abcd-ef1234567890",
"number": 1,
"node_errors": {}
}
```
Save the `prompt_id` — you will poll with it in the next step.
***
### Step 4 — Poll for the Result
```bash
curl --http1.1 https://YOUR_ENDPOINT_DOMAIN/history/a1b2c3d4-e5f6-7890-abcd-ef1234567890 \
-H "Authorization: Bearer YOUR_API_KEY" | python3 -m json.tool
```
When generation is complete, the response contains the output image filename:
```json
{
"a1b2c3d4-e5f6-7890-abcd-ef1234567890": {
"status": {
"status_str": "success",
"completed": true
},
"outputs": {
"9": {
"images": [
{
"filename": "flux_output_00001_.png",
"subfolder": "",
"type": "output"
}
]
}
}
}
}
```
***
### Step 5 — Fetch the Image as Base64
Use the filename from the history response to download and encode the image:
```bash
curl --http1.1 \
"https://YOUR_ENDPOINT_DOMAIN/view?filename=flux_output_00001_.png&type=output" \
-H "Authorization: Bearer YOUR_API_KEY" \
--output generated.png
```
**To get Base64 directly:**
```bash
curl --http1.1 \
"https://YOUR_ENDPOINT_DOMAIN/view?filename=flux_output_00001_.png&type=output" \
-H "Authorization: Bearer YOUR_API_KEY" \
--output - | base64
```
***
### Step 6 — Full Python Client
This script wraps the entire flow — submit prompt, poll until done, return Base64:
```python
import requests
import base64
import time
import json
ENDPOINT = "https://YOUR_ENDPOINT_DOMAIN"
API_KEY = "YOUR_API_KEY"
HEADERS = {
"Authorization": f"Bearer {API_KEY}",
"Content-Type": "application/json",
}
def build_workflow(prompt: str, width: int = 1024, height: int = 1024, steps: int = 20, seed: int = 42) -> dict:
return {
"prompt": {
"6": {"class_type": "CLIPTextEncode", "inputs": {"clip": ["11", 0], "text": prompt}},
"8": {"class_type": "VAEDecode", "inputs": {"samples": ["13", 0], "vae": ["10", 0]}},
"9": {"class_type": "SaveImage", "inputs": {"filename_prefix": "flux_output", "images": ["8", 0]}},
"10": {"class_type": "VAELoader", "inputs": {"vae_name": "ae.safetensors"}},
"11": {"class_type": "DualCLIPLoader", "inputs": {"clip_name1": "t5xxl_fp8_e4m3fn_scaled.safetensors", "clip_name2": "clip_l.safetensors", "type": "flux"}},
"12": {"class_type": "UNETLoader", "inputs": {"unet_name": "flux1-dev.safetensors", "weight_dtype": "fp8_e4m3fn"}},
"13": {"class_type": "KSampler", "inputs": {"cfg": 1.0, "denoise": 1.0, "latent_image": ["14", 0], "model": ["12", 0], "negative": ["15", 0], "positive": ["6", 0], "sampler_name": "euler", "scheduler": "simple", "seed": seed, "steps": steps}},
"14": {"class_type": "EmptyLatentImage", "inputs": {"batch_size": 1, "height": height, "width": width}},
"15": {"class_type": "CLIPTextEncode", "inputs": {"clip": ["11", 0], "text": ""}},
}
}
def generate_image(prompt: str, width: int = 1024, height: int = 1024, steps: int = 20, seed: int = 42, timeout: int = 300) -> str:
"""
Submit a prompt to FLUX.1-Dev and return the result as a Base64-encoded PNG string.
"""
# 1. Submit prompt
workflow = build_workflow(prompt, width, height, steps, seed)
resp = requests.post(f"{ENDPOINT}/prompt", headers=HEADERS, json=workflow)
resp.raise_for_status()
prompt_id = resp.json()["prompt_id"]
print(f"Submitted. prompt_id: {prompt_id}")
# 2. Poll for completion
start = time.time()
while True:
if time.time() - start > timeout:
raise TimeoutError(f"Generation timed out after {timeout}s")
history = requests.get(f"{ENDPOINT}/history/{prompt_id}", headers=HEADERS).json()
if prompt_id in history:
job = history[prompt_id]
if job["status"]["completed"]:
images = job["outputs"]["9"]["images"]
filename = images[0]["filename"]
subfolder = images[0]["subfolder"]
print(f"Done. Fetching: {filename}")
break
print("Waiting for generation...")
time.sleep(3)
# 3. Fetch image and encode as Base64
params = {"filename": filename, "type": "output"}
if subfolder:
params["subfolder"] = subfolder
img_resp = requests.get(f"{ENDPOINT}/view", headers=HEADERS, params=params)
img_resp.raise_for_status()
return base64.b64encode(img_resp.content).decode("utf-8")
if __name__ == "__main__":
prompt = "a cinematic portrait of an astronaut on the moon, golden hour, highly detailed, 8k"
b64 = generate_image(prompt, width=1024, height=1024, steps=20, seed=42)
# Save to file
with open("output.png", "wb") as f:
f.write(base64.b64decode(b64))
print(f"Image saved to output.png")
print(f"Base64 length: {len(b64)} characters")
```
***
### Managing Your Endpoint
**Stop the endpoint (pause billing):**
```bash
curl --http1.1 -X POST https://api.yottalabs.ai/v2/serverless/{id}/stop \
-H "x-api-key: YOUR_API_KEY"
```
**Restart:**
```bash
curl --http1.1 -X POST https://api.yottalabs.ai/v2/serverless/{id}/start \
-H "x-api-key: YOUR_API_KEY"
```
**Check the generation queue:**
```bash
curl --http1.1 https://YOUR_ENDPOINT_DOMAIN/queue \
-H "Authorization: Bearer YOUR_API_KEY" | python3 -m json.tool
```
***
### Common Issues and Fixes
**Model weights not downloaded yet (generation fails immediately)**
Check the download log and wait:
```bash
curl --http1.1 "https://YOUR_ENDPOINT_DOMAIN/view?filename=flux_download.log" \
-H "Authorization: Bearer YOUR_API_KEY"
```
The full download is \~24 GB and takes 10–20 minutes on first start.
**403 on HuggingFace during download**
Your `HF_TOKEN` does not have approved access to `black-forest-labs/FLUX.1-dev`. Visit the model page and request access, then recreate the endpoint with the correct token.
**`node_errors` in the prompt response**
A model file is missing or named differently. Check that all files exist under `/home/ubuntu/ComfyUI/models/`:
```
diffusion_models/flux1-dev.safetensors
vae/ae.safetensors
text_encoders/t5xxl_fp8_e4m3fn_scaled.safetensors
text_encoders/clip_l.safetensors
```
**Generation is slow (>60s per image)**
Normal for FLUX.1-Dev at 20 steps on FP16. Options to speed up:
* Reduce `steps` to 10–15 (quality tradeoff)
* Use the Nunchaku-optimized image instead: `yottalabsai/flux1.dev:comfyui-nunchaku-cuda12.8.1-ubuntu22.04-2025102101`
***
### Performance Reference
| Steps | Resolution | RTX 5090 (approx.) |
| ----- | -------------------- | ------------------ |
| 10 | 512×512 | \~8s |
| 20 | 1024×1024 | \~25s |
| 20 | 1024×1024 (Nunchaku) | \~12s |
***
### Nunchaku Variant (Faster Inference)
YottaLabs also provides a quantized version of the image with Nunchaku acceleration, which roughly halves generation time on RTX 5090:
```bash
"image": "yottalabsai/flux1.dev:comfyui-nunchaku-cuda12.8.1-ubuntu22.04-2025102101"
```
Everything else — environment variables, ports, API calls — remains identical. Switch the image name and redeploy.
***
### Next Steps
* **LoRA support**: Place `.safetensors` LoRA files under `ComfyUI/models/loras/` and add a `LoraLoader` node to the workflow
* **Batch generation**: Set `batch_size` > 1 in the `EmptyLatentImage` node to generate multiple images per request
* **Different resolutions**: FLUX.1-Dev supports arbitrary resolutions. Common choices: 768×1344 (portrait), 1344×768 (landscape), 1024×1024 (square)
* **img2img**: Add an `ImageToLatent` node before the KSampler and set `denoise` < 1.0
# User Interface
Coming soon...
# Broker Node
Coming soon...
# GPU Worker
# Quickstart
This document provides a high-level overview of how users can set up GPU workers to join the Yotta network.
## Prerequisites
**Workers** are central to our project, especially those with the highest share in the airdrop. Anyone who meets the [minimum system requirements](https://docs.io.net/docs/supported-devices) can become a worker. For smoother job access, it's recommended to have a download/upload speed of 200–500 Mbps, meet graphics card/processor requirements, and have 16GB of RAM to avoid crashes. But not meeting these doesn't disqualify you: uptime, GPU/CPU power, and internet speed also matter. So, even if you don't get a job, you can still earn airdrop rewards as a worker. Getting a job gives you an edge, though.
## Minimum System Requirements:
* 12 GB RAM
* 256 GB Hard Drive
* Operating System: Linux/MacOS/Windows
* Networking
* Download: 100 Mbps
* Upload: 100 Mbps
* Ping: 200ms
* GPUs: See [Supported Devices](/products/inference/gpu-worker/supported-devices)
## Create Account
The first step is to create an account on [orchestrator.yottalabs.ai](https://orchestrator.yottalabs.ai). Click `Sign Up` and choose whatever the most convenient for you.
## Link Wallet to Your Account
# Core Concept
## GPU Worker
## Wallet
## Rewards & Fees
## Worker Status
# Troubleshoot
Coming soon...
{% hint style="info" %}
Still having issues? Please logging into the orchestrator platform and submitting a ticket!
{% endhint %}
# Supported Devices
Below is the full list of supported Nvidia GPUs
GPU Chipset
Interconnection
RAM
H100
PCIe
80 GB
A100
SXM4
80 GB
A100
SXM4
40 GB
P100
PCIe
16 GB
V100
SXM2
16 GB
RTX 8000
PCIe
48 GB
RTX 4090
PCIe
24 GB
*
# FAQs
Coming soon...
Q:
# Fine-Tune
In the following guide, we'll learn how to use the Yotta AI fine-tuning CLI tool to fine-tune a Llama 3 7B model on a testing dataset.
## Install the CLI
To get started, install the Yotta Python CLI:
{% code overflow="wrap" fullWidth="false" %}
```sh
pip install --upgrade yotta
```
{% endcode %}
## Authentication
The API Key can be configured via setting the `YOTTA_API_KEY` environment variable by running the following command:
```sh
export YOTTA_API_KEY=xxxxx
```
## Uploading Data
To upload your data, run the following command. Remember to replace `PATH_TO_DATA_FILE` with the path to your dataset.
```
yotta files upload {PATH_TO_DATA_FILE}
```
## Start Fine-Tuning Job
You now can start the fine-tuning job based on your training file and model. The command line is:
```
yotta fine-tuning start --training-file {FILE_ID} --model {MODEL_NAME} --wandb-api-key {WANDB_API_KEY}
```
## Monitor Jobs
You can use the following command line to get the progress of a job:
```
yotta fine-tuning list-events {FINE-TUNING_ID}
```
## Other Useful CLI Commands
```sh
# list all available commands
yotta --help
# check which models are available.
yotta models list
# check your jsonl file
yotta files check test.jsonl
# upload your jsonl file
yotta files upload test.jsonl
# list your uploaded files
yotta files list
# retrieve progress updates about the finetune job
yotta fine-tuning retrieve ft-01b7df2b-122a-4b84-9838-4d84200dc7ac
# download your fine-tuned model using the uuid of your fine-tuning job
yotta fine-tuning download ft-01b7df2b-122a-4b84-9838-4d84200dc7ac
```
## **Pricing**
# Agent
# Referrals
### Referral Bonus
Referral Bonus are rewards you and your invited friends earn by inviting them to join Yotta Labs.
When someone signs up using your unique referral link and fits our bonus conditions, your organization and your referral's organization will both receive credits that can be applied toward your future compute usage on our platform.
#### How Referral Works
1. **Share Your Referral Link with New Users:**
Click on the `share` button and share the referral link to your friends via X(Twitter), Facebook or Reddit.
{% hint style="info" %}
Each organization has one unique Referral Link that is permanently bound to that Org and cannot be changed.
{% endhint %}
2. **New User Registration:**
When someone clicks your referral link and creates a new Yotta Labs account with a third-party account, they become your referred user. **Their account status so far is only `registered` , not `valid` yet.**
3. **Validation Requirements:**
For the referral to be successful and rewards to be granted, your referred user must first register and then become **valid referrals** under the following conditions :
* **Sign up with a third-party account (Google / GitHub)**
* **Top up a total of $5 credits in four weeks ($2 welcome credit for new users not included)**
4. **Earn Referral Bonus**:
Once the referred user meets the activation requirements, the **corresponding tier bonus** will be automatically added to your referral bonus in your organization.
Meanwhile, the referral's organization will receive **3 credits** as their bonus as well.
For specific bonus tiers, please refer to the image below.
The more people your invite, the more bonus you'll receive **until you reach an upper limit of 40 people!**
5. **Claim Your Credits**:
Click the "Claim" button to convert your Available Bonus into usable compute credits. Once claimed, the amount moves to **Claimed Credits** and adds up to your organization's **Balance** on **Billing** page**.**
{% hint style="info" %}
Remember, **Available Bonus + Compute Credits = Total Referral Bonus**.
{% endhint %}
6. **See your claim history**
You can check your the date, amount and currency of your past claiming at the **Claim History** part.
{% hint style="info" %}
Anyone belong to the organization can share the link, and all bonus is earned and claimed within the organization account.
{% endhint %}
7. **See your Referral Credit Claim History**
Your can check the total number and register dates of your referred users and whether they've become valid users at the **Referral Credit Claim History** page. Don't hesitate to reach out if they stuck in `registered` status!
### Risk control policy
Users are strictly prohibited from engaging in fraudulent or abusive behavior to manipulate the referral program. Once an invited user is identified as such problematic user:
1. That invited user will no longer be eligible to receive the $3 reward.
2. For the referrer:
1. That invited user will not be counted toward the referral count, valid referral count, or referral history.
2. No referral bonus will be granted to the referrer as a result of that invited user becoming a valid referral.
> #### *Platform Rights & Legal Disclaimer*
>
> *Yotta Labs reserves the right to protect the integrity of the referral program through appropriate enforcement measures. We may delay credit distribution pending verification, revoke credits that were issued based on fraudulent or non-compliant activities, and suspend or terminate accounts of organizations found to be in violation of program rules. These measures ensure fairness for all legitimate users of the platform.*
>
> *All referral rewards are issued exclusively as compute credits for use on the Yotta Labs platform. These credits have no cash value, cannot be exchanged for monetary equivalent, and do not constitute income, commission, or any form of taxable compensation. Yotta Labs reserves the right to modify program terms, adjust reward structures, or terminate the referral program at any time without prior notice.*
# Billing
Yotta Labs provides a simple and secure way to top up your account credit, enabling uninterrupted access to advanced features like GPU instances, AI models, and more. Recharge your credit to continue
## **Supported Payment Methods**
We support a variety of payment options for global accessibility:
* **Credit/Debit Card**
* **Alipay**
* **Amazon Pay**
* **Cash App Pay**
## **How to Recharge**
1. **Navigate to the Billing section from the left-hand menu**
2. **Enter the amount you wish to top up**
3. **Select your preferred payment method and provide the required details**
4. **Confirm the payment to instantly add credit to your account**
## **Auto-Pay**
**How It Works**:
* When enabled, the system will automatically charge your saved payment method once the balance dips below the defined **threshold**.
* You can set the threshold amount (e.g., $25) and the auto-pay amount (e.g., $10). So whenever your balance is below $25, a new $10 is charged.
**It's disabled by default.** To enable it, turn on the feature switch and adjust threshold amount and auto-pay amount. Hit "save" to save your preferences.
## Low-Balance Alert
* **How It Works**:
* When the balance reaches below the specified threshold (e.g., $10), you will receive an email alert notifying you of the low funds in your account.
* This alert system helps you prevent any disruption in service.
**It's disabled by default.** To enable it, turn on the feature switch and adjust the threshold. Hit "save" to save your preferences.
## Billing History
To track your transactions, see our **Billing History** board.
Hit "Export" and a pdf file of your billing history will be downloaded.
Use the dropdown menu to filter your billing history based on different time periods. You can view the data of several options:
1. **Day** – View billing data on a daily basis.
2. **Week** – View billing data on a weekly basis.
3. **Month** – View billing data on a monthly basis.
# API Keys
### What is an API Key
An API key is a unique credential that authenticates your requests and operations within the Yottalabs AI Platform.
### How to Access Your Own API Keys
Launch Console -> Settings -> Access Keys
### When You'll Need API Keys
#### Authorizing API Requests
All endpoints require API key authentication via the `X-Api-Key` header:
```
X-Api-Key: {X-Api-Key}
```
**How to Use**:
Include headers in your endpoint requests, for example:
```json
curl -X POST https://api.yottalabs.ai/v2/pods \
-H "X-Api-Key: {your-x-api-key}" \
-H "Content-Type: application/json" \
-d '{
"name": "test-pod",
"image": "yottalabsai/pytorch:2.9.0-py3.11-cuda12.8.1-cudnn-devel-ubuntu22.04",
"gpuType": "NVIDIA_RTX_4090_24G",
"gpuCount": 1,
"containerVolumeInGb": 50,
"regions": ["us-east-1"],
"minSingleCardVcpu": 8,
"minSingleCardRamInGb": 32,
"environmentVars": [
{"key": "PYTHONUNBUFFERED", "value": "1"}
],
"expose": [
{"port": 8888, "protocol": "http"}
]
}'
```
{% hint style="info" %}
Pay special attention to your **API key security**.
Make sure to update credentials periodically for security
{% endhint %}
# API Guides
Learn how to use Yotta’s APIs to manage GPUs, deploy workloads, and automate infrastructure.
## Overview
This API is your gateway to building, scaling, and automating AI workloads on Yotta’s distributed GPU cloud. With just a few API calls, you can spin up compute Pods, query available GPUs, and orchestrate high-performance training or inference workloads seamlessly across regions.
### Base URL
```http
https://api.yottalabs.ai
```
### Authentication
All endpoints require API key authentication via the `X-Api-Key` header:
```
X-Api-Key: {X-Api-Key}
```
### Standard Response Format
All endpoints return a standard JSON response:
```json
{
"message": "string",
"code": 10000,
"data": { ... }
}
```
| CODE | DESCRIPTION |
| ----- | -------------------------- |
| 10000 | Success |
| 10001 | Invalid request parameters |
| 10002 | System error |
| 10007 | Record not exist |
| 11000 | VM not found |
| 11001 | VM status invalid |
| 11002 | No terminate permissions |
| 12001 | Resource status invalid |
| 13000 | Pod not found |
| 14000 | Endpoint not found |
| 24000 | Serverless unavailable |
| 24001 | Serverless does not exist |
| 24011 | Task does not exist |
***
### Common Status Codes
| VM STATUS | POD STATUS | ENDPOINT STATUS |
| ------------ | ------------ | --------------- |
| running | RUNNING | RUNNING |
| initializing | INITIALIZING | INITIALIZING |
| stopped | STOPPED | STOPPED |
| terminated | TERMINATED | TERMINATED |
***
### GPU Types Reference
You can use these codes in your request.
| CODE | DISPLAY NAME | VRAM |
| --------------------------- | ------------- | ------ |
| NVIDIA\_RTX\_4090\_24G | RTX 4090 | 24 GB |
| NVIDIA\_RTX\_5090\_32G | RTX 5090 | 32 GB |
| NVIDIA\_RTX\_A6000\_48G | RTX A6000 | 48 GB |
| NVIDIA\_RTX\_6000\_Ada\_48G | RTX 6000 Ada | 48 GB |
| NVIDIA\_A100\_PCIe\_40G | A100 PCIe 40G | 40 GB |
| NVIDIA\_A100\_40G | A100 40G | 40 GB |
| NVIDIA\_A100\_PCIe\_80G | A100 PCIe 80G | 80 GB |
| NVIDIA\_A100\_80G | A100 80GB | 80 GB |
| NVIDIA\_H100\_PCIe\_80G | H100 PCIe | 80 GB |
| NVIDIA\_H100\_80G | H100 | 80 GB |
| NVIDIA\_RTX\_PRO\_6000\_96G | RTX PRO 6000 | 96 GB |
| NVIDIA\_H200\_141G | H200 | 141 GB |
| NVIDIA\_B200\_180G | B200 | 180 GB |
| NVIDIA\_B300\_262G | B300 | 262 GB |
| AWS\_Trainium\_32G | Trainium1 | 32 GB |
| AMD\_MI300X\_192G | MI300X | 192 GB |
***
### Service Modes (Endpoints)
| MODE | DESCRIPTION |
| ------ | --------------------------------------------------------------- |
| ALB | Application Load Balancer - Direct request routing |
| QUEUE | Queue mode - Requests queued and processed by available workers |
| CUSTOM | Custom deployment mode |
### v2 API vs v1 API Changes
| FEATURE | V1 | V2 |
| ------------- | ---------------------------------------------- | ------------------------------------------------ |
| Base Path | `/openapi/v1/...` | `/v2/...` |
| Naming | `podName`, `nickName` | `name` |
| Region | `region` (single) | `regionList` (set) |
| Registry Auth | `imageRegistryUsername` + `imageRegistryToken` | `containerRegistryAuthId` (credential reference) |
| Timestamps | `Long` (epoch seconds) | `Long` (epoch milliseconds) |
| Update Method | `POST /{id}/update` | `PATCH /{id}` |
| List Method | `GET /list` | `GET /` |
| Response | `data` field may vary | Consistent `{message,code,data}` |
| Volume Size | `volumeSizeGb` (integer) | `sizeInGb` (integer) |
| Storage Type | Integer (1,2,3,4) | String (`S3`,`CEPH`,`VENDOR`,`R2`) |
| Volume Status | Integer (0,1,2,3,4,5) | String (lowercase) |
***
### Notes
* All IDs are returned as strings in Endpoint responses for compatibility
* Timestamps are in milliseconds (epoch) for Pods, ISO 8601 for Endpoints
* GPU counts must be powers of 2 (1, 2, 4, 8, ...)
* Minimum container volume is 20 GB for endpoints
* Credentials cannot be retrieved (password/token omitted for security)
* Delete operations will fail if resource is in use
* Volumes with `mountCount > 0` cannot be deleted or resized
* S3/R2 volumes have unlimited size; CEPH/VENDOR volumes require `sizeInGb`
* SYSTEM volumes are not exposed via the v2 API (auto-managed by platform)
* For private images, use `containerRegistryAuthId` to reference stored credentials
* If `imageRegistry` is not specified, Docker Hub is used by default
# Get started
Start here with examples through api workflow listed below!
#### 1. Create Credential for Private Image
```bash
curl -X POST https://api.yottalabs.ai/v2/container-registry-auths \
-H "X-Api-Key: {X-Api-Key}" \
-H "Content-Type: application/json" \
-d '{
"name": "my-private-registry",
"type": "DOCKER_HUB",
"username": "myuser",
"password": "mypassword"
}'
```
#### 2. Create VM
```bash
curl -X POST https://api.yottalabs.ai/v2/vms \
-H "X-Api-Key: {X-Api-Key}" \
-H "Content-Type: application/json" \
-d '{
"vmTypeId": 1,
"region": "us-east-1",
"name": "dev-vm",
"isSpot": 0,
"volumeMountPaths": {
"123": "/mnt/data",
"456": "/mnt/models"
}
}'
```
#### 3. Create Pod with GPU
Number of callback notification attempts. Max 3 retries after initial failure (intervals: 1min, 5min, 15min).
|
| nextResultSendTime | string | Next scheduled result transmission time (if retry is needed) |
| taskData | object | Original task data payload |
| header | object | Custom task request headers |
| taskResult | object | Task execution result |
| notifySendCount | number | Total number of notifications sent |
| lastNotifiedAt | string | Last notification timestamp |
***
### Get Processing Task Count
**Endpoint:** `/openapi/v1/skywalker/tasks/processing/count`
**Method:** `GET`
**Description:** Retrieves the count of tasks that are currently pending or processing.
* **Rate Limiting:**
* Per `X-Endpoint-ID`: 60 QPS.
* Global Limit: 400 QPS.
**Authorizations**
| Name | Location | Type | Required | Description |
| ------------- | -------- | ------ | -------- | ------------- |
| X-API-Key | header | string | required | Your API Key |
| X-Endpoint-ID | header | string | required | Serverless ID |
**Example — curl**
```bash
curl --location 'https://api.yottalabs.ai/openapi/v1/skywalker/tasks/processing/count' \
--header 'X-API-Key: your-api-key-here' \
--header 'X-Endpoint-ID: 378570724762587238'
```
**Response**
```json
{
"message": "success",
"code": 10000,
"data": {
"processingCount": 515
}
}
```
**Response Fields**
| Field | Type | Description |
| --------------- | ------ | ----------------------------------------- |
| processingCount | number | Number of tasks currently being processed |
***
### List Tasks
**Endpoint:** `/openapi/v1/skywalker/tasks`
**Method:** `GET`
**Description:** Retrieves a paginated list of tasks.
* **Rate Limiting:**
* Per `X-Endpoint-ID`: 60 QPS.
* Global Limit: 400 QPS.
**Authorizations**
| Name | Location | Type | Required | Description |
| ------------- | -------- | ------ | -------- | ------------- |
| X-API-Key | header | string | required | Your API Key |
| X-Endpoint-ID | header | string | required | Serverless ID |
**Query Parameters**
| Name | Type | Required | Default | Description |
| -------- | ------ | -------- | ------- | ------------------------------------------------------------------------------- |
| status | number | optional | - |
Filter by Task Status: 0=PROCESSING, 1=DELIVERED, 2=SUCCESS, 3=FAILED
|
| page | number | optional | 1 | Page number, starting from 1 |
| pageSize | number | optional | 10 | Number of records per page |
**Example — curl**
```bash
curl --location 'https://api.yottalabs.ai/openapi/v1/skywalker/tasks?status=1&page=1&pageSize=5' \
--header 'X-API-Key: your-api-key-here'
```
**Response**
Returns an object containing `data` with `items` (TaskDetail\[]) and `pagination` (Pagination).
```json
{
"message": "success",
"code": 10000,
"data": {
"items": [
{
"userTaskId": "task_20251111_001",
"status": "PROCESSING",
"workerUrl": "http://localhost:8000/v1/chat/completions",
...
}
],
"pagination": {
"page": 1,
"pageSize": 5,
"totalCount": 515,
"totalPages": 103
}
}
}
```
**Structure Definitions**
**TaskDetail**
| Name | Type | Description |
| ---------------- | ------ | ------------------------------------------------------------------------------------ |
| userTaskId | string | User Task ID |
| workerUrl | string | Full Worker URL (host:port + processUri) |
| notifyUrl | string | Callback notification URL |
| createdAt | string | Task creation time (ISO 8601 format) |
| updatedAt | string | Last update time (ISO 8601 format) |
| status | number | Task Status (0=PROCESSING, 1=DELIVERED, 2=SUCCESS, 3=FAILED) |
| resultSendStatus | number | Callback notification status (0=INIT, 1=SUCCESS, 2=FAILED, 3=MAX\_RETRIES\_EXCEEDED) |
| resultSendCount | number | Number of callback attempts |
| notifySendCount | number | Total number of notifications sent |
**Pagination**
| Name | Type | Description |
| ---------- | ------ | -------------------------- |
| page | number | Current page number |
| pageSize | number | Number of records per page |
| totalCount | number | Total number of records |
| totalPages | number | Total number of pages |
***
### Callback Notification
**Endpoint:** `{userNotifyUrl}`
**Method:** `POST`
**Description:** Task completion result notification (**Caller:** Skywalker → User Application). Skywalker actively calls the `notifyUrl` provided by the user during endpoint creation to notify the result.
**Retry Mechanism:**
* If the initial notification fails (returns a non-2xx status code), the system treats it as a failure and queues a compensation task.
* Retry intervals: 1 minute, 5 minutes, 15 minutes.
* Supports multiple retries until success or the maximum of 3 retries is reached.
**Authorizations**
| Name | Location | Type | Required | Description |
| --------- | -------- | ------ | -------- | ------------------------------------------------------------------------------------- |
| X-API-Key | header | string | required | Uses the `notifyAuthKey` parameter from the Create Task interface for authentication. |
**Request Body (JSON)**
| Name | Type | Required | Description |
| -------------- | ------- | -------- | ------------------------------------------------------------------------------------------------ |
| task\_id | number | required | System Internal Task ID. Used for backward compatibility. |
| user\_task\_id | string | required | User-defined Custom Task ID. Main identifier (Max 255 chars). |
| endpoint\_id | string | required | Endpoint ID identifying where the task belongs (Max 255 chars). |
| status | string | required | Task status. Enum values: `Success` or `Failed`. |
| success | boolean | required | Task success flag. `true` indicates success, `false` indicates failure. |
| timestamp | string | required | Notification timestamp (UTC). Format: `YYYY-MM-DD HH:mm:ss.SSS` |
| retry\_count | number | required | Retry count. Starts at 1 (initial send is 1). |
| result | object | optional | Task execution result data. Contains the processing result returned by the worker if successful. |
| failed\_reason | string | optional | Reason for failure. Only exists when `status` is `Failed`. |
**Example — curl**
```json
{
"endpoint_id": 379017551614185902,
"status": "SUCCESS",
"success": true,
"task_id": 246634865268150272,
"timestamp": "2025-11-11 15:52:28.385",
"user_task_id": "task_427",
"retry_count": 1
}
```
***
## Enums
**Task.status**
| Value | Name | Description |
| ----- | ---------- | ------------------------------------- |
| 0 | PROCESSING | Task is currently being processed |
| 1 | DELIVERED | Task has been delivered to the worker |
| 2 | SUCCESS | Task executed successfully |
| 3 | FAILED | Task execution failed |
**Task.resultSendStatus**
| Value | Name | Description |
| ----- | ---------------------- | ----------------------------------------- |
| 0 | INIT | Initial state, not sent |
| 1 | SUCCESS | Result sent successfully |
| 2 | FAILED | Result sending failed |
| 3 | MAX\_RETRIES\_EXCEEDED | Exceeded maximum retry attempts (3 times) |
***
## Response Codes
| Code | Message | Description |
| ----- | ----------------------------------------- | --------------------------------------------------- |
| 10000 | success | Request successful |
| 429 | too many requests | Request QPS exceeded rate limit threshold |
| 40001 | userTaskId is required | `userTaskId` field is missing |
| 40001 | userTaskId exceeds maximum length... | `userTaskId` exceeds length limit of 255 characters |
| 40001 | userTaskId can only contain... | `userTaskId` contains invalid characters |
| 40001 | workerPort must be at least 1 | Port number below minimum value |
| 40001 | workerPort must not exceed 65535 | Port number exceeds maximum value |
| 40001 | processUri is required | `processUri` field is missing |
| 40001 | processUri must not contain spaces | `processUri` contains spaces |
| 40001 | processUri contains invalid characters... | `processUri` contains invalid URI characters |
| 40001 | notifyUrl must be a valid URL | `notifyUrl` format is incorrect |
| 40001 | taskData is required | `taskData` field is missing |
| 40001 | taskData cannot be empty | `taskData` is empty |
| 40001 | header must be a kv structure | `header` is not a Key-Value structure |
| 40101 | Authentication context not found | Authentication context missing |
| 40001 | status must be between 0 and 3 | Task status enum value error |
| 40402 | Task not found | Task does not exist |
| 50001 | Failed to create a task | Internal server error creating task |
# Credential
#### List All Credentials
```bash
GET /v2/container-registry-auths
```
**Response:**
```json
{
"message": "success",
"code": 10000,
"data": [
{
"id": 123,
"name": "my-docker-registry",
"type": "DOCKER_HUB",
"createdAt": "2024-01-15T10:30:00Z"
}
]
}
```
#### Get Credential by ID
```bash
GET /v2/container-registry-auths/{id}
```
**Response:** Same as list
#### Create Credential
```bash
POST /v2/container-registry-auths
```
**Request Body:**
```json
{
"name": "my-docker-registry",
"type": "DOCKER_HUB",
"username": "myuser",
"password": "mypassword"
}
```
| FIELD | TYPE | REQUIRED | DESCRIPTION |
| -------- | ------ | -------- | -------------------------------------------- |
| name | string | Yes | Credential name |
| type | string | Yes | `DOCKER_HUB`, `GCR`, `ECR`, `ACR`, `PRIVATE` |
| username | string | Yes | Registry username |
| password | string | Yes | Registry password/token |
**Response:** Returns created credential
#### Update Credential (Partial)
```bash
PATCH /v2/container-registry-auths/{id}
```
**Request Body:** All fields optional
```json
{
"name": "updated-name",
"username": "newuser",
"password": "newpassword"
}
```
#### Delete Credential
```
DELETE /v2/container-registry-auths/{id}
```
**Note:** Will fail if credential is in use by any Pod or Endpoint.
# Virtual Machines
#### Create VM
```bash
POST /v2/vms
```
**Request Body:**
```json
{
"vmTypeId": 1,
"region": "us-east-1",
"name": "my-vm",
"isSpot": 0,
"volumeMountPaths": {
"123": "/mnt/data",
"456": "/mnt/models"
}
}
```
| FIELD | TYPE | REQUIRED | DESCRIPTION |
| ---------------- | ------- | -------- | -------------------------------- |
| vmTypeId | integer | Yes | VM type ID |
| region | string | Yes | Region code (e.g., "us-east-1") |
| name | string | Yes | VM display name |
| isSpot | integer | No | 0=on-demand, 1=spot (default: 0) |
| volumeMountPaths | map | No | Volume ID to mount path mapping |
**Response:**
```json
{
"message": "success",
"code": 10000,
"data": {
"id": 456,
"name": "my-vm",
"status": "running",
"gpuDisplayName": "NVIDIA RTX A4000",
"ipAddress": "192.168.1.100",
"cpuCores": 8,
"memoryInGb": "32",
"gpuCount": 1,
"gpuMemoryInGb": "16",
"region": "us-east-1",
"storageInGb": "100",
"sshTemplate": "ssh root@192.168.1.100",
"createdAt": "2024-01-15T10:30:00Z",
"isSpot": 0
}
}
```
#### Get VM by ID
```bash
GET /v2/vms/{id}
```
**Response:** Same as create
#### List VMs (Paginated)
```bash
GET /v2/vms
```
**Query Parameters:**
| PARAMETER | TYPE | DEFAULT | DESCRIPTION |
| --------- | ------ | ------- | ---------------------------------- |
| page | long | 1 | Page number (1-based) |
| size | long | 10 | Page size |
| status | string | - | Filter by status (e.g., "running") |
**Response:**
```json
{
"message": "success",
"code": 10000,
"data": {
"items": [ ... ],
"page": 1,
"size": 10,
"total": 42,
"pages": 5
}
}
```
#### Update VM (Rename)
```bash
PATCH /v2/vms/{id}
```
**Request Body:**
```json
{
"name": "updated-vm-name"
}
```
#### Terminate VM
```bash
DELETE /v2/vms/{id}
```
**Response:**
```json
{
"message": "success",
"code": 10000,
"data": true
}
```
#### Get VM Types
```bash
GET /v2/vms/types
```
Returns all available GPU types and their availability by region. Required for creating VMs - the `vmTypeId` in create request comes from this list.
**Response:**
```json
{
"message": "success",
"code": 10000,
"data": [
{
"gpuType": "NVIDIA_RTX_4090_24G",
"regions": [
{
"region": "us-east-1",
"regionName": "US East",
"available": true,
"vmTypeId": 1
}
]
},
{
"gpuType": "NVIDIA_RTX_A6000_48G",
"regions": [
{
"region": "us-west-1",
"regionName": "US West",
"available": true,
"vmTypeId": 2
}
]
}
]
}
```
# Volume
#### Create Volume
```bash
POST /v2/volumes
```
**Request Body:**
```json
{
"name": "my-ceph-volume",
"storageType": "CEPH",
"region": "us-west-1",
"sizeInGb": 100
}
```
| FIELD | TYPE | REQUIRED | DESCRIPTION |
| ---------------- | ------- | -------------- | --------------------------------------- |
| name | string | Yes | Volume name (valid volume name format) |
| storageType | string | Yes | `S3`, `CEPH`, `VENDOR`, or `R2` |
| region | string | CEPH/VENDOR/R2 | Storage region code (e.g., "us-west-1") |
| sizeInGb | integer | CEPH/VENDOR | Volume size in GB (1-10240) |
| vendorVolumeType | string | VENDOR | Volume type: `NVMe` or `HDD` |
**Storage Type Details:**
| TYPE | REQUIRED FIELDS | NOTES |
| ------ | ---------------------------------------- | ----------------------------------------------------- |
| S3 | name | Unlimited size, no region needed |
| R2 | name | Cloudflare R2 storage (S3-compatible, no egress fees) |
| CEPH | name, region, sizeInGb | Network storage for pods |
| VENDOR | name, region, sizeInGb, vendorVolumeType | Third-party vendor storage (Verda) |
**Response:**
```json
{
"message": "success",
"code": 10000,
"data": {
"id": 123,
"name": "my-ceph-volume",
"sizeInGb": 100,
"region": "us-west-1",
"storageType": "CEPH",
"status": "creating",
"vendorVolumeType": null,
"mountCount": 0,
"cost": 0.00,
"createdAt": 1705306200000
}
}
```
#### 5.2 List Volumes (Paginated)
```bash
GET /v2/volumes
```
**Query Parameters:**
| PARAMETER | TYPE | REQUIRED | DEFAULT | DESCRIPTION |
| ----------- | ------ | -------- | ------- | ------------------------------------ |
| page | long | No | 1 | Page number (1-based) |
| size | long | No | 10 | Page size |
| storageType | string | **Yes** | - | Storage type: `S3`, `CEPH`, `VENDOR` |
| region | string | No | - | Filter by region code |
**Response:**
```json
{
"message": "success",
"code": 10000,
"data": {
"items": [
{
"id": 123,
"name": "my-ceph-volume",
"sizeInGb": 100,
"region": "us-west-1",
"storageType": "CEPH",
"status": "active",
"vendorVolumeType": null,
"mountCount": 1,
"cost": 5.00,
"createdAt": 1705306200000
}
],
"page": 1,
"size": 10,
"total": 42,
"pages": 5
}
}
```
#### Get Volume by ID
```bash
GET /v2/volumes/{id}
```
**Response:** Same as create response (with current status)
#### Delete Volume
```bash
DELETE /v2/volumes/{id}
```
**Note:** Only volumes with `mountCount=0` can be deleted. Attempting to delete a mounted volume will fail.
**Response:**
```json
{
"message": "success",
"code": 10000,
"data": true
}
```
#### 5.5 Rename Volume
```bash
POST /v2/volumes/{id}/name
```
**Request Body:**
```json
{
"name": "my-renamed-volume"
}
```
| FIELD | TYPE | REQUIRED | DESCRIPTION |
| ----- | ------ | -------- | ------------------------------------------ |
| name | string | Yes | New volume name (valid volume name format) |
**Response:** Returns updated volume (same format as create response)
#### 5.6 Resize Volume
```bash
POST /v2/volumes/{id}/resize
```
Resize a CEPH or VENDOR volume. Only volumes with `ACTIVE` status and `mountCount=0` can be resized.
**Request Body:**
```json
{
"sizeInGb": 200
}
```
| FIELD | TYPE | REQUIRED | DESCRIPTION |
| -------- | ------- | -------- | ------------------------------- |
| sizeInGb | integer | Yes | New volume size in GB (1-10240) |
**Response:**
```json
{
"message": "success",
"code": 10000,
"data": null
}
```
**Volume Status Values:**
| STATUS | DESCRIPTION |
| -------- | --------------------------- |
| creating | Volume is being provisioned |
| active | Volume is ready for use |
| deleting | Volume is being deleted |
| resizing | Volume is being resized |
| error | Volume operation failed |
# API Reference - v1
# Credentials
## Create a credentials
> Create a credentials
```json
{"openapi":"3.0.1","info":{"title":"默认模块","version":"1.0.0"},"tags":[{"name":"OpenapiCredentials"}],"security":[{}],"paths":{"/openapi/v1/credentials/create":{"post":{"summary":"Create a credentials","deprecated":false,"description":"Create a credentials","operationId":"create_5","tags":["OpenapiCredentials"],"parameters":[],"requestBody":{"content":{"application/json":{"schema":{"$ref":"#/components/schemas/OpenapiCredentialCreateRequest"}}},"required":true},"responses":{"200":{"description":"OK","content":{"*/*":{"schema":{"$ref":"#/components/schemas/ResultOpenapiCredentialDetailResponse"}}},"headers":{}},"400":{"description":"Bad Request","content":{"*/*":{"schema":{"$ref":"#/components/schemas/ResultObject"}}},"headers":{}},"500":{"description":"Internal Server Error","content":{"*/*":{"schema":{"$ref":"#/components/schemas/ResultObject"}}},"headers":{}}}}}},"components":{"schemas":{"OpenapiCredentialCreateRequest":{"type":"object","description":"CredentialCreateRequest","properties":{"name":{"type":"string","description":"Credential name","minLength":1,"pattern":"^(?=[A-Za-z])[A-Za-z0-9@._-]{1,50}$"},"username":{"type":"string","description":"username","maxLength":255,"minLength":1},"token":{"type":"string","description":"token","maxLength":255,"minLength":1}},"required":["name","token","username"]},"ResultOpenapiCredentialDetailResponse":{"type":"object","properties":{"message":{"type":"string","description":"message"},"code":{"type":"integer","format":"int32","description":"code"},"data":{"$ref":"#/components/schemas/OpenapiCredentialDetailResponse","description":"data"}}},"OpenapiCredentialDetailResponse":{"type":"object","description":"CredentialDetail","properties":{"id":{"type":"integer","format":"int64","description":"id"},"name":{"type":"string","description":"name"}}},"ResultObject":{"type":"object","properties":{"message":{"type":"string","description":"message"},"code":{"type":"integer","format":"int32","description":"code"},"data":{"description":"data"}}}}}}
```
## Delete a credentials
> Delete a specific credentials
```json
{"openapi":"3.0.1","info":{"title":"默认模块","version":"1.0.0"},"tags":[{"name":"OpenapiCredentials"}],"security":[{}],"paths":{"/openapi/v1/credentials/{id}":{"delete":{"summary":"Delete a credentials","deprecated":false,"description":"Delete a specific credentials","operationId":"delete_2","tags":["OpenapiCredentials"],"parameters":[{"name":"id","in":"path","description":"","required":true,"schema":{"type":"integer","format":"int64"}}],"responses":{"200":{"description":"OK","content":{"*/*":{"schema":{"$ref":"#/components/schemas/ResultObject"}}},"headers":{}},"400":{"description":"Bad Request","content":{"*/*":{"schema":{"$ref":"#/components/schemas/ResultObject"}}},"headers":{}},"500":{"description":"Internal Server Error","content":{"*/*":{"schema":{"$ref":"#/components/schemas/ResultObject"}}},"headers":{}}}}}},"components":{"schemas":{"ResultObject":{"type":"object","properties":{"message":{"type":"string","description":"message"},"code":{"type":"integer","format":"int32","description":"code"},"data":{"description":"data"}}}}}}
```
## Get all credentials
> Get all credentials
```json
{"openapi":"3.0.1","info":{"title":"默认模块","version":"1.0.0"},"tags":[{"name":"OpenapiCredentials"}],"security":[{}],"paths":{"/openapi/v1/credentials/list":{"get":{"summary":"Get all credentials","deprecated":false,"description":"Get all credentials","operationId":"list_2","tags":["OpenapiCredentials"],"parameters":[],"responses":{"200":{"description":"OK","content":{"*/*":{"schema":{"$ref":"#/components/schemas/ResultListOpenapiCredentialDetailResponse"}}},"headers":{}},"400":{"description":"Bad Request","content":{"*/*":{"schema":{"$ref":"#/components/schemas/ResultObject"}}},"headers":{}},"500":{"description":"Internal Server Error","content":{"*/*":{"schema":{"$ref":"#/components/schemas/ResultObject"}}},"headers":{}}}}}},"components":{"schemas":{"ResultListOpenapiCredentialDetailResponse":{"type":"object","properties":{"message":{"type":"string","description":"message"},"code":{"type":"integer","format":"int32","description":"code"},"data":{"type":"array","description":"data","items":{"$ref":"#/components/schemas/OpenapiCredentialDetailResponse"}}}},"OpenapiCredentialDetailResponse":{"type":"object","description":"CredentialDetail","properties":{"id":{"type":"integer","format":"int64","description":"id"},"name":{"type":"string","description":"name"}}},"ResultObject":{"type":"object","properties":{"message":{"type":"string","description":"message"},"code":{"type":"integer","format":"int32","description":"code"},"data":{"description":"data"}}}}}}
```
## Get a credential detail
> Get a credential detail
```json
{"openapi":"3.0.1","info":{"title":"默认模块","version":"1.0.0"},"tags":[{"name":"OpenapiCredentials"}],"security":[{}],"paths":{"/openapi/v1/credentials/{id}":{"get":{"summary":"Get a credential detail","deprecated":false,"description":"Get a credential detail","operationId":"detail","tags":["OpenapiCredentials"],"parameters":[{"name":"id","in":"path","description":"","required":true,"schema":{"type":"integer","format":"int64"}}],"responses":{"200":{"description":"OK","content":{"*/*":{"schema":{"$ref":"#/components/schemas/ResultOpenapiCredentialDetailResponse"}}},"headers":{}},"400":{"description":"Bad Request","content":{"*/*":{"schema":{"$ref":"#/components/schemas/ResultObject"}}},"headers":{}},"500":{"description":"Internal Server Error","content":{"*/*":{"schema":{"$ref":"#/components/schemas/ResultObject"}}},"headers":{}}}}}},"components":{"schemas":{"ResultOpenapiCredentialDetailResponse":{"type":"object","properties":{"message":{"type":"string","description":"message"},"code":{"type":"integer","format":"int32","description":"code"},"data":{"$ref":"#/components/schemas/OpenapiCredentialDetailResponse","description":"data"}}},"OpenapiCredentialDetailResponse":{"type":"object","description":"CredentialDetail","properties":{"id":{"type":"integer","format":"int64","description":"id"},"name":{"type":"string","description":"name"}}},"ResultObject":{"type":"object","properties":{"message":{"type":"string","description":"message"},"code":{"type":"integer","format":"int32","description":"code"},"data":{"description":"data"}}}}}}
```
# Pods
## Create pod
> Create pod
```json
{"openapi":"3.0.1","info":{"title":"默认模块","version":"1.0.0"},"tags":[{"name":"OpenapiPod"}],"security":[{}],"paths":{"/openapi/v1/pods/create":{"post":{"summary":"Create pod","deprecated":false,"description":"Create pod","operationId":"create_4","tags":["OpenapiPod"],"parameters":[],"requestBody":{"content":{"application/json":{"schema":{"$ref":"#/components/schemas/OpenapiPodCreateRequest"}}},"required":true},"responses":{"200":{"description":"OK","content":{"*/*":{"schema":{"$ref":"#/components/schemas/ResultLong"}}},"headers":{}},"400":{"description":"Bad Request","content":{"*/*":{"schema":{"$ref":"#/components/schemas/ResultObject"}}},"headers":{}},"500":{"description":"Internal Server Error","content":{"*/*":{"schema":{"$ref":"#/components/schemas/ResultObject"}}},"headers":{}}}}}},"components":{"schemas":{"OpenapiPodCreateRequest":{"type":"object","description":"OpenapiPodCreateRequest","properties":{"imagePublicType":{"type":"string","description":"ImagePublicTypeEnum: PUBLIC, PRIVATE"},"resourceType":{"type":"string","description":"ResourceTypeEnum: GPU,CPU"},"region":{"type":"string","description":"Region"},"regionList":{"type":"array","description":"Region List","items":{"type":"string"},"uniqueItems":true},"podName":{"type":"string","description":"pod nick name"},"image":{"type":"string","description":"image name","maxLength":255,"minLength":1},"imageRegistry":{"type":"string","default":"https://index.docker.io/v1/","description":"image registry url"},"credentialId":{"type":"integer","format":"int64","description":"container registry credential ID"},"imageRegistryUsername":{"type":"string","description":"image registry username"},"imageRegistryToken":{"type":"string","description":"image registry token or password"},"gpuType":{"type":"string","description":"gpu type","minLength":1},"gpuCount":{"type":"integer","format":"int32","description":"gpu count"},"isSpot":{"type":"boolean","description":"Create on Spot resource when true; default false"},"maxPrice":{"type":"number","description":"Spot instance max hourly price cap for the whole machine; only valid when isSpot=true"},"shmInGb":{"type":"integer","format":"int32","description":"shm unit:GB","minimum":1},"minSingleCardRamInGb":{"type":"integer","format":"int32","description":"min single card ram unit: GB","maximum":1536,"minimum":0},"minSingleCardVramInGb":{"type":"integer","format":"int32","description":"min single card vram unit: GB","maximum":1536,"minimum":0},"minSingleCardVcpu":{"type":"integer","format":"int32","description":"min single card vcpu unit: count","minimum":0},"containerVolumeInGb":{"type":"integer","format":"int32","description":"container volume unit:GB"},"initializationCommand":{"type":"string","description":"initialization command"},"environmentVars":{"type":"array","description":"image needed environment vars [{\"key\":\"myKey\", \"value\": myValue}]","items":{"$ref":"#/components/schemas/KeyValuePairDTO"}},"expose":{"type":"array","description":"expose ports [{\"port\": 8000, \"protocol\": \"HTTP\"]","items":{"$ref":"#/components/schemas/OpenapiPodExposePortRequest"}},"persistentVolumes":{"type":"array","description":"persistent volumes","items":{"$ref":"#/components/schemas/PersistentVolumesRequest"}},"callbackUrl":{"type":"string","description":"Pod lifecycle webhook callback URL. When creating a Pod, you can provide a `callbackUrl` in the request body. The platform will send HTTP POST notifications to this URL whenever the Pod transitions into a key lifecycle state (RUNNING, TERMINATED, FAILED, or DEGRADED)."}},"required":["gpuType","image"]},"KeyValuePairDTO":{"type":"object","description":"KeyValuePairDTO","properties":{"key":{"type":"string","description":"key","minLength":1},"value":{"type":"string","description":"value","minLength":1}},"required":["key","value"]},"OpenapiPodExposePortRequest":{"type":"object","description":"OpenapiPodExposePortRequest","properties":{"port":{"type":"integer","format":"int32","description":"port","maximum":65535,"minimum":0},"protocol":{"type":"string","description":"protocol","enum":["HTTP","TCP"]}},"required":["port"]},"PersistentVolumesRequest":{"type":"object","description":"PersistentVolumesRequest","properties":{"id":{"type":"integer","format":"int64","description":"pv id"},"name":{"type":"string","description":"pv name"},"volumeType":{"type":"string","description":"Persistent volume type","enum":["CloudStorage","Ceph","System"]},"mountMode":{"type":"string","description":"mountMode","enum":["Data","System"]},"volumeSize":{"type":"integer","format":"int32","description":"volumeSize, required when volumeType is System"},"volumePrice":{"type":"number","description":"volume price"},"mountPath":{"type":"string","description":"mount path","minLength":1},"cloudStorageType":{"type":"string","description":"cloud storage type, required when volumeType is CloudStorage","enum":["S3","R2"]},"systemVolumeType":{"type":"string","description":"System volume type: Local or Ceph. Required when volumeType is System","enum":["Local","Ceph"]}},"required":["mountPath","volumeType"]},"ResultLong":{"type":"object","properties":{"message":{"type":"string","description":"message"},"code":{"type":"integer","format":"int32","description":"code"},"data":{"type":"integer","format":"int64","description":"data"}}},"ResultObject":{"type":"object","properties":{"message":{"type":"string","description":"message"},"code":{"type":"integer","format":"int32","description":"code"},"data":{"description":"data"}}}}}}
```
## Pod resume
> Pod resume
```json
{"openapi":"3.0.1","info":{"title":"默认模块","version":"1.0.0"},"tags":[{"name":"OpenapiPod"}],"security":[{}],"paths":{"/openapi/v1/pods/resume/{podId}":{"post":{"summary":"Pod resume","deprecated":false,"description":"Pod resume","operationId":"resume","tags":["OpenapiPod"],"parameters":[{"name":"podId","in":"path","description":"","required":true,"schema":{"type":"integer","format":"int64"}}],"responses":{"200":{"description":"OK","content":{"*/*":{"schema":{"$ref":"#/components/schemas/ResultVoid"}}},"headers":{}},"400":{"description":"Bad Request","content":{"*/*":{"schema":{"$ref":"#/components/schemas/ResultObject"}}},"headers":{}},"500":{"description":"Internal Server Error","content":{"*/*":{"schema":{"$ref":"#/components/schemas/ResultObject"}}},"headers":{}}}}}},"components":{"schemas":{"ResultVoid":{"type":"object","properties":{"message":{"type":"string","description":"message"},"code":{"type":"integer","format":"int32","description":"code"},"data":{"description":"data"}}},"ResultObject":{"type":"object","properties":{"message":{"type":"string","description":"message"},"code":{"type":"integer","format":"int32","description":"code"},"data":{"description":"data"}}}}}}
```
## Pod pause
> Pod pause
```json
{"openapi":"3.0.1","info":{"title":"默认模块","version":"1.0.0"},"tags":[{"name":"OpenapiPod"}],"security":[{}],"paths":{"/openapi/v1/pods/pause/{podId}":{"post":{"summary":"Pod pause","deprecated":false,"description":"Pod pause","operationId":"pause_1","tags":["OpenapiPod"],"parameters":[{"name":"podId","in":"path","description":"","required":true,"schema":{"type":"integer","format":"int64"}}],"responses":{"200":{"description":"OK","content":{"*/*":{"schema":{"$ref":"#/components/schemas/ResultVoid"}}},"headers":{}},"400":{"description":"Bad Request","content":{"*/*":{"schema":{"$ref":"#/components/schemas/ResultObject"}}},"headers":{}},"500":{"description":"Internal Server Error","content":{"*/*":{"schema":{"$ref":"#/components/schemas/ResultObject"}}},"headers":{}}}}}},"components":{"schemas":{"ResultVoid":{"type":"object","properties":{"message":{"type":"string","description":"message"},"code":{"type":"integer","format":"int32","description":"code"},"data":{"description":"data"}}},"ResultObject":{"type":"object","properties":{"message":{"type":"string","description":"message"},"code":{"type":"integer","format":"int32","description":"code"},"data":{"description":"data"}}}}}}
```
## Pod delete
> Pod delete
```json
{"openapi":"3.0.1","info":{"title":"默认模块","version":"1.0.0"},"tags":[{"name":"OpenapiPod"}],"security":[{}],"paths":{"/openapi/v1/pods/{podId}":{"delete":{"summary":"Pod delete","deprecated":false,"description":"Pod delete","operationId":"delete_1","tags":["OpenapiPod"],"parameters":[{"name":"podId","in":"path","description":"","required":true,"schema":{"type":"integer","format":"int64"}}],"responses":{"200":{"description":"OK","content":{"*/*":{"schema":{"$ref":"#/components/schemas/ResultVoid"}}},"headers":{}},"400":{"description":"Bad Request","content":{"*/*":{"schema":{"$ref":"#/components/schemas/ResultObject"}}},"headers":{}},"500":{"description":"Internal Server Error","content":{"*/*":{"schema":{"$ref":"#/components/schemas/ResultObject"}}},"headers":{}}}}}},"components":{"schemas":{"ResultVoid":{"type":"object","properties":{"message":{"type":"string","description":"message"},"code":{"type":"integer","format":"int32","description":"code"},"data":{"description":"data"}}},"ResultObject":{"type":"object","properties":{"message":{"type":"string","description":"message"},"code":{"type":"integer","format":"int32","description":"code"},"data":{"description":"data"}}}}}}
```
## Get pod detail
> Fetch detailed information of a specific pod by its ID
```json
{"openapi":"3.0.1","info":{"title":"默认模块","version":"1.0.0"},"tags":[{"name":"OpenapiPod"}],"security":[{}],"paths":{"/openapi/v1/pods/{podId}":{"get":{"summary":"Get pod detail","deprecated":false,"description":"Fetch detailed information of a specific pod by its ID","operationId":"getPodDetail","tags":["OpenapiPod"],"parameters":[{"name":"podId","in":"path","description":"","required":true,"schema":{"type":"integer","format":"int64"}}],"responses":{"200":{"description":"OK","content":{"*/*":{"schema":{"$ref":"#/components/schemas/ResultOpenapiPodListDetailResponse"}}},"headers":{}},"400":{"description":"Bad Request","content":{"*/*":{"schema":{"$ref":"#/components/schemas/ResultObject"}}},"headers":{}},"500":{"description":"Internal Server Error","content":{"*/*":{"schema":{"$ref":"#/components/schemas/ResultObject"}}},"headers":{}}}}}},"components":{"schemas":{"ResultOpenapiPodListDetailResponse":{"type":"object","properties":{"message":{"type":"string","description":"message"},"code":{"type":"integer","format":"int32","description":"code"},"data":{"$ref":"#/components/schemas/OpenapiPodListDetailResponse","description":"data"}}},"OpenapiPodListDetailResponse":{"type":"object","description":"OpenapiPodListDetailResponse","properties":{"id":{"type":"integer","format":"int64","description":"id"},"orgId":{"type":"integer","format":"int64","description":"org id"},"applicantId":{"type":"integer","format":"int64","description":"The applicant id"},"podName":{"type":"string","description":"pod nick name"},"imageId":{"type":"integer","format":"int64","description":"image id"},"officialImage":{"type":"string","description":"ImageSourceEnum: OFFICIAL, CUSTOM","enum":["OFFICIAL","CUSTOM"]},"imagePublicType":{"type":"string","description":"ImagePublicTypeEnum: PUBLIC, PRIVATE","enum":["PUBLIC","PRIVATE"]},"image":{"type":"string","description":"image name"},"imageRegistry":{"type":"string","description":"image registry url"},"imageRegistryUsername":{"type":"string","description":"image registry username"},"resourceType":{"type":"string","description":"ResourceTypeEnum: GPU, CPU","enum":["GPU","CPU"]},"gpuType":{"type":"string","description":"gpu type: RTX_4090_24G"},"gpuDisplayName":{"type":"string","description":"gpu display name"},"gpuCount":{"type":"integer","format":"int32","description":"gpu count"},"shmInGb":{"type":"integer","format":"int32","description":"shm unit:GB"},"singleCardVramInGb":{"type":"integer","format":"int32","description":"single card vram unit: GB"},"singleCardRamInGb":{"type":"integer","format":"int32","description":"single card ram unit: GB"},"singleCardVcpu":{"type":"integer","format":"int32","description":"single card vcpu count"},"location":{"type":"string","description":"location"},"region":{"type":"string","description":"region"},"cloudType":{"type":"string","description":"CloudTypeEnum: SECURE, COMMUNITY","enum":["SECURE","COMMUNITY"]},"containerVolumeInGb":{"type":"integer","format":"int32","description":"container volume unit:GB"},"networkUploadMbps":{"type":"number","description":"network upload"},"networkDownloadMbps":{"type":"number","description":"network download"},"diskReadSpeedMbps":{"type":"number","description":"disk read speed"},"diskWriteSpeedMbps":{"type":"number","description":"disk write speed"},"singleCardPrice":{"type":"number","description":"gpu single card price"},"containerVolumePrice":{"type":"number","description":"container volume price"},"initializationCommand":{"type":"string","description":"initialization command"},"environmentVars":{"type":"array","description":"image needed environment vars [{\"key\":\"myKey\", \"value\": myValue}]","items":{"$ref":"#/components/schemas/KeyValuePairDTO"}},"expose":{"type":"array","description":"expose ports","items":{"$ref":"#/components/schemas/OpenapiPodExposePortResponse"}},"sshCmd":{"type":"string","description":"ssh cmd"},"status":{"type":"string","description":"PodStatusEnum","enum":["INITIALIZE","RUNNING","PAUSING","PAUSED","TERMINATING","TERMINATED","FAILED","PENDING","PREPARING"]},"createdAt":{"type":"string","format":"date-time","description":"create time"},"updatedAt":{"type":"string","format":"date-time","description":"update time"},"persistentVolumes":{"type":"array","description":"persistent volumes","items":{"$ref":"#/components/schemas/PersistentVolumesResponse"}},"internalIp":{"type":"string","description":"internal ip"}}},"KeyValuePairDTO":{"type":"object","description":"KeyValuePairDTO","properties":{"key":{"type":"string","description":"key","minLength":1},"value":{"type":"string","description":"value","minLength":1}},"required":["key","value"]},"OpenapiPodExposePortResponse":{"type":"object","description":"OpenapiPodExposePortResponse","properties":{"port":{"type":"integer","format":"int32","description":"port","maximum":65535,"minimum":0},"proxyPort":{"type":"integer","format":"int32","description":"proxy port"},"protocol":{"type":"string","description":"protocol","enum":["HTTP","TCP"]},"host":{"type":"string","description":"host"},"healthy":{"type":"boolean","description":"healthy"},"ingressUrl":{"type":"string","description":"ingress url"},"serviceName":{"type":"string","description":"service name"}},"required":["port"]},"PersistentVolumesResponse":{"type":"object","description":"PersistentVolumesResponse","properties":{"id":{"type":"integer","format":"int64","description":"pv id"},"name":{"type":"string","description":"pv name"},"volumeType":{"type":"string","description":"Ceph or CloudStorage","enum":["CloudStorage","Ceph","System"]},"volumeSize":{"type":"integer","format":"int32","description":"volumeSize"},"volumePrice":{"type":"number","description":"volume price"},"mountPath":{"type":"string","description":"mount path","minLength":1},"cloudStorageType":{"type":"string","description":"cloud storage type","enum":["S3","R2"]},"systemVolumeType":{"type":"string","description":"System volume type: Local or Ceph (only for System volumeType)","enum":["Local","Ceph"]}},"required":["mountPath","volumeType"]},"ResultObject":{"type":"object","properties":{"message":{"type":"string","description":"message"},"code":{"type":"integer","format":"int32","description":"code"},"data":{"description":"data"}}}}}}
```
## Get Org pod list
> Get Org pod list
```json
{"openapi":"3.0.1","info":{"title":"默认模块","version":"1.0.0"},"tags":[{"name":"OpenapiPod"}],"security":[{}],"paths":{"/openapi/v1/pods/list":{"get":{"summary":"Get Org pod list","deprecated":false,"description":"Get Org pod list","operationId":"getPodList_1","tags":["OpenapiPod"],"parameters":[{"name":"regionList","in":"query","description":"","required":false,"schema":{"type":"array","items":{"type":"string"}}},{"name":"statusList","in":"query","description":"","required":false,"schema":{"type":"array","items":{"type":"integer","format":"int32"}}}],"responses":{"200":{"description":"OK","content":{"*/*":{"schema":{"$ref":"#/components/schemas/ResultListOpenapiPodListDetailResponse"}}},"headers":{}},"400":{"description":"Bad Request","content":{"*/*":{"schema":{"$ref":"#/components/schemas/ResultObject"}}},"headers":{}},"500":{"description":"Internal Server Error","content":{"*/*":{"schema":{"$ref":"#/components/schemas/ResultObject"}}},"headers":{}}}}}},"components":{"schemas":{"ResultListOpenapiPodListDetailResponse":{"type":"object","properties":{"message":{"type":"string","description":"message"},"code":{"type":"integer","format":"int32","description":"code"},"data":{"type":"array","description":"data","items":{"$ref":"#/components/schemas/OpenapiPodListDetailResponse"}}}},"OpenapiPodListDetailResponse":{"type":"object","description":"OpenapiPodListDetailResponse","properties":{"id":{"type":"integer","format":"int64","description":"id"},"orgId":{"type":"integer","format":"int64","description":"org id"},"applicantId":{"type":"integer","format":"int64","description":"The applicant id"},"podName":{"type":"string","description":"pod nick name"},"imageId":{"type":"integer","format":"int64","description":"image id"},"officialImage":{"type":"string","description":"ImageSourceEnum: OFFICIAL, CUSTOM","enum":["OFFICIAL","CUSTOM"]},"imagePublicType":{"type":"string","description":"ImagePublicTypeEnum: PUBLIC, PRIVATE","enum":["PUBLIC","PRIVATE"]},"image":{"type":"string","description":"image name"},"imageRegistry":{"type":"string","description":"image registry url"},"imageRegistryUsername":{"type":"string","description":"image registry username"},"resourceType":{"type":"string","description":"ResourceTypeEnum: GPU, CPU","enum":["GPU","CPU"]},"gpuType":{"type":"string","description":"gpu type: RTX_4090_24G"},"gpuDisplayName":{"type":"string","description":"gpu display name"},"gpuCount":{"type":"integer","format":"int32","description":"gpu count"},"shmInGb":{"type":"integer","format":"int32","description":"shm unit:GB"},"singleCardVramInGb":{"type":"integer","format":"int32","description":"single card vram unit: GB"},"singleCardRamInGb":{"type":"integer","format":"int32","description":"single card ram unit: GB"},"singleCardVcpu":{"type":"integer","format":"int32","description":"single card vcpu count"},"location":{"type":"string","description":"location"},"region":{"type":"string","description":"region"},"cloudType":{"type":"string","description":"CloudTypeEnum: SECURE, COMMUNITY","enum":["SECURE","COMMUNITY"]},"containerVolumeInGb":{"type":"integer","format":"int32","description":"container volume unit:GB"},"networkUploadMbps":{"type":"number","description":"network upload"},"networkDownloadMbps":{"type":"number","description":"network download"},"diskReadSpeedMbps":{"type":"number","description":"disk read speed"},"diskWriteSpeedMbps":{"type":"number","description":"disk write speed"},"singleCardPrice":{"type":"number","description":"gpu single card price"},"containerVolumePrice":{"type":"number","description":"container volume price"},"initializationCommand":{"type":"string","description":"initialization command"},"environmentVars":{"type":"array","description":"image needed environment vars [{\"key\":\"myKey\", \"value\": myValue}]","items":{"$ref":"#/components/schemas/KeyValuePairDTO"}},"expose":{"type":"array","description":"expose ports","items":{"$ref":"#/components/schemas/OpenapiPodExposePortResponse"}},"sshCmd":{"type":"string","description":"ssh cmd"},"status":{"type":"string","description":"PodStatusEnum","enum":["INITIALIZE","RUNNING","PAUSING","PAUSED","TERMINATING","TERMINATED","FAILED","PENDING","PREPARING"]},"createdAt":{"type":"string","format":"date-time","description":"create time"},"updatedAt":{"type":"string","format":"date-time","description":"update time"},"persistentVolumes":{"type":"array","description":"persistent volumes","items":{"$ref":"#/components/schemas/PersistentVolumesResponse"}},"internalIp":{"type":"string","description":"internal ip"}}},"KeyValuePairDTO":{"type":"object","description":"KeyValuePairDTO","properties":{"key":{"type":"string","description":"key","minLength":1},"value":{"type":"string","description":"value","minLength":1}},"required":["key","value"]},"OpenapiPodExposePortResponse":{"type":"object","description":"OpenapiPodExposePortResponse","properties":{"port":{"type":"integer","format":"int32","description":"port","maximum":65535,"minimum":0},"proxyPort":{"type":"integer","format":"int32","description":"proxy port"},"protocol":{"type":"string","description":"protocol","enum":["HTTP","TCP"]},"host":{"type":"string","description":"host"},"healthy":{"type":"boolean","description":"healthy"},"ingressUrl":{"type":"string","description":"ingress url"},"serviceName":{"type":"string","description":"service name"}},"required":["port"]},"PersistentVolumesResponse":{"type":"object","description":"PersistentVolumesResponse","properties":{"id":{"type":"integer","format":"int64","description":"pv id"},"name":{"type":"string","description":"pv name"},"volumeType":{"type":"string","description":"Ceph or CloudStorage","enum":["CloudStorage","Ceph","System"]},"volumeSize":{"type":"integer","format":"int32","description":"volumeSize"},"volumePrice":{"type":"number","description":"volume price"},"mountPath":{"type":"string","description":"mount path","minLength":1},"cloudStorageType":{"type":"string","description":"cloud storage type","enum":["S3","R2"]},"systemVolumeType":{"type":"string","description":"System volume type: Local or Ceph (only for System volumeType)","enum":["Local","Ceph"]}},"required":["mountPath","volumeType"]},"ResultObject":{"type":"object","properties":{"message":{"type":"string","description":"message"},"code":{"type":"integer","format":"int32","description":"code"},"data":{"description":"data"}}}}}}
```
# VMs
## Create VM
> Create VM
```json
{"openapi":"3.0.1","info":{"title":"默认模块","version":"1.0.0"},"tags":[{"name":"OpenapiVm"}],"security":[{}],"paths":{"/openapi/v1/vms/create":{"post":{"summary":"Create VM","deprecated":false,"description":"Create VM","operationId":"create_2","tags":["OpenapiVm"],"parameters":[],"requestBody":{"content":{"application/json":{"schema":{"$ref":"#/components/schemas/OpenapiInstanceRentRequest"}}},"required":true},"responses":{"200":{"description":"OK","content":{"*/*":{"schema":{"$ref":"#/components/schemas/ResultOpenapiInstanceDetailResponse"}}},"headers":{}},"400":{"description":"Bad Request","content":{"*/*":{"schema":{"$ref":"#/components/schemas/ResultObject"}}},"headers":{}},"500":{"description":"Internal Server Error","content":{"*/*":{"schema":{"$ref":"#/components/schemas/ResultObject"}}},"headers":{}}}}}},"components":{"schemas":{"OpenapiInstanceRentRequest":{"type":"object","description":"Instance Rent Request","properties":{"vmTypeId":{"type":"integer","format":"int32","description":"machine model type id"},"region":{"type":"string","description":"region"},"regionId":{"type":"integer","format":"int32"},"nickName":{"type":"string","maxLength":255,"minLength":1},"isSpot":{"type":"integer","format":"int32","description":"is spot instance, 0: on-demand, 1: spot","maximum":1,"minimum":0},"volumeMountPaths":{"type":"object","additionalProperties":{"type":"string"},"description":"Volume mount paths mapping: volumeId -> mountPath. If not specified, default path will be used.","properties":{}}},"required":["isSpot","nickName","region","vmTypeId"]},"ResultOpenapiInstanceDetailResponse":{"type":"object","properties":{"message":{"type":"string","description":"message"},"code":{"type":"integer","format":"int32","description":"code"},"data":{"$ref":"#/components/schemas/OpenapiInstanceDetailResponse","description":"data"}}},"OpenapiInstanceDetailResponse":{"type":"object","properties":{"id":{"type":"integer","format":"int64"},"orgId":{"type":"string"},"nickname":{"type":"string"},"gpuDisplayName":{"type":"string"},"ipAddress":{"type":"string"},"domainName":{"type":"string"},"cpuCores":{"type":"integer","format":"int32"},"memoryInGb":{"type":"string"},"gpuCount":{"type":"integer","format":"int32"},"gpuMemoryInGb":{"type":"string"},"region":{"type":"string"},"storageInGb":{"type":"string"},"notebookUrl":{"type":"string"},"sshTemplate":{"type":"string"},"status":{"type":"string"},"createdAt":{"type":"integer","format":"int64"},"terminatedAt":{"type":"integer","format":"int64"},"updatedAt":{"type":"integer","format":"int64"},"osInfo":{"type":"string"},"gpuType":{"type":"string"},"isSpot":{"type":"integer","format":"int32"}}},"ResultObject":{"type":"object","properties":{"message":{"type":"string","description":"message"},"code":{"type":"integer","format":"int32","description":"code"},"data":{"description":"data"}}}}}}
```
## Terminate VM
> Terminate VM
```json
{"openapi":"3.0.1","info":{"title":"默认模块","version":"1.0.0"},"tags":[{"name":"OpenapiVm"}],"security":[{}],"paths":{"/openapi/v1/vms/{vmId}/terminate":{"delete":{"summary":"Terminate VM","deprecated":false,"description":"Terminate VM","operationId":"terminateInstance","tags":["OpenapiVm"],"parameters":[{"name":"vmId","in":"path","description":"","required":true,"schema":{"type":"integer","format":"int64"}}],"responses":{"200":{"description":"OK","content":{"*/*":{"schema":{"$ref":"#/components/schemas/ResultObject"}}},"headers":{}},"400":{"description":"Bad Request","content":{"*/*":{"schema":{"$ref":"#/components/schemas/ResultObject"}}},"headers":{}},"500":{"description":"Internal Server Error","content":{"*/*":{"schema":{"$ref":"#/components/schemas/ResultObject"}}},"headers":{}},"11000":{"description":"Instance not exist","content":{"*/*":{"schema":{"$ref":"#/components/schemas/ResultBoolean"}}},"headers":{}},"11001":{"description":"Instance status invalid","content":{"*/*":{"schema":{"$ref":"#/components/schemas/ResultBoolean"}}},"headers":{}},"11002":{"description":"No terminate instance permissions","content":{"*/*":{"schema":{"$ref":"#/components/schemas/ResultBoolean"}}},"headers":{}},"12001":{"description":"Resource status invalid","content":{"*/*":{"schema":{"$ref":"#/components/schemas/ResultBoolean"}}},"headers":{}}}}}},"components":{"schemas":{"ResultObject":{"type":"object","properties":{"message":{"type":"string","description":"message"},"code":{"type":"integer","format":"int32","description":"code"},"data":{"description":"data"}}},"ResultBoolean":{"type":"object","properties":{"message":{"type":"string","description":"message"},"code":{"type":"integer","format":"int32","description":"code"},"data":{"type":"boolean","description":"data"}}}}}}
```
## Get available Instance ModelType
> Get available Instance ModelType
```json
{"openapi":"3.0.1","info":{"title":"默认模块","version":"1.0.0"},"tags":[{"name":"OpenapiVm"}],"security":[{}],"paths":{"/openapi/v1/vms/type":{"get":{"summary":"Get available Instance ModelType","deprecated":false,"description":"Get available Instance ModelType","operationId":"getAvailableMachineModelType_1","tags":["OpenapiVm"],"parameters":[],"responses":{"200":{"description":"OK","content":{"*/*":{"schema":{"$ref":"#/components/schemas/ResultListOpenapiVmsResponse"}}},"headers":{}},"400":{"description":"Bad Request","content":{"*/*":{"schema":{"$ref":"#/components/schemas/ResultObject"}}},"headers":{}},"404":{"description":"Not Found","content":{"*/*":{"schema":{"$ref":"#/components/schemas/ResultObject"}}},"headers":{}},"500":{"description":"Internal Server Error","content":{"*/*":{"schema":{"$ref":"#/components/schemas/ResultObject"}}},"headers":{}}}}}},"components":{"schemas":{"ResultListOpenapiVmsResponse":{"type":"object","properties":{"message":{"type":"string","description":"message"},"code":{"type":"integer","format":"int32","description":"code"},"data":{"type":"array","description":"data","items":{"$ref":"#/components/schemas/OpenapiVmsResponse"}}}},"OpenapiVmsResponse":{"type":"object","properties":{"gpuType":{"type":"string"},"regions":{"type":"array","items":{"$ref":"#/components/schemas/OpenapiVmsRegionsResponse"}}}},"OpenapiVmsRegionsResponse":{"type":"object","properties":{"region":{"type":"string"},"types":{"type":"array","items":{"$ref":"#/components/schemas/OpenapiVmsTypesResponse"}}}},"OpenapiVmsTypesResponse":{"type":"object","properties":{"vmTypeId":{"type":"integer","format":"int32"},"gpuCount":{"type":"integer","format":"int32"},"pricePerHour":{"type":"string"},"supportSpot":{"type":"integer","format":"int32"},"spotPricePerHour":{"type":"string"},"currency":{"type":"string"},"displayName":{"type":"string"},"cpuCores":{"type":"integer","format":"int32"},"memoryInGb":{"type":"string"},"gpuMemoryInGb":{"type":"string"},"gpuTotalMemoryInGb":{"type":"string"},"storageType":{"type":"string"},"storageCapacityInGb":{"type":"string"},"osName":{"type":"string"},"osVersion":{"type":"string"},"supportOnDemand":{"type":"integer","format":"int32"},"ondemandAvailable":{"type":"integer","format":"int32"},"spotAvailable":{"type":"integer","format":"int32"}}},"ResultObject":{"type":"object","properties":{"message":{"type":"string","description":"message"},"code":{"type":"integer","format":"int32","description":"code"},"data":{"description":"data"}}}}}}
```
## Get VM details
> Get VM details
```json
{"openapi":"3.0.1","info":{"title":"默认模块","version":"1.0.0"},"tags":[{"name":"OpenapiVm"}],"security":[{}],"paths":{"/openapi/v1/vms/{vmId}":{"get":{"summary":"Get VM details","deprecated":false,"description":"Get VM details","operationId":"getInstanceDetail","tags":["OpenapiVm"],"parameters":[{"name":"vmId","in":"path","description":"","required":true,"schema":{"type":"integer","format":"int64"}}],"responses":{"200":{"description":"OK","content":{"*/*":{"schema":{"$ref":"#/components/schemas/ResultOpenapiInstanceDetailResponse"}}},"headers":{}},"400":{"description":"Bad Request","content":{"*/*":{"schema":{"$ref":"#/components/schemas/ResultObject"}}},"headers":{}},"500":{"description":"Internal Server Error","content":{"*/*":{"schema":{"$ref":"#/components/schemas/ResultObject"}}},"headers":{}}}}}},"components":{"schemas":{"ResultOpenapiInstanceDetailResponse":{"type":"object","properties":{"message":{"type":"string","description":"message"},"code":{"type":"integer","format":"int32","description":"code"},"data":{"$ref":"#/components/schemas/OpenapiInstanceDetailResponse","description":"data"}}},"OpenapiInstanceDetailResponse":{"type":"object","properties":{"id":{"type":"integer","format":"int64"},"orgId":{"type":"string"},"nickname":{"type":"string"},"gpuDisplayName":{"type":"string"},"ipAddress":{"type":"string"},"domainName":{"type":"string"},"cpuCores":{"type":"integer","format":"int32"},"memoryInGb":{"type":"string"},"gpuCount":{"type":"integer","format":"int32"},"gpuMemoryInGb":{"type":"string"},"region":{"type":"string"},"storageInGb":{"type":"string"},"notebookUrl":{"type":"string"},"sshTemplate":{"type":"string"},"status":{"type":"string"},"createdAt":{"type":"integer","format":"int64"},"terminatedAt":{"type":"integer","format":"int64"},"updatedAt":{"type":"integer","format":"int64"},"osInfo":{"type":"string"},"gpuType":{"type":"string"},"isSpot":{"type":"integer","format":"int32"}}},"ResultObject":{"type":"object","properties":{"message":{"type":"string","description":"message"},"code":{"type":"integer","format":"int32","description":"code"},"data":{"description":"data"}}}}}}
```
## Get Org VM list
> Get Org VM list
```json
{"openapi":"3.0.1","info":{"title":"默认模块","version":"1.0.0"},"tags":[{"name":"OpenapiVm"}],"security":[{}],"paths":{"/openapi/v1/vms/list":{"post":{"summary":"Get Org VM list","deprecated":false,"description":"Get Org VM list","operationId":"getInstanceList","tags":["OpenapiVm"],"parameters":[],"requestBody":{"content":{"application/json":{"schema":{"$ref":"#/components/schemas/YottaPageRequestOpenapiInstanceSearchRequest"}}},"required":true},"responses":{"200":{"description":"OK","content":{"*/*":{"schema":{"$ref":"#/components/schemas/ResultOpenapiYottaPageResponseOpenapiInstanceResponse"}}},"headers":{}},"400":{"description":"Bad Request","content":{"*/*":{"schema":{"$ref":"#/components/schemas/ResultObject"}}},"headers":{}},"500":{"description":"Internal Server Error","content":{"*/*":{"schema":{"$ref":"#/components/schemas/ResultObject"}}},"headers":{}}}}}},"components":{"schemas":{"YottaPageRequestOpenapiInstanceSearchRequest":{"type":"object","description":"Yotta Page Request","properties":{"search":{"$ref":"#/components/schemas/OpenapiInstanceSearchRequest","description":"The search data is empty and {} needs to be transmitted"},"pageNumber":{"type":"integer","format":"int64","description":"Yotta pageNumber","minimum":1},"pageSize":{"type":"integer","format":"int64","description":"Yotta pageSize","minimum":1},"pageMark":{"type":"integer","format":"int64","description":"Yotta pageMark for cursor-based pagination"},"totalPage":{"type":"integer","format":"int64","description":"Yotta totalPage"},"totalRow":{"type":"integer","format":"int64","description":"Yotta totalRow"},"nextPage":{"type":"boolean","description":"Next Page"}},"required":["pageNumber","pageSize","search"]},"OpenapiInstanceSearchRequest":{"type":"object","description":"Instance Search Request","properties":{"status":{"type":"string","description":"Status for filtering by multiple statuses @see InstanceStatusEnum"}}},"ResultOpenapiYottaPageResponseOpenapiInstanceResponse":{"type":"object","properties":{"message":{"type":"string","description":"message"},"code":{"type":"integer","format":"int32","description":"code"},"data":{"$ref":"#/components/schemas/OpenapiYottaPageResponseOpenapiInstanceResponse","description":"data"}}},"OpenapiYottaPageResponseOpenapiInstanceResponse":{"type":"object","properties":{"records":{"type":"array","items":{"$ref":"#/components/schemas/OpenapiInstanceResponse"}},"pageNumber":{"type":"integer","format":"int64"},"pageSize":{"type":"integer","format":"int64"},"totalPage":{"type":"integer","format":"int64"},"totalRow":{"type":"integer","format":"int64"}}},"OpenapiInstanceResponse":{"type":"object","properties":{"id":{"type":"integer","format":"int64"},"orgId":{"type":"string"},"nickname":{"type":"string"},"gpuDisplayName":{"type":"string"},"ipAddress":{"type":"string"},"domainName":{"type":"string"},"cpuCores":{"type":"integer","format":"int32"},"memoryInGb":{"type":"string"},"gpuCount":{"type":"integer","format":"int32"},"gpuMemoryInGb":{"type":"string"},"region":{"type":"string","description":"0: US"},"storageInGb":{"type":"string"},"notebookUrl":{"type":"string"},"sshTemplate":{"type":"string"},"status":{"type":"string"},"createdAt":{"type":"integer","format":"int64"},"terminatedAt":{"type":"integer","format":"int64"},"updatedAt":{"type":"integer","format":"int64"},"osInfo":{"type":"string"},"gpuType":{"type":"string"},"isSpot":{"type":"integer","format":"int32"}}},"ResultObject":{"type":"object","properties":{"message":{"type":"string","description":"message"},"code":{"type":"integer","format":"int32","description":"code"},"data":{"description":"data"}}}}}}
```
# Serverless
## Create a Elastic deployment
> Create a Elastic deployment
```json
{"openapi":"3.0.1","info":{"title":"默认模块","version":"1.0.0"},"tags":[{"name":"OpenapiElasticDeployment"}],"security":[{}],"paths":{"/openapi/v1/elastic/deploy/create":{"post":{"summary":"Create a Elastic deployment","deprecated":false,"description":"Create a Elastic deployment","operationId":"endpointCreate","tags":["OpenapiElasticDeployment"],"parameters":[],"requestBody":{"content":{"application/json":{"schema":{"$ref":"#/components/schemas/OpenapiElasticCreateRequest"}}},"required":true},"responses":{"200":{"description":"OK","content":{"*/*":{"schema":{"$ref":"#/components/schemas/ResultOpenapiElasticDetailResponse"}}},"headers":{}},"400":{"description":"Bad Request","content":{"*/*":{"schema":{"$ref":"#/components/schemas/ResultObject"}}},"headers":{}},"500":{"description":"Internal Server Error","content":{"*/*":{"schema":{"$ref":"#/components/schemas/ResultObject"}}},"headers":{}}}}}},"components":{"schemas":{"OpenapiElasticCreateRequest":{"type":"object","description":"ElasticDeployCreateRequest","properties":{"name":{"type":"string","description":"Elastic Deployment Name","minLength":1,"pattern":"^(?=[A-Za-z])[A-Za-z0-9@._-]{1,50}$"},"imageRegistry":{"type":"string","description":"Image Registry Url"},"image":{"type":"string","description":"image","maxLength":255,"minLength":1},"resources":{"type":"array","description":"GPU resources","items":{"$ref":"#/components/schemas/OpenapiElasticResource"},"minItems":1},"minSingleCardVramInGb":{"type":"integer","format":"int32","description":"Min GPU Single Card VRAM(GB)","maximum":1536,"minimum":0},"minSingleCardVcpu":{"type":"integer","format":"int32","description":"Min GPU Single Card VCPU"},"minSingleCardRamInGb":{"type":"integer","format":"int32","description":"Min GPU Single Card RAM(GB)","maximum":1536,"minimum":0},"workers":{"type":"integer","format":"int32","description":"Workers","minimum":1},"credentialId":{"type":"string","description":"Credential Id"},"containerVolumeInGb":{"type":"integer","format":"int32","description":"Container volume(GB)","minimum":20},"initializationCommand":{"type":"string","description":"Initialization Command"},"environmentVars":{"type":"array","description":"Environment Variables","items":{"$ref":"#/components/schemas/KeyValuePairDTO"}},"expose":{"$ref":"#/components/schemas/OpenapiExposePort","description":"Expose"},"serviceMode":{"type":"string","description":"Service Mode(ALB,QUEUE,CUSTOM)","minLength":1},"webhookUrl":{"type":"string","description":"Webhook Url"}},"required":["containerVolumeInGb","image","name","resources","serviceMode","workers"]},"OpenapiElasticResource":{"type":"object","properties":{"region":{"type":"string","description":"Region","minLength":1},"gpuType":{"type":"string","description":"GPU Type","minLength":1},"gpuCount":{"type":"integer","format":"int32","description":"GPU Count"}},"required":["gpuCount","gpuType","region"]},"KeyValuePairDTO":{"type":"object","description":"KeyValuePairDTO","properties":{"key":{"type":"string","description":"key","minLength":1},"value":{"type":"string","description":"value","minLength":1}},"required":["key","value"]},"OpenapiExposePort":{"type":"object","description":"Expose","properties":{"port":{"type":"integer","format":"int32","description":"port","maximum":65535,"minimum":1},"protocol":{"type":"string","description":"protocol"}},"required":["port"]},"ResultOpenapiElasticDetailResponse":{"type":"object","properties":{"message":{"type":"string","description":"message"},"code":{"type":"integer","format":"int32","description":"code"},"data":{"$ref":"#/components/schemas/OpenapiElasticDetailResponse","description":"data"}}},"OpenapiElasticDetailResponse":{"type":"object","description":"ElasticDetail","properties":{"id":{"type":"string","description":"Elastic Deployment ID"},"name":{"type":"string"},"creator":{"type":"string"},"domain":{"type":"string"},"imageRegistry":{"type":"string"},"image":{"type":"string"},"resources":{"type":"array","items":{"$ref":"#/components/schemas/OpenapiElasticResourceResponse"}},"minSingleCardVramInGb":{"type":"integer","format":"int32"},"minSingleCardVcpu":{"type":"integer","format":"int32"},"minSingleCardRamInGb":{"type":"integer","format":"int32"},"credentialId":{"type":"integer","format":"int64"},"containerVolumeInGb":{"type":"integer","format":"int32"},"initializationCommand":{"type":"string"},"environmentVars":{"type":"array","items":{"$ref":"#/components/schemas/KeyValuePairDTO"}},"expose":{"$ref":"#/components/schemas/OpenapiExposePortResponse"},"totalWorkers":{"type":"integer","format":"int32"},"runningWorkers":{"type":"integer","format":"int32"},"cost":{"type":"number"},"perSecondPrice":{"type":"number"},"perHourPrice":{"type":"number"},"serviceMode":{"type":"string"},"webhookUrl":{"type":"string"},"status":{"type":"string"}}},"OpenapiElasticResourceResponse":{"type":"object","description":"ElasticResource","properties":{"region":{"type":"string","description":"Region"},"regionDisplayName":{"type":"string","description":"Region Display Name"},"gpuType":{"type":"string","description":"GPU Type"},"gpuDisplayName":{"type":"string","description":"GPU DisplayName"},"gpuCount":{"type":"integer","format":"int32","description":"GPU Count"},"singleCardVramInGb":{"type":"integer","format":"int32","description":"GPU Single Card VRAM(GB)"},"singleCardVcpu":{"type":"integer","format":"int32","description":"GPU Single Card VCPU"},"singleCardRamInGb":{"type":"integer","format":"int32","description":"GPU Single Card RAM(GB)"}}},"OpenapiExposePortResponse":{"type":"object","description":"ElasticExpose","properties":{"port":{"type":"integer","format":"int32","description":"port"},"protocol":{"type":"string","description":"protocol"}}},"ResultObject":{"type":"object","properties":{"message":{"type":"string","description":"message"},"code":{"type":"integer","format":"int32","description":"code"},"data":{"description":"data"}}}}}}
```
## Update a Elastic deployment
> Update a specific Elastic deployment
```json
{"openapi":"3.0.1","info":{"title":"默认模块","version":"1.0.0"},"tags":[{"name":"OpenapiElasticDeployment"}],"security":[{}],"paths":{"/openapi/v1/elastic/deploy/{id}/update":{"post":{"summary":"Update a Elastic deployment","deprecated":false,"description":"Update a specific Elastic deployment","operationId":"endpointUpdate","tags":["OpenapiElasticDeployment"],"parameters":[{"name":"id","in":"path","description":"","required":true,"schema":{"type":"integer","format":"int64"}}],"requestBody":{"content":{"application/json":{"schema":{"$ref":"#/components/schemas/OpenapiElasticUpdateRequest"}}},"required":true},"responses":{"200":{"description":"OK","content":{"*/*":{"schema":{"$ref":"#/components/schemas/ResultOpenapiElasticDetailResponse"}}},"headers":{}},"400":{"description":"Bad Request","content":{"*/*":{"schema":{"$ref":"#/components/schemas/ResultObject"}}},"headers":{}},"500":{"description":"Internal Server Error","content":{"*/*":{"schema":{"$ref":"#/components/schemas/ResultObject"}}},"headers":{}}}}}},"components":{"schemas":{"OpenapiElasticUpdateRequest":{"type":"object","description":"ElasticDeployUpdateRequest","properties":{"name":{"type":"string","description":"Elastic Deployment Name","minLength":1,"pattern":"^(?=[A-Za-z])[A-Za-z0-9@._-]{1,50}$"},"resources":{"type":"array","description":"GPU resources","items":{"$ref":"#/components/schemas/OpenapiElasticResource"},"minItems":1},"minSingleCardVramInGb":{"type":"integer","format":"int32","description":"Min GPU Single Card VRAM(GB)"},"minSingleCardVcpu":{"type":"integer","format":"int32","description":"Min GPU Single Card VCPU"},"minSingleCardRamInGb":{"type":"integer","format":"int32","description":"Min GPU Single Card RAM(GB)"},"workers":{"type":"integer","format":"int32","description":"Workers","minimum":1},"credentialId":{"type":"string","description":"Credential Id"},"containerVolumeInGb":{"type":"integer","format":"int32","description":"Container volume(GB)","minimum":20},"initializationCommand":{"type":"string","description":"Initialization Command"},"environmentVars":{"type":"array","description":"Environment Variables","items":{"$ref":"#/components/schemas/KeyValuePairDTO"}},"expose":{"$ref":"#/components/schemas/OpenapiExposePort","description":"Expose"},"webhookUrl":{"type":"string","description":"Webhook Url"}},"required":["containerVolumeInGb","name","resources","workers"]},"OpenapiElasticResource":{"type":"object","properties":{"region":{"type":"string","description":"Region","minLength":1},"gpuType":{"type":"string","description":"GPU Type","minLength":1},"gpuCount":{"type":"integer","format":"int32","description":"GPU Count"}},"required":["gpuCount","gpuType","region"]},"KeyValuePairDTO":{"type":"object","description":"KeyValuePairDTO","properties":{"key":{"type":"string","description":"key","minLength":1},"value":{"type":"string","description":"value","minLength":1}},"required":["key","value"]},"OpenapiExposePort":{"type":"object","description":"Expose","properties":{"port":{"type":"integer","format":"int32","description":"port","maximum":65535,"minimum":1},"protocol":{"type":"string","description":"protocol"}},"required":["port"]},"ResultOpenapiElasticDetailResponse":{"type":"object","properties":{"message":{"type":"string","description":"message"},"code":{"type":"integer","format":"int32","description":"code"},"data":{"$ref":"#/components/schemas/OpenapiElasticDetailResponse","description":"data"}}},"OpenapiElasticDetailResponse":{"type":"object","description":"ElasticDetail","properties":{"id":{"type":"string","description":"Elastic Deployment ID"},"name":{"type":"string"},"creator":{"type":"string"},"domain":{"type":"string"},"imageRegistry":{"type":"string"},"image":{"type":"string"},"resources":{"type":"array","items":{"$ref":"#/components/schemas/OpenapiElasticResourceResponse"}},"minSingleCardVramInGb":{"type":"integer","format":"int32"},"minSingleCardVcpu":{"type":"integer","format":"int32"},"minSingleCardRamInGb":{"type":"integer","format":"int32"},"credentialId":{"type":"integer","format":"int64"},"containerVolumeInGb":{"type":"integer","format":"int32"},"initializationCommand":{"type":"string"},"environmentVars":{"type":"array","items":{"$ref":"#/components/schemas/KeyValuePairDTO"}},"expose":{"$ref":"#/components/schemas/OpenapiExposePortResponse"},"totalWorkers":{"type":"integer","format":"int32"},"runningWorkers":{"type":"integer","format":"int32"},"cost":{"type":"number"},"perSecondPrice":{"type":"number"},"perHourPrice":{"type":"number"},"serviceMode":{"type":"string"},"webhookUrl":{"type":"string"},"status":{"type":"string"}}},"OpenapiElasticResourceResponse":{"type":"object","description":"ElasticResource","properties":{"region":{"type":"string","description":"Region"},"regionDisplayName":{"type":"string","description":"Region Display Name"},"gpuType":{"type":"string","description":"GPU Type"},"gpuDisplayName":{"type":"string","description":"GPU DisplayName"},"gpuCount":{"type":"integer","format":"int32","description":"GPU Count"},"singleCardVramInGb":{"type":"integer","format":"int32","description":"GPU Single Card VRAM(GB)"},"singleCardVcpu":{"type":"integer","format":"int32","description":"GPU Single Card VCPU"},"singleCardRamInGb":{"type":"integer","format":"int32","description":"GPU Single Card RAM(GB)"}}},"OpenapiExposePortResponse":{"type":"object","description":"ElasticExpose","properties":{"port":{"type":"integer","format":"int32","description":"port"},"protocol":{"type":"string","description":"protocol"}}},"ResultObject":{"type":"object","properties":{"message":{"type":"string","description":"message"},"code":{"type":"integer","format":"int32","description":"code"},"data":{"description":"data"}}}}}}
```
## Stop a Elastic deployment
> Stop a specific Elastic deployment
```json
{"openapi":"3.0.1","info":{"title":"默认模块","version":"1.0.0"},"tags":[{"name":"OpenapiElasticDeployment"}],"security":[{}],"paths":{"/openapi/v1/elastic/deploy/{id}/stop":{"post":{"summary":"Stop a Elastic deployment","deprecated":false,"description":"Stop a specific Elastic deployment","operationId":"endpointStop","tags":["OpenapiElasticDeployment"],"parameters":[{"name":"id","in":"path","description":"","required":true,"schema":{"type":"integer","format":"int64"}}],"responses":{"200":{"description":"OK","content":{"*/*":{"schema":{"$ref":"#/components/schemas/ResultVoid"}}},"headers":{}},"400":{"description":"Bad Request","content":{"*/*":{"schema":{"$ref":"#/components/schemas/ResultObject"}}},"headers":{}},"500":{"description":"Internal Server Error","content":{"*/*":{"schema":{"$ref":"#/components/schemas/ResultObject"}}},"headers":{}}}}}},"components":{"schemas":{"ResultVoid":{"type":"object","properties":{"message":{"type":"string","description":"message"},"code":{"type":"integer","format":"int32","description":"code"},"data":{"description":"data"}}},"ResultObject":{"type":"object","properties":{"message":{"type":"string","description":"message"},"code":{"type":"integer","format":"int32","description":"code"},"data":{"description":"data"}}}}}}
```
## Scale Elastic Deployment Workers
> Adjust the number of workers for a specific elastic deployment.
```json
{"openapi":"3.0.1","info":{"title":"默认模块","version":"1.0.0"},"tags":[{"name":"OpenapiElasticDeployment"}],"security":[{}],"paths":{"/openapi/v1/elastic/deploy/{id}/workers":{"post":{"summary":"Scale Elastic Deployment Workers","deprecated":false,"description":"Adjust the number of workers for a specific elastic deployment.","operationId":"endpointScale","tags":["OpenapiElasticDeployment"],"parameters":[{"name":"id","in":"path","description":"","required":true,"schema":{"type":"integer","format":"int64"}}],"requestBody":{"content":{"application/json":{"schema":{"$ref":"#/components/schemas/OpenapiElasticWorkerScaleRequest"}}},"required":true},"responses":{"200":{"description":"OK","content":{"*/*":{"schema":{"$ref":"#/components/schemas/ResultVoid"}}},"headers":{}},"400":{"description":"Bad Request","content":{"*/*":{"schema":{"$ref":"#/components/schemas/ResultObject"}}},"headers":{}},"500":{"description":"Internal Server Error","content":{"*/*":{"schema":{"$ref":"#/components/schemas/ResultObject"}}},"headers":{}}}}}},"components":{"schemas":{"OpenapiElasticWorkerScaleRequest":{"type":"object","description":"OpenapiScaleWorkersRequest","properties":{"workers":{"type":"integer","format":"int32","description":"workers"}},"required":["workers"]},"ResultVoid":{"type":"object","properties":{"message":{"type":"string","description":"message"},"code":{"type":"integer","format":"int32","description":"code"},"data":{"description":"data"}}},"ResultObject":{"type":"object","properties":{"message":{"type":"string","description":"message"},"code":{"type":"integer","format":"int32","description":"code"},"data":{"description":"data"}}}}}}
```
## Start or resume a Elastic deployment
> Start or resume a specific Elastic deployment
```json
{"openapi":"3.0.1","info":{"title":"默认模块","version":"1.0.0"},"tags":[{"name":"OpenapiElasticDeployment"}],"security":[{}],"paths":{"/openapi/v1/elastic/deploy/{id}/start":{"post":{"summary":"Start or resume a Elastic deployment","deprecated":false,"description":"Start or resume a specific Elastic deployment","operationId":"endpointStart","tags":["OpenapiElasticDeployment"],"parameters":[{"name":"id","in":"path","description":"","required":true,"schema":{"type":"integer","format":"int64"}}],"responses":{"200":{"description":"OK","content":{"*/*":{"schema":{"$ref":"#/components/schemas/ResultVoid"}}},"headers":{}},"400":{"description":"Bad Request","content":{"*/*":{"schema":{"$ref":"#/components/schemas/ResultObject"}}},"headers":{}},"500":{"description":"Internal Server Error","content":{"*/*":{"schema":{"$ref":"#/components/schemas/ResultObject"}}},"headers":{}}}}}},"components":{"schemas":{"ResultVoid":{"type":"object","properties":{"message":{"type":"string","description":"message"},"code":{"type":"integer","format":"int32","description":"code"},"data":{"description":"data"}}},"ResultObject":{"type":"object","properties":{"message":{"type":"string","description":"message"},"code":{"type":"integer","format":"int32","description":"code"},"data":{"description":"data"}}}}}}
```
## Delete a Elastic deployment
> Delete a specific Elastic deployment
```json
{"openapi":"3.0.1","info":{"title":"默认模块","version":"1.0.0"},"tags":[{"name":"OpenapiElasticDeployment"}],"security":[{}],"paths":{"/openapi/v1/elastic/deploy/{id}":{"delete":{"summary":"Delete a Elastic deployment","deprecated":false,"description":"Delete a specific Elastic deployment","operationId":"endpointDelete_2","tags":["OpenapiElasticDeployment"],"parameters":[{"name":"id","in":"path","description":"","required":true,"schema":{"type":"integer","format":"int64"}}],"responses":{"200":{"description":"OK","content":{"*/*":{"schema":{"$ref":"#/components/schemas/ResultVoid"}}},"headers":{}},"400":{"description":"Bad Request","content":{"*/*":{"schema":{"$ref":"#/components/schemas/ResultObject"}}},"headers":{}},"500":{"description":"Internal Server Error","content":{"*/*":{"schema":{"$ref":"#/components/schemas/ResultObject"}}},"headers":{}}}}}},"components":{"schemas":{"ResultVoid":{"type":"object","properties":{"message":{"type":"string","description":"message"},"code":{"type":"integer","format":"int32","description":"code"},"data":{"description":"data"}}},"ResultObject":{"type":"object","properties":{"message":{"type":"string","description":"message"},"code":{"type":"integer","format":"int32","description":"code"},"data":{"description":"data"}}}}}}
```
## Get all Elastic deployments
> Get all Elastic deployments list
```json
{"openapi":"3.0.1","info":{"title":"默认模块","version":"1.0.0"},"tags":[{"name":"OpenapiElasticDeployment"}],"security":[{}],"paths":{"/openapi/v1/elastic/deploy/list":{"get":{"summary":"Get all Elastic deployments","deprecated":false,"description":"Get all Elastic deployments list","operationId":"endpointList_1","tags":["OpenapiElasticDeployment"],"parameters":[{"name":"statusList","in":"query","description":"","required":false,"schema":{"type":"array","items":{"type":"string"},"uniqueItems":true}}],"responses":{"200":{"description":"OK","content":{"*/*":{"schema":{"$ref":"#/components/schemas/ResultListOpenapiElasticDetailResponse"}}},"headers":{}},"400":{"description":"Bad Request","content":{"*/*":{"schema":{"$ref":"#/components/schemas/ResultObject"}}},"headers":{}},"500":{"description":"Internal Server Error","content":{"*/*":{"schema":{"$ref":"#/components/schemas/ResultObject"}}},"headers":{}}}}}},"components":{"schemas":{"ResultListOpenapiElasticDetailResponse":{"type":"object","properties":{"message":{"type":"string","description":"message"},"code":{"type":"integer","format":"int32","description":"code"},"data":{"type":"array","description":"data","items":{"$ref":"#/components/schemas/OpenapiElasticDetailResponse"}}}},"OpenapiElasticDetailResponse":{"type":"object","description":"ElasticDetail","properties":{"id":{"type":"string","description":"Elastic Deployment ID"},"name":{"type":"string"},"creator":{"type":"string"},"domain":{"type":"string"},"imageRegistry":{"type":"string"},"image":{"type":"string"},"resources":{"type":"array","items":{"$ref":"#/components/schemas/OpenapiElasticResourceResponse"}},"minSingleCardVramInGb":{"type":"integer","format":"int32"},"minSingleCardVcpu":{"type":"integer","format":"int32"},"minSingleCardRamInGb":{"type":"integer","format":"int32"},"credentialId":{"type":"integer","format":"int64"},"containerVolumeInGb":{"type":"integer","format":"int32"},"initializationCommand":{"type":"string"},"environmentVars":{"type":"array","items":{"$ref":"#/components/schemas/KeyValuePairDTO"}},"expose":{"$ref":"#/components/schemas/OpenapiExposePortResponse"},"totalWorkers":{"type":"integer","format":"int32"},"runningWorkers":{"type":"integer","format":"int32"},"cost":{"type":"number"},"perSecondPrice":{"type":"number"},"perHourPrice":{"type":"number"},"serviceMode":{"type":"string"},"webhookUrl":{"type":"string"},"status":{"type":"string"}}},"OpenapiElasticResourceResponse":{"type":"object","description":"ElasticResource","properties":{"region":{"type":"string","description":"Region"},"regionDisplayName":{"type":"string","description":"Region Display Name"},"gpuType":{"type":"string","description":"GPU Type"},"gpuDisplayName":{"type":"string","description":"GPU DisplayName"},"gpuCount":{"type":"integer","format":"int32","description":"GPU Count"},"singleCardVramInGb":{"type":"integer","format":"int32","description":"GPU Single Card VRAM(GB)"},"singleCardVcpu":{"type":"integer","format":"int32","description":"GPU Single Card VCPU"},"singleCardRamInGb":{"type":"integer","format":"int32","description":"GPU Single Card RAM(GB)"}}},"KeyValuePairDTO":{"type":"object","description":"KeyValuePairDTO","properties":{"key":{"type":"string","description":"key","minLength":1},"value":{"type":"string","description":"value","minLength":1}},"required":["key","value"]},"OpenapiExposePortResponse":{"type":"object","description":"ElasticExpose","properties":{"port":{"type":"integer","format":"int32","description":"port"},"protocol":{"type":"string","description":"protocol"}}},"ResultObject":{"type":"object","properties":{"message":{"type":"string","description":"message"},"code":{"type":"integer","format":"int32","description":"code"},"data":{"description":"data"}}}}}}
```
## Query worker logs
> Query worker logs with pagination
```json
{"openapi":"3.0.1","info":{"title":"默认模块","version":"1.0.0"},"tags":[{"name":"OpenapiElasticDeployment"}],"security":[{}],"paths":{"/openapi/v1/elastic/deploy/{id}/workers/{workerId}/logs":{"get":{"summary":"Query worker logs","deprecated":false,"description":"Query worker logs with pagination","operationId":"queryWorkerLogs","tags":["OpenapiElasticDeployment"],"parameters":[{"name":"id","in":"path","description":"","required":true,"schema":{"type":"integer","format":"int64"}},{"name":"workerId","in":"path","description":"","required":true,"schema":{"type":"integer","format":"int64"}},{"name":"pageSize","in":"query","description":"","required":false,"schema":{"type":"integer","format":"int32","default":100}},{"name":"keyword","in":"query","description":"","required":false,"schema":{"type":"string"}},{"name":"startTime","in":"query","description":"","required":false,"schema":{"type":"string"}},{"name":"endTime","in":"query","description":"","required":false,"schema":{"type":"string"}},{"name":"searchAfterTime","in":"query","description":"","required":false,"schema":{"type":"string"}},{"name":"searchAfterOffset","in":"query","description":"","required":false,"schema":{"type":"integer","format":"int64"}},{"name":"direction","in":"query","description":"","required":false,"schema":{"type":"string"}}],"responses":{"200":{"description":"OK","content":{"*/*":{"schema":{"$ref":"#/components/schemas/ResultOpenapiLogResponse"}}},"headers":{}},"400":{"description":"Bad Request","content":{"*/*":{"schema":{"$ref":"#/components/schemas/ResultObject"}}},"headers":{}},"500":{"description":"Internal Server Error","content":{"*/*":{"schema":{"$ref":"#/components/schemas/ResultObject"}}},"headers":{}}}}}},"components":{"schemas":{"ResultOpenapiLogResponse":{"type":"object","properties":{"message":{"type":"string","description":"message"},"code":{"type":"integer","format":"int32","description":"code"},"data":{"$ref":"#/components/schemas/OpenapiLogResponse","description":"data"}}},"OpenapiLogResponse":{"type":"object","properties":{"logs":{"type":"array","items":{"$ref":"#/components/schemas/Log"}},"hasMore":{"type":"boolean"},"nextSearchAfterTime":{"type":"string"},"nextSearchAfterOffset":{"type":"string"}}},"Log":{"type":"object","properties":{"timestamp":{"type":"string"},"log":{"type":"string"},"offset":{"type":"integer","format":"int64"}}},"ResultObject":{"type":"object","properties":{"message":{"type":"string","description":"message"},"code":{"type":"integer","format":"int32","description":"code"},"data":{"description":"data"}}}}}}
```
## Get Elastic deployment detail
> Retrieve detailed information of a specific elastic deployment by ID.
```json
{"openapi":"3.0.1","info":{"title":"默认模块","version":"1.0.0"},"tags":[{"name":"OpenapiElasticDeployment"}],"security":[{}],"paths":{"/openapi/v1/elastic/deploy/{id}":{"get":{"summary":"Get Elastic deployment detail","deprecated":false,"description":"Retrieve detailed information of a specific elastic deployment by ID.","operationId":"endpointDetail","tags":["OpenapiElasticDeployment"],"parameters":[{"name":"id","in":"path","description":"","required":true,"schema":{"type":"integer","format":"int64"}}],"responses":{"200":{"description":"OK","content":{"*/*":{"schema":{"$ref":"#/components/schemas/ResultOpenapiElasticDetailResponse"}}},"headers":{}},"400":{"description":"Bad Request","content":{"*/*":{"schema":{"$ref":"#/components/schemas/ResultObject"}}},"headers":{}},"500":{"description":"Internal Server Error","content":{"*/*":{"schema":{"$ref":"#/components/schemas/ResultObject"}}},"headers":{}}}}}},"components":{"schemas":{"ResultOpenapiElasticDetailResponse":{"type":"object","properties":{"message":{"type":"string","description":"message"},"code":{"type":"integer","format":"int32","description":"code"},"data":{"$ref":"#/components/schemas/OpenapiElasticDetailResponse","description":"data"}}},"OpenapiElasticDetailResponse":{"type":"object","description":"ElasticDetail","properties":{"id":{"type":"string","description":"Elastic Deployment ID"},"name":{"type":"string"},"creator":{"type":"string"},"domain":{"type":"string"},"imageRegistry":{"type":"string"},"image":{"type":"string"},"resources":{"type":"array","items":{"$ref":"#/components/schemas/OpenapiElasticResourceResponse"}},"minSingleCardVramInGb":{"type":"integer","format":"int32"},"minSingleCardVcpu":{"type":"integer","format":"int32"},"minSingleCardRamInGb":{"type":"integer","format":"int32"},"credentialId":{"type":"integer","format":"int64"},"containerVolumeInGb":{"type":"integer","format":"int32"},"initializationCommand":{"type":"string"},"environmentVars":{"type":"array","items":{"$ref":"#/components/schemas/KeyValuePairDTO"}},"expose":{"$ref":"#/components/schemas/OpenapiExposePortResponse"},"totalWorkers":{"type":"integer","format":"int32"},"runningWorkers":{"type":"integer","format":"int32"},"cost":{"type":"number"},"perSecondPrice":{"type":"number"},"perHourPrice":{"type":"number"},"serviceMode":{"type":"string"},"webhookUrl":{"type":"string"},"status":{"type":"string"}}},"OpenapiElasticResourceResponse":{"type":"object","description":"ElasticResource","properties":{"region":{"type":"string","description":"Region"},"regionDisplayName":{"type":"string","description":"Region Display Name"},"gpuType":{"type":"string","description":"GPU Type"},"gpuDisplayName":{"type":"string","description":"GPU DisplayName"},"gpuCount":{"type":"integer","format":"int32","description":"GPU Count"},"singleCardVramInGb":{"type":"integer","format":"int32","description":"GPU Single Card VRAM(GB)"},"singleCardVcpu":{"type":"integer","format":"int32","description":"GPU Single Card VCPU"},"singleCardRamInGb":{"type":"integer","format":"int32","description":"GPU Single Card RAM(GB)"}}},"KeyValuePairDTO":{"type":"object","description":"KeyValuePairDTO","properties":{"key":{"type":"string","description":"key","minLength":1},"value":{"type":"string","description":"value","minLength":1}},"required":["key","value"]},"OpenapiExposePortResponse":{"type":"object","description":"ElasticExpose","properties":{"port":{"type":"integer","format":"int32","description":"port"},"protocol":{"type":"string","description":"protocol"}}},"ResultObject":{"type":"object","properties":{"message":{"type":"string","description":"message"},"code":{"type":"integer","format":"int32","description":"code"},"data":{"description":"data"}}}}}}
```
## Get all workers of a Elastic deployment
> Get all workers of a specific Elastic deployment
```json
{"openapi":"3.0.1","info":{"title":"默认模块","version":"1.0.0"},"tags":[{"name":"OpenapiElasticDeployment"}],"security":[{}],"paths":{"/openapi/v1/elastic/deploy/{id}/workers":{"get":{"summary":"Get all workers of a Elastic deployment","deprecated":false,"description":"Get all workers of a specific Elastic deployment","operationId":"endpointWorkers","tags":["OpenapiElasticDeployment"],"parameters":[{"name":"id","in":"path","description":"","required":true,"schema":{"type":"integer","format":"int64"}},{"name":"statusList","in":"query","description":"","required":false,"schema":{"type":"array","items":{"type":"string"},"uniqueItems":true}}],"responses":{"200":{"description":"OK","content":{"*/*":{"schema":{"$ref":"#/components/schemas/ResultListOpenapiElasticWorkerResponse"}}},"headers":{}},"400":{"description":"Bad Request","content":{"*/*":{"schema":{"$ref":"#/components/schemas/ResultObject"}}},"headers":{}},"500":{"description":"Internal Server Error","content":{"*/*":{"schema":{"$ref":"#/components/schemas/ResultObject"}}},"headers":{}}}}}},"components":{"schemas":{"ResultListOpenapiElasticWorkerResponse":{"type":"object","properties":{"message":{"type":"string","description":"message"},"code":{"type":"integer","format":"int32","description":"code"},"data":{"type":"array","description":"data","items":{"$ref":"#/components/schemas/OpenapiElasticWorkerResponse"}}}},"OpenapiElasticWorkerResponse":{"type":"object","description":"ElasticWorker","properties":{"id":{"type":"string","description":"Worker ID"},"region":{"type":"string","description":"Region"},"regionDisplayName":{"type":"string","description":"Region Display Name"},"gpuType":{"type":"string","description":"GPU Type"},"gpuDisplayName":{"type":"string","description":"GPU DisplayName"},"gpuCount":{"type":"integer","format":"int32","description":"GPU Count"},"singleCardVramInGb":{"type":"integer","format":"int32","description":"GPU Single Card VRAM(GB)"},"singleCardVcpu":{"type":"integer","format":"int32","description":"GPU Single Card VCPU"},"singleCardRamInGb":{"type":"integer","format":"int32","description":"GPU Single Card RAM(GB)"},"uptime":{"type":"integer","format":"int64","description":"Uptime(Milliseconds)"},"cost":{"type":"number","description":"Cost(Dollars)"},"status":{"type":"string","description":"Status"}}},"ResultObject":{"type":"object","properties":{"message":{"type":"string","description":"message"},"code":{"type":"integer","format":"int32","description":"code"},"data":{"description":"data"}}}}}}
```
# API Reference - v2
# Credentials
## Create credential
> Create a new container registry credential
```json
{"openapi":"3.0.1","info":{"title":"默认模块","version":"1.0.0"},"tags":[{"name":"API v2"},{"name":"Credentials v2"}],"security":[{}],"paths":{"/v2/container-registry-auths":{"post":{"summary":"Create credential","deprecated":false,"description":"Create a new container registry credential","operationId":"createCredential","tags":["Credentials v2","API v2"],"parameters":[],"requestBody":{"content":{"application/json":{"schema":{"$ref":"#/components/schemas/CredentialV2CreateRequest"}}},"required":true},"responses":{"200":{"description":"OK","content":{"*/*":{"schema":{"$ref":"#/components/schemas/ResultCredentialV2Response"}}},"headers":{}},"400":{"description":"Invalid request","content":{"*/*":{"schema":{"$ref":"#/components/schemas/Result"}}},"headers":{}},"500":{"description":"Internal Server Error","content":{"*/*":{"schema":{"$ref":"#/components/schemas/Result"}}},"headers":{}}}}}},"components":{"schemas":{"CredentialV2CreateRequest":{"type":"object","description":"Container Registry Credential Create Request (v2)","properties":{"name":{"type":"string","description":"Credential name (1-20 chars, starts with letter)","minLength":1,"pattern":"^(?=[A-Za-z])[A-Za-z0-9@._-]{1,20}$"},"username":{"type":"string","description":"Registry username","maxLength":255,"minLength":1},"password":{"type":"string","description":"Registry password/token","maxLength":255,"minLength":1}},"required":["name","password","username"]},"ResultCredentialV2Response":{"type":"object","properties":{"message":{"type":"string","description":"message"},"code":{"type":"integer","format":"int32","description":"code"},"data":{"$ref":"#/components/schemas/CredentialV2Response","description":"data"}}},"CredentialV2Response":{"type":"object","description":"Container Registry Credential Response (v2)","properties":{"id":{"type":"integer","format":"int64","description":"Credential ID"},"name":{"type":"string","description":"Credential name"}}},"Result":{"type":"object","properties":{"message":{"type":"string","description":"message"},"code":{"type":"integer","format":"int32","description":"code"},"data":{"description":"data"}}}}}}
```
## Delete credential
> Delete a credential
```json
{"openapi":"3.0.1","info":{"title":"默认模块","version":"1.0.0"},"tags":[{"name":"API v2"},{"name":"Credentials v2"}],"security":[{}],"paths":{"/v2/container-registry-auths/{id}":{"delete":{"summary":"Delete credential","deprecated":false,"description":"Delete a credential","operationId":"deleteCredential","tags":["Credentials v2","API v2"],"parameters":[{"name":"id","in":"path","description":"","required":true,"schema":{"type":"integer","format":"int64"}}],"responses":{"200":{"description":"Credential deleted","content":{"*/*":{"schema":{"$ref":"#/components/schemas/ResultVoid"}}},"headers":{}},"400":{"description":"Bad Request","content":{"*/*":{"schema":{"$ref":"#/components/schemas/Result"}}},"headers":{}},"409":{"description":"Credential in use","content":{"*/*":{"schema":{"$ref":"#/components/schemas/Result"}}},"headers":{}},"500":{"description":"Internal Server Error","content":{"*/*":{"schema":{"$ref":"#/components/schemas/Result"}}},"headers":{}}}}}},"components":{"schemas":{"ResultVoid":{"type":"object","properties":{"message":{"type":"string","description":"message"},"code":{"type":"integer","format":"int32","description":"code"},"data":{"description":"data"}}},"Result":{"type":"object","properties":{"message":{"type":"string","description":"message"},"code":{"type":"integer","format":"int32","description":"code"},"data":{"description":"data"}}}}}}
```
## Update credential
> Update an existing credential (partial update)
```json
{"openapi":"3.0.1","info":{"title":"默认模块","version":"1.0.0"},"tags":[{"name":"API v2"},{"name":"Credentials v2"}],"security":[{}],"paths":{"/v2/container-registry-auths/{id}":{"patch":{"summary":"Update credential","deprecated":false,"description":"Update an existing credential (partial update)","operationId":"updateCredential","tags":["Credentials v2","API v2"],"parameters":[{"name":"id","in":"path","description":"","required":true,"schema":{"type":"integer","format":"int64"}}],"requestBody":{"content":{"application/json":{"schema":{"$ref":"#/components/schemas/CredentialV2UpdateRequest"}}},"required":true},"responses":{"200":{"description":"Credential updated","content":{"*/*":{"schema":{"$ref":"#/components/schemas/ResultCredentialV2Response"}}},"headers":{}},"400":{"description":"Bad Request","content":{"*/*":{"schema":{"$ref":"#/components/schemas/Result"}}},"headers":{}},"404":{"description":"Credential not found","content":{"*/*":{"schema":{"$ref":"#/components/schemas/Result"}}},"headers":{}},"500":{"description":"Internal Server Error","content":{"*/*":{"schema":{"$ref":"#/components/schemas/Result"}}},"headers":{}}}}}},"components":{"schemas":{"CredentialV2UpdateRequest":{"type":"object","description":"Container Registry Credential Update Request (v2)","properties":{"name":{"type":"string","description":"Credential name (1-20 chars, starts with letter)","maxLength":20,"minLength":1},"username":{"type":"string","description":"Registry username","maxLength":255,"minLength":1},"password":{"type":"string","description":"Registry password/token","maxLength":255,"minLength":1}}},"ResultCredentialV2Response":{"type":"object","properties":{"message":{"type":"string","description":"message"},"code":{"type":"integer","format":"int32","description":"code"},"data":{"$ref":"#/components/schemas/CredentialV2Response","description":"data"}}},"CredentialV2Response":{"type":"object","description":"Container Registry Credential Response (v2)","properties":{"id":{"type":"integer","format":"int64","description":"Credential ID"},"name":{"type":"string","description":"Credential name"}}},"Result":{"type":"object","properties":{"message":{"type":"string","description":"message"},"code":{"type":"integer","format":"int32","description":"code"},"data":{"description":"data"}}}}}}
```
## Get credential
> Get details of a specific credential
```json
{"openapi":"3.0.1","info":{"title":"默认模块","version":"1.0.0"},"tags":[{"name":"API v2"},{"name":"Credentials v2"}],"security":[{}],"paths":{"/v2/container-registry-auths/{id}":{"get":{"summary":"Get credential","deprecated":false,"description":"Get details of a specific credential","operationId":"getCredential","tags":["Credentials v2","API v2"],"parameters":[{"name":"id","in":"path","description":"","required":true,"schema":{"type":"integer","format":"int64"}}],"responses":{"200":{"description":"Credential found","content":{"*/*":{"schema":{"$ref":"#/components/schemas/ResultCredentialV2Response"}}},"headers":{}},"400":{"description":"Bad Request","content":{"*/*":{"schema":{"$ref":"#/components/schemas/Result"}}},"headers":{}},"404":{"description":"Credential not found","content":{"*/*":{"schema":{"$ref":"#/components/schemas/Result"}}},"headers":{}},"500":{"description":"Internal Server Error","content":{"*/*":{"schema":{"$ref":"#/components/schemas/Result"}}},"headers":{}}}}}},"components":{"schemas":{"ResultCredentialV2Response":{"type":"object","properties":{"message":{"type":"string","description":"message"},"code":{"type":"integer","format":"int32","description":"code"},"data":{"$ref":"#/components/schemas/CredentialV2Response","description":"data"}}},"CredentialV2Response":{"type":"object","description":"Container Registry Credential Response (v2)","properties":{"id":{"type":"integer","format":"int64","description":"Credential ID"},"name":{"type":"string","description":"Credential name"}}},"Result":{"type":"object","properties":{"message":{"type":"string","description":"message"},"code":{"type":"integer","format":"int32","description":"code"},"data":{"description":"data"}}}}}}
```
## List credentials
> Get all credentials for your organization
```json
{"openapi":"3.0.1","info":{"title":"默认模块","version":"1.0.0"},"tags":[{"name":"API v2"},{"name":"Credentials v2"}],"security":[{}],"paths":{"/v2/container-registry-auths":{"get":{"summary":"List credentials","deprecated":false,"description":"Get all credentials for your organization","operationId":"listCredentials","tags":["Credentials v2","API v2"],"parameters":[],"responses":{"200":{"description":"OK","content":{"*/*":{"schema":{"$ref":"#/components/schemas/ResultListCredentialV2Response"}}},"headers":{}},"400":{"description":"Bad Request","content":{"*/*":{"schema":{"$ref":"#/components/schemas/Result"}}},"headers":{}},"500":{"description":"Internal Server Error","content":{"*/*":{"schema":{"$ref":"#/components/schemas/Result"}}},"headers":{}}}}}},"components":{"schemas":{"ResultListCredentialV2Response":{"type":"object","properties":{"message":{"type":"string","description":"message"},"code":{"type":"integer","format":"int32","description":"code"},"data":{"type":"array","description":"data","items":{"$ref":"#/components/schemas/CredentialV2Response"}}}},"CredentialV2Response":{"type":"object","description":"Container Registry Credential Response (v2)","properties":{"id":{"type":"integer","format":"int64","description":"Credential ID"},"name":{"type":"string","description":"Credential name"}}},"Result":{"type":"object","properties":{"message":{"type":"string","description":"message"},"code":{"type":"integer","format":"int32","description":"code"},"data":{"description":"data"}}}}}}
```
# Pods
## Create Pod
> Create a new pod
```json
{"openapi":"3.0.1","info":{"title":"默认模块","version":"1.0.0"},"tags":[{"name":"API v2"},{"name":"Pods v2"}],"security":[{}],"paths":{"/v2/pods":{"post":{"summary":"Create Pod","deprecated":false,"description":"Create a new pod","operationId":"createPod","tags":["API v2","Pods v2"],"parameters":[],"requestBody":{"content":{"application/json":{"schema":{"$ref":"#/components/schemas/PodV2CreateRequest"}}},"required":true},"responses":{"200":{"description":"OK","content":{"*/*":{"schema":{"$ref":"#/components/schemas/ResultPodV2Response"}}},"headers":{}},"400":{"description":"Bad Request","content":{"*/*":{"schema":{"$ref":"#/components/schemas/Result"}}},"headers":{}},"500":{"description":"Internal Server Error","content":{"*/*":{"schema":{"$ref":"#/components/schemas/Result"}}},"headers":{}},"10000":{"description":"Pod created successfully","content":{"*/*":{"schema":{"$ref":"#/components/schemas/ResultPodV2Response"}}},"headers":{}},"10001":{"description":"Invalid request parameters","content":{"*/*":{"schema":{"$ref":"#/components/schemas/Result"}}},"headers":{}}}}}},"components":{"schemas":{"PodV2CreateRequest":{"type":"object","description":"Pod Create Request v2","properties":{"regions":{"type":"array","description":"Acceptable region codes","items":{"type":"string"},"uniqueItems":true},"name":{"type":"string","description":"Pod name","maxLength":255,"minLength":1},"image":{"type":"string","description":"Docker image name","maxLength":255,"minLength":1},"containerRegistryAuthId":{"type":"integer","format":"int64","description":"Container registry auth ID"},"imageRegistry":{"type":"string","description":"Image registry URL","maxLength":255,"minLength":0},"imagePublicType":{"type":"string","description":"Image type: PUBLIC or PRIVATE","enum":["PUBLIC","PRIVATE"]},"resourceType":{"type":"string","description":"Resource type: GPU or CPU","enum":["GPU","CPU"]},"gpuType":{"type":"string","description":"GPU type","minLength":1},"gpuCount":{"type":"integer","format":"int32","description":"GPU count (must be power of 2)"},"isSpot":{"type":"boolean","description":"Create on Spot resource when true"},"maxPrice":{"type":"number","description":"Spot instance max hourly price cap for the whole machine; only valid when isSpot=true"},"shmInGb":{"type":"integer","format":"int32","description":"Shared memory size in GB"},"minSingleCardRamInGb":{"type":"integer","format":"int32","description":"Minimum single card RAM in GB"},"minSingleCardVramInGb":{"type":"integer","format":"int32","description":"Minimum single card VRAM in GB"},"minSingleCardVcpu":{"type":"integer","format":"int32","description":"Minimum single card vCPU count"},"containerVolumeInGb":{"type":"integer","format":"int32","description":"Container volume size in GB"},"initializationCommand":{"type":"string","description":"Initialization command"},"environmentVars":{"type":"array","description":"Environment variables","items":{"$ref":"#/components/schemas/KeyValuePairDTO"}},"expose":{"type":"array","description":"Ports to expose","items":{"$ref":"#/components/schemas/OpenapiPodExposePortRequest"}},"volumes":{"type":"array","description":"Existing volumes to mount","items":{"$ref":"#/components/schemas/PodV2VolumeRequest"}},"callbackUrl":{"type":"string","description":"Pod lifecycle webhook callback URL. When creating a Pod, you can provide a `callbackUrl` in the request body. The platform will send HTTP POST notifications to this URL whenever the Pod transitions into a key lifecycle state (RUNNING, TERMINATED, FAILED, or DEGRADED).","maxLength":512,"minLength":0}},"required":["gpuCount","gpuType","image","name"]},"KeyValuePairDTO":{"type":"object","description":"KeyValuePairDTO","properties":{"key":{"type":"string","description":"key","minLength":1},"value":{"type":"string","description":"value","minLength":1}},"required":["key","value"]},"OpenapiPodExposePortRequest":{"type":"object","description":"OpenapiPodExposePortRequest","properties":{"port":{"type":"integer","format":"int32","description":"port","maximum":65535,"minimum":0},"protocol":{"type":"string","description":"protocol","enum":["HTTP","TCP"]}},"required":["port"]},"PodV2VolumeRequest":{"type":"object","description":"Pod v2 volume mount request","properties":{"id":{"type":"string","description":"Volume ID returned by /v2/volumes, string to avoid JavaScript int64 precision loss","minLength":1},"mountPath":{"type":"string","description":"Mount path inside the container","minLength":1}},"required":["id","mountPath"]},"ResultPodV2Response":{"type":"object","properties":{"message":{"type":"string","description":"message"},"code":{"type":"integer","format":"int32","description":"code"},"data":{"$ref":"#/components/schemas/PodV2Response","description":"data"}}},"PodV2Response":{"type":"object","description":"Pod Response v2","properties":{"id":{"type":"integer","format":"int64","description":"Pod ID"},"orgId":{"type":"integer","format":"int64","description":"Organization ID"},"applicantId":{"type":"integer","format":"int64","description":"User ID who created the pod"},"name":{"type":"string","description":"Pod name"},"imageId":{"type":"integer","format":"int64","description":"Image ID"},"officialImage":{"type":"string","description":"Image source","enum":["OFFICIAL","CUSTOM"]},"imagePublicType":{"type":"string","description":"Image type","enum":["PUBLIC","PRIVATE"]},"image":{"type":"string","description":"Docker image name"},"imageRegistry":{"type":"string","description":"Image registry URL"},"imageRegistryUsername":{"type":"string","description":"Image registry username"},"resourceType":{"type":"string","description":"Resource type","enum":["GPU","CPU"]},"gpuType":{"type":"string","description":"GPU type"},"gpuDisplayName":{"type":"string","description":"GPU display name"},"gpuCount":{"type":"integer","format":"int32","description":"Number of GPUs"},"shmInGb":{"type":"integer","format":"int32","description":"Shared memory in GB"},"singleCardVramInGb":{"type":"integer","format":"int32","description":"Single card VRAM in GB"},"singleCardRamInGb":{"type":"integer","format":"int32","description":"Single card RAM in GB"},"singleCardVcpu":{"type":"integer","format":"int32","description":"Single card vCPU count"},"location":{"type":"string","description":"Location"},"region":{"type":"string","description":"Region code"},"cloudType":{"type":"string","description":"Cloud type","enum":["SECURE","COMMUNITY"]},"containerVolumeInGb":{"type":"integer","format":"int32","description":"Container volume in GB"},"networkUploadMbps":{"type":"number","description":"Network upload speed (Mbps)"},"networkDownloadMbps":{"type":"number","description":"Network download speed (Mbps)"},"diskReadSpeedMbps":{"type":"number","description":"Disk read speed (Mbps)"},"diskWriteSpeedMbps":{"type":"number","description":"Disk write speed (Mbps)"},"singleCardPrice":{"type":"number","description":"GPU single card price"},"containerVolumePrice":{"type":"number","description":"Container volume price"},"initializationCommand":{"type":"string","description":"Initialization command"},"environmentVars":{"type":"array","description":"Environment variables","items":{"$ref":"#/components/schemas/KeyValuePairDTO"}},"expose":{"type":"array","description":"Exposed ports","items":{"$ref":"#/components/schemas/OpenapiPodExposePortResponse"}},"sshCmd":{"type":"string","description":"SSH command template"},"status":{"type":"string","description":"Pod status","enum":["INITIALIZING","RUNNING","PAUSING","PAUSED","TERMINATING","TERMINATED","FAILED","PENDING","PREPARING"]},"createdAt":{"type":"integer","format":"int64","description":"Creation timestamp (epoch milliseconds)"},"updatedAt":{"type":"integer","format":"int64","description":"Last update timestamp (epoch milliseconds)"},"volumes":{"type":"array","description":"Mounted volumes","items":{"$ref":"#/components/schemas/PodV2VolumeResponse"}},"internalIp":{"type":"string","description":"Internal IP address"},"desiredState":{"type":"string","description":"Desired state","enum":["RUNNING","PAUSED"]},"isSpot":{"type":"boolean","description":"Whether the pod was created on a Spot resource"},"persistentMountPath":{"type":"string","description":"Persistent volume mount path"},"persistentVolumePrice":{"type":"number","description":"Persistent volume price"},"callbackUrl":{"type":"string","description":"Pod lifecycle webhook callback URL"}}},"OpenapiPodExposePortResponse":{"type":"object","description":"OpenapiPodExposePortResponse","properties":{"port":{"type":"integer","format":"int32","description":"port","maximum":65535,"minimum":0},"proxyPort":{"type":"integer","format":"int32","description":"proxy port"},"protocol":{"type":"string","description":"protocol","enum":["HTTP","TCP"]},"host":{"type":"string","description":"host"},"healthy":{"type":"boolean","description":"healthy"},"ingressUrl":{"type":"string","description":"ingress url"},"serviceName":{"type":"string","description":"service name"}},"required":["port"]},"PodV2VolumeResponse":{"type":"object","description":"Pod v2 mounted volume response","properties":{"id":{"type":"string","description":"Volume ID as string to avoid JavaScript int64 precision loss"},"mountPath":{"type":"string","description":"Mount path inside the pod"},"mountMode":{"type":"string","description":"Mount mode","enum":["Data","System"]}}},"Result":{"type":"object","properties":{"message":{"type":"string","description":"message"},"code":{"type":"integer","format":"int32","description":"code"},"data":{"description":"data"}}}}}}
```
## Delete Pod
> Delete a pod
```json
{"openapi":"3.0.1","info":{"title":"默认模块","version":"1.0.0"},"tags":[{"name":"API v2"},{"name":"Pods v2"}],"security":[{}],"paths":{"/v2/pods/{id}":{"delete":{"summary":"Delete Pod","deprecated":false,"description":"Delete a pod","operationId":"deletePod","tags":["API v2","Pods v2"],"parameters":[{"name":"id","in":"path","description":"","required":true,"schema":{"type":"integer","format":"int64"}}],"responses":{"200":{"description":"OK","content":{"*/*":{"schema":{"$ref":"#/components/schemas/ResultVoid"}}},"headers":{}},"400":{"description":"Bad Request","content":{"*/*":{"schema":{"$ref":"#/components/schemas/Result"}}},"headers":{}},"500":{"description":"Internal Server Error","content":{"*/*":{"schema":{"$ref":"#/components/schemas/Result"}}},"headers":{}},"10000":{"description":"Pod deleted","content":{"*/*":{"schema":{"$ref":"#/components/schemas/ResultVoid"}}},"headers":{}},"13000":{"description":"Pod not found","content":{"*/*":{"schema":{"$ref":"#/components/schemas/Result"}}},"headers":{}}}}}},"components":{"schemas":{"ResultVoid":{"type":"object","properties":{"message":{"type":"string","description":"message"},"code":{"type":"integer","format":"int32","description":"code"},"data":{"description":"data"}}},"Result":{"type":"object","properties":{"message":{"type":"string","description":"message"},"code":{"type":"integer","format":"int32","description":"code"},"data":{"description":"data"}}}}}}
```
## Resume Pod
> Resume a paused pod
```json
{"openapi":"3.0.1","info":{"title":"默认模块","version":"1.0.0"},"tags":[{"name":"API v2"},{"name":"Pods v2"}],"security":[{}],"paths":{"/v2/pods/{id}/resume":{"post":{"summary":"Resume Pod","deprecated":false,"description":"Resume a paused pod","operationId":"resumePod","tags":["API v2","Pods v2"],"parameters":[{"name":"id","in":"path","description":"","required":true,"schema":{"type":"integer","format":"int64"}}],"responses":{"200":{"description":"OK","content":{"*/*":{"schema":{"$ref":"#/components/schemas/ResultVoid"}}},"headers":{}},"400":{"description":"Bad Request","content":{"*/*":{"schema":{"$ref":"#/components/schemas/Result"}}},"headers":{}},"500":{"description":"Internal Server Error","content":{"*/*":{"schema":{"$ref":"#/components/schemas/Result"}}},"headers":{}},"10000":{"description":"Pod resumed","content":{"*/*":{"schema":{"$ref":"#/components/schemas/ResultVoid"}}},"headers":{}},"13000":{"description":"Pod not found","content":{"*/*":{"schema":{"$ref":"#/components/schemas/Result"}}},"headers":{}}}}}},"components":{"schemas":{"ResultVoid":{"type":"object","properties":{"message":{"type":"string","description":"message"},"code":{"type":"integer","format":"int32","description":"code"},"data":{"description":"data"}}},"Result":{"type":"object","properties":{"message":{"type":"string","description":"message"},"code":{"type":"integer","format":"int32","description":"code"},"data":{"description":"data"}}}}}}
```
## Pause Pod
> Pause a running pod
```json
{"openapi":"3.0.1","info":{"title":"默认模块","version":"1.0.0"},"tags":[{"name":"API v2"},{"name":"Pods v2"}],"security":[{}],"paths":{"/v2/pods/{id}/pause":{"post":{"summary":"Pause Pod","deprecated":false,"description":"Pause a running pod","operationId":"pausePod","tags":["API v2","Pods v2"],"parameters":[{"name":"id","in":"path","description":"","required":true,"schema":{"type":"integer","format":"int64"}}],"responses":{"200":{"description":"OK","content":{"*/*":{"schema":{"$ref":"#/components/schemas/ResultVoid"}}},"headers":{}},"400":{"description":"Bad Request","content":{"*/*":{"schema":{"$ref":"#/components/schemas/Result"}}},"headers":{}},"500":{"description":"Internal Server Error","content":{"*/*":{"schema":{"$ref":"#/components/schemas/Result"}}},"headers":{}},"10000":{"description":"Pod paused","content":{"*/*":{"schema":{"$ref":"#/components/schemas/ResultVoid"}}},"headers":{}},"13000":{"description":"Pod not found","content":{"*/*":{"schema":{"$ref":"#/components/schemas/Result"}}},"headers":{}}}}}},"components":{"schemas":{"ResultVoid":{"type":"object","properties":{"message":{"type":"string","description":"message"},"code":{"type":"integer","format":"int32","description":"code"},"data":{"description":"data"}}},"Result":{"type":"object","properties":{"message":{"type":"string","description":"message"},"code":{"type":"integer","format":"int32","description":"code"},"data":{"description":"data"}}}}}}
```
## List Pods
> Get all pods for your organization
```json
{"openapi":"3.0.1","info":{"title":"默认模块","version":"1.0.0"},"tags":[{"name":"API v2"},{"name":"Pods v2"}],"security":[{}],"paths":{"/v2/pods":{"get":{"summary":"List Pods","deprecated":false,"description":"Get all pods for your organization","operationId":"listPods","tags":["API v2","Pods v2"],"parameters":[{"name":"regionList","in":"query","description":"","required":false,"schema":{"type":"array","items":{"type":"string"}}},{"name":"statusList","in":"query","description":"Filter by status names, e.g. RUNNING, PAUSED, TERMINATED","required":false,"schema":{"type":"array","items":{"type":"string"}}}],"responses":{"200":{"description":"Success, returns list of pods","content":{"*/*":{"schema":{"$ref":"#/components/schemas/ResultListPodV2ListDetailResponse"}}},"headers":{}},"400":{"description":"Bad Request","content":{"*/*":{"schema":{"$ref":"#/components/schemas/Result"}}},"headers":{}},"500":{"description":"Internal Server Error","content":{"*/*":{"schema":{"$ref":"#/components/schemas/Result"}}},"headers":{}},"10000":{"description":"Success","content":{"*/*":{"schema":{"$ref":"#/components/schemas/ResultListPodV2ListDetailResponse"}}},"headers":{}}}}}},"components":{"schemas":{"ResultListPodV2ListDetailResponse":{"type":"object","properties":{"message":{"type":"string","description":"message"},"code":{"type":"integer","format":"int32","description":"code"},"data":{"type":"array","description":"data","items":{"$ref":"#/components/schemas/PodV2ListDetailResponse"}}}},"PodV2ListDetailResponse":{"allOf":[{"$ref":"#/components/schemas/PodV2Response"},{"type":"object","description":"Pod list/detail response v2 with Reserve visibility","properties":{"nodePool":{"type":"string","nullable":true,"description":"Actual scheduling node pool","enum":["shared","reserved","spot"]},"reserveActive":{"type":"boolean","description":"Whether this Pod is currently using owner-reserved capacity"}}}],"description":"Pod list/detail response v2 with Reserve visibility"},"PodV2Response":{"type":"object","description":"Pod Response v2","properties":{"id":{"type":"integer","format":"int64","description":"Pod ID"},"orgId":{"type":"integer","format":"int64","description":"Organization ID"},"applicantId":{"type":"integer","format":"int64","description":"User ID who created the pod"},"name":{"type":"string","description":"Pod name"},"imageId":{"type":"integer","format":"int64","description":"Image ID"},"officialImage":{"type":"string","description":"Image source","enum":["OFFICIAL","CUSTOM"]},"imagePublicType":{"type":"string","description":"Image type","enum":["PUBLIC","PRIVATE"]},"image":{"type":"string","description":"Docker image name"},"imageRegistry":{"type":"string","description":"Image registry URL"},"imageRegistryUsername":{"type":"string","description":"Image registry username"},"resourceType":{"type":"string","description":"Resource type","enum":["GPU","CPU"]},"gpuType":{"type":"string","description":"GPU type"},"gpuDisplayName":{"type":"string","description":"GPU display name"},"gpuCount":{"type":"integer","format":"int32","description":"Number of GPUs"},"shmInGb":{"type":"integer","format":"int32","description":"Shared memory in GB"},"singleCardVramInGb":{"type":"integer","format":"int32","description":"Single card VRAM in GB"},"singleCardRamInGb":{"type":"integer","format":"int32","description":"Single card RAM in GB"},"singleCardVcpu":{"type":"integer","format":"int32","description":"Single card vCPU count"},"location":{"type":"string","description":"Location"},"region":{"type":"string","description":"Region code"},"cloudType":{"type":"string","description":"Cloud type","enum":["SECURE","COMMUNITY"]},"containerVolumeInGb":{"type":"integer","format":"int32","description":"Container volume in GB"},"networkUploadMbps":{"type":"number","description":"Network upload speed (Mbps)"},"networkDownloadMbps":{"type":"number","description":"Network download speed (Mbps)"},"diskReadSpeedMbps":{"type":"number","description":"Disk read speed (Mbps)"},"diskWriteSpeedMbps":{"type":"number","description":"Disk write speed (Mbps)"},"singleCardPrice":{"type":"number","description":"GPU single card price"},"containerVolumePrice":{"type":"number","description":"Container volume price"},"initializationCommand":{"type":"string","description":"Initialization command"},"environmentVars":{"type":"array","description":"Environment variables","items":{"$ref":"#/components/schemas/KeyValuePairDTO"}},"expose":{"type":"array","description":"Exposed ports","items":{"$ref":"#/components/schemas/OpenapiPodExposePortResponse"}},"sshCmd":{"type":"string","description":"SSH command template"},"status":{"type":"string","description":"Pod status","enum":["INITIALIZING","RUNNING","PAUSING","PAUSED","TERMINATING","TERMINATED","FAILED","PENDING","PREPARING"]},"createdAt":{"type":"integer","format":"int64","description":"Creation timestamp (epoch milliseconds)"},"updatedAt":{"type":"integer","format":"int64","description":"Last update timestamp (epoch milliseconds)"},"volumes":{"type":"array","description":"Mounted volumes","items":{"$ref":"#/components/schemas/PodV2VolumeResponse"}},"internalIp":{"type":"string","description":"Internal IP address"},"desiredState":{"type":"string","description":"Desired state","enum":["RUNNING","PAUSED"]},"isSpot":{"type":"boolean","description":"Whether the pod was created on a Spot resource"},"persistentMountPath":{"type":"string","description":"Persistent volume mount path"},"persistentVolumePrice":{"type":"number","description":"Persistent volume price"},"callbackUrl":{"type":"string","description":"Pod lifecycle webhook callback URL"}}},"KeyValuePairDTO":{"type":"object","description":"KeyValuePairDTO","properties":{"key":{"type":"string","description":"key","minLength":1},"value":{"type":"string","description":"value","minLength":1}},"required":["key","value"]},"OpenapiPodExposePortResponse":{"type":"object","description":"OpenapiPodExposePortResponse","properties":{"port":{"type":"integer","format":"int32","description":"port","maximum":65535,"minimum":0},"proxyPort":{"type":"integer","format":"int32","description":"proxy port"},"protocol":{"type":"string","description":"protocol","enum":["HTTP","TCP"]},"host":{"type":"string","description":"host"},"healthy":{"type":"boolean","description":"healthy"},"ingressUrl":{"type":"string","description":"ingress url"},"serviceName":{"type":"string","description":"service name"}},"required":["port"]},"PodV2VolumeResponse":{"type":"object","description":"Pod v2 mounted volume response","properties":{"id":{"type":"string","description":"Volume ID as string to avoid JavaScript int64 precision loss"},"mountPath":{"type":"string","description":"Mount path inside the pod"},"mountMode":{"type":"string","description":"Mount mode","enum":["Data","System"]}}},"Result":{"type":"object","properties":{"message":{"type":"string","description":"message"},"code":{"type":"integer","format":"int32","description":"code"},"data":{"description":"data"}}}}}}
```
## Get Pod
> Get details of a specific pod
```json
{"openapi":"3.0.1","info":{"title":"默认模块","version":"1.0.0"},"tags":[{"name":"API v2"},{"name":"Pods v2"}],"security":[{}],"paths":{"/v2/pods/{id}":{"get":{"summary":"Get Pod","deprecated":false,"description":"Get details of a specific pod","operationId":"getPod","tags":["API v2","Pods v2"],"parameters":[{"name":"id","in":"path","description":"","required":true,"schema":{"type":"integer","format":"int64"}}],"responses":{"200":{"description":"OK","content":{"*/*":{"schema":{"$ref":"#/components/schemas/ResultPodV2ListDetailResponse"}}},"headers":{}},"400":{"description":"Bad Request","content":{"*/*":{"schema":{"$ref":"#/components/schemas/Result"}}},"headers":{}},"500":{"description":"Internal Server Error","content":{"*/*":{"schema":{"$ref":"#/components/schemas/Result"}}},"headers":{}},"10000":{"description":"Pod found","content":{"*/*":{"schema":{"$ref":"#/components/schemas/ResultPodV2ListDetailResponse"}}},"headers":{}},"13000":{"description":"Pod not found","content":{"*/*":{"schema":{"$ref":"#/components/schemas/Result"}}},"headers":{}}}}}},"components":{"schemas":{"ResultPodV2ListDetailResponse":{"type":"object","properties":{"message":{"type":"string","description":"message"},"code":{"type":"integer","format":"int32","description":"code"},"data":{"$ref":"#/components/schemas/PodV2ListDetailResponse","description":"data"}}},"PodV2ListDetailResponse":{"allOf":[{"$ref":"#/components/schemas/PodV2Response"},{"type":"object","description":"Pod list/detail response v2 with Reserve visibility","properties":{"nodePool":{"type":"string","nullable":true,"description":"Actual scheduling node pool","enum":["shared","reserved","spot"]},"reserveActive":{"type":"boolean","description":"Whether this Pod is currently using owner-reserved capacity"}}}],"description":"Pod list/detail response v2 with Reserve visibility"},"PodV2Response":{"type":"object","description":"Pod Response v2","properties":{"id":{"type":"integer","format":"int64","description":"Pod ID"},"orgId":{"type":"integer","format":"int64","description":"Organization ID"},"applicantId":{"type":"integer","format":"int64","description":"User ID who created the pod"},"name":{"type":"string","description":"Pod name"},"imageId":{"type":"integer","format":"int64","description":"Image ID"},"officialImage":{"type":"string","description":"Image source","enum":["OFFICIAL","CUSTOM"]},"imagePublicType":{"type":"string","description":"Image type","enum":["PUBLIC","PRIVATE"]},"image":{"type":"string","description":"Docker image name"},"imageRegistry":{"type":"string","description":"Image registry URL"},"imageRegistryUsername":{"type":"string","description":"Image registry username"},"resourceType":{"type":"string","description":"Resource type","enum":["GPU","CPU"]},"gpuType":{"type":"string","description":"GPU type"},"gpuDisplayName":{"type":"string","description":"GPU display name"},"gpuCount":{"type":"integer","format":"int32","description":"Number of GPUs"},"shmInGb":{"type":"integer","format":"int32","description":"Shared memory in GB"},"singleCardVramInGb":{"type":"integer","format":"int32","description":"Single card VRAM in GB"},"singleCardRamInGb":{"type":"integer","format":"int32","description":"Single card RAM in GB"},"singleCardVcpu":{"type":"integer","format":"int32","description":"Single card vCPU count"},"location":{"type":"string","description":"Location"},"region":{"type":"string","description":"Region code"},"cloudType":{"type":"string","description":"Cloud type","enum":["SECURE","COMMUNITY"]},"containerVolumeInGb":{"type":"integer","format":"int32","description":"Container volume in GB"},"networkUploadMbps":{"type":"number","description":"Network upload speed (Mbps)"},"networkDownloadMbps":{"type":"number","description":"Network download speed (Mbps)"},"diskReadSpeedMbps":{"type":"number","description":"Disk read speed (Mbps)"},"diskWriteSpeedMbps":{"type":"number","description":"Disk write speed (Mbps)"},"singleCardPrice":{"type":"number","description":"GPU single card price"},"containerVolumePrice":{"type":"number","description":"Container volume price"},"initializationCommand":{"type":"string","description":"Initialization command"},"environmentVars":{"type":"array","description":"Environment variables","items":{"$ref":"#/components/schemas/KeyValuePairDTO"}},"expose":{"type":"array","description":"Exposed ports","items":{"$ref":"#/components/schemas/OpenapiPodExposePortResponse"}},"sshCmd":{"type":"string","description":"SSH command template"},"status":{"type":"string","description":"Pod status","enum":["INITIALIZING","RUNNING","PAUSING","PAUSED","TERMINATING","TERMINATED","FAILED","PENDING","PREPARING"]},"createdAt":{"type":"integer","format":"int64","description":"Creation timestamp (epoch milliseconds)"},"updatedAt":{"type":"integer","format":"int64","description":"Last update timestamp (epoch milliseconds)"},"volumes":{"type":"array","description":"Mounted volumes","items":{"$ref":"#/components/schemas/PodV2VolumeResponse"}},"internalIp":{"type":"string","description":"Internal IP address"},"desiredState":{"type":"string","description":"Desired state","enum":["RUNNING","PAUSED"]},"isSpot":{"type":"boolean","description":"Whether the pod was created on a Spot resource"},"persistentMountPath":{"type":"string","description":"Persistent volume mount path"},"persistentVolumePrice":{"type":"number","description":"Persistent volume price"},"callbackUrl":{"type":"string","description":"Pod lifecycle webhook callback URL"}}},"KeyValuePairDTO":{"type":"object","description":"KeyValuePairDTO","properties":{"key":{"type":"string","description":"key","minLength":1},"value":{"type":"string","description":"value","minLength":1}},"required":["key","value"]},"OpenapiPodExposePortResponse":{"type":"object","description":"OpenapiPodExposePortResponse","properties":{"port":{"type":"integer","format":"int32","description":"port","maximum":65535,"minimum":0},"proxyPort":{"type":"integer","format":"int32","description":"proxy port"},"protocol":{"type":"string","description":"protocol","enum":["HTTP","TCP"]},"host":{"type":"string","description":"host"},"healthy":{"type":"boolean","description":"healthy"},"ingressUrl":{"type":"string","description":"ingress url"},"serviceName":{"type":"string","description":"service name"}},"required":["port"]},"PodV2VolumeResponse":{"type":"object","description":"Pod v2 mounted volume response","properties":{"id":{"type":"string","description":"Volume ID as string to avoid JavaScript int64 precision loss"},"mountPath":{"type":"string","description":"Mount path inside the pod"},"mountMode":{"type":"string","description":"Mount mode","enum":["Data","System"]}}},"Result":{"type":"object","properties":{"message":{"type":"string","description":"message"},"code":{"type":"integer","format":"int32","description":"code"},"data":{"description":"data"}}}}}}
```
## List GPU machine specs
> List GPU machine spec options for Pod v2 create, including per-count availability, volume limits, and prices.
```json
{"openapi":"3.0.1","info":{"title":"默认模块","version":"1.0.0"},"tags":[{"name":"API v2"},{"name":"GPU list v2"}],"security":[{}],"paths":{"/v2/gpu/list":{"post":{"summary":"List GPU machine specs","deprecated":false,"description":"List GPU machine spec options for Pod v2 create, including per-count availability, volume limits, and prices.","operationId":"listGpuResources","tags":["API v2","GPU list v2"],"parameters":[],"requestBody":{"content":{"application/json":{"schema":{"$ref":"#/components/schemas/GpuListV2Request"}}}},"responses":{"200":{"description":"Success","content":{"*/*":{"schema":{"$ref":"#/components/schemas/ResultV2PageResponseGpuListV2Item"}}},"headers":{}},"400":{"description":"Bad Request","content":{"*/*":{"schema":{"$ref":"#/components/schemas/Result"}}},"headers":{}},"500":{"description":"Internal Server Error","content":{"*/*":{"schema":{"$ref":"#/components/schemas/Result"}}},"headers":{}},"10000":{"description":"Success","content":{"*/*":{"schema":{"$ref":"#/components/schemas/ResultV2PageResponseGpuListV2Item"}}},"headers":{}}}}}},"components":{"schemas":{"GpuListV2Request":{"type":"object","description":"GPU list v2 request","properties":{"page":{"type":"integer","format":"int64","description":"Page number, 1-based"},"size":{"type":"integer","format":"int64","description":"Page size"},"regions":{"type":"array","description":"Region filters","items":{"type":"string"}},"gpuTypes":{"type":"array","description":"GPU type filters","items":{"type":"string"}},"gpuCounts":{"type":"array","description":"GPU card count filters","items":{"type":"integer","format":"int32"}},"minGpuMemoryInGb":{"type":"integer","format":"int32","description":"Minimum GPU memory per card in GB"},"minRamPerGpuInGb":{"type":"integer","format":"int32","description":"Minimum RAM per GPU card in GB"},"minVcpuPerGpu":{"type":"integer","format":"int32","description":"Minimum vCPU per GPU card"},"containerVolumeInGb":{"type":"integer","format":"int32","description":"Container volume size in GB. Omitted means no container-volume filtering."},"systemVolumeInGb":{"type":"integer","format":"int32","description":"Local system volume size in GB. Omitted or null means no system-volume filtering."},"cloudTypes":{"type":"array","description":"Cloud type filters","enum":["SECURE","COMMUNITY"],"items":{"type":"string"}},"acceleratorVendor":{"type":"string","default":"NVIDIA","description":"Accelerator vendor filter. Defaults to NVIDIA when omitted.","enum":["NVIDIA","AWS"]},"includeUnavailable":{"type":"boolean","default":false,"description":"Whether to include unavailable resources"},"isSpot":{"type":"boolean","description":"Spot resource filter. Omitted means include both Spot and on-demand resources."}}},"ResultV2PageResponseGpuListV2Item":{"type":"object","properties":{"message":{"type":"string","description":"message"},"code":{"type":"integer","format":"int32","description":"code"},"data":{"$ref":"#/components/schemas/V2PageResponseGpuListV2Item","description":"data"}}},"V2PageResponseGpuListV2Item":{"type":"object","description":"Paginated Response","properties":{"items":{"type":"array","description":"List of items in the current page","items":{"$ref":"#/components/schemas/GpuListV2Item"}},"page":{"type":"integer","format":"int64","description":"Current page number (1-based)"},"size":{"type":"integer","format":"int64","description":"Number of items per page"},"total":{"type":"integer","format":"int64","description":"Total number of items across all pages"},"pages":{"type":"integer","format":"int64","description":"Total number of pages"}}},"GpuListV2Item":{"type":"object","description":"GPU machine spec option","properties":{"gpuType":{"type":"string","description":"GPU type used for Pod create"},"displayName":{"type":"string","description":"GPU display name"},"gpuMemoryInGb":{"type":"integer","format":"int32","description":"GPU memory per card in GB"},"region":{"type":"string","description":"Region code"},"cloudType":{"type":"string","description":"Cloud type","enum":["SECURE","COMMUNITY"]},"acceleratorVendor":{"type":"string","description":"Accelerator vendor","enum":["NVIDIA","AWS"]},"isSpot":{"type":"boolean","description":"True when this machine option is Spot"},"status":{"type":"string","description":"Availability summary","enum":["AVAILABLE","UNAVAILABLE"]},"maxGpuCount":{"type":"integer","format":"int32","description":"Maximum supported GPU card count for this spec"},"availableGpuCounts":{"type":"array","description":"Currently available GPU card count options","items":{"type":"integer","format":"int32"}},"ramPerGpuInGb":{"type":"integer","format":"int32","description":"RAM per GPU card in GB"},"vcpuPerGpu":{"type":"integer","format":"int32","description":"vCPU per GPU card"},"localDiskPerGpuInGb":{"type":"integer","format":"int32","description":"Local disk per GPU card in GB"},"gpuCountOptions":{"type":"array","description":"GPU count options with availability, volume limits, and price","items":{"$ref":"#/components/schemas/GpuListV2GpuCountOption"}}}},"GpuListV2GpuCountOption":{"type":"object","description":"GPU count option for a machine spec","properties":{"gpuCount":{"type":"integer","format":"int32","description":"GPU card count"},"available":{"type":"boolean","description":"Whether this GPU count is currently creatable"},"totalGpuMemoryInGb":{"type":"integer","format":"int32","description":"Total GPU memory in GB"},"totalRamInGb":{"type":"integer","format":"int32","description":"Total RAM in GB"},"totalVcpu":{"type":"integer","format":"int32","description":"Total vCPU count"},"totalLocalDiskInGb":{"type":"integer","format":"int32","description":"Total local disk in GB"},"containerVolume":{"$ref":"#/components/schemas/GpuListV2ContainerVolume","description":"Container volume limits"},"systemVolume":{"$ref":"#/components/schemas/GpuListV2SystemVolume","description":"Local system volume limits"},"price":{"$ref":"#/components/schemas/GpuListV2Price","description":"Price estimate"}}},"GpuListV2ContainerVolume":{"type":"object","description":"Container volume limits for a GPU count option","properties":{"minInGb":{"type":"integer","format":"int32","description":"Minimum container volume size in GB"},"maxInGb":{"type":"integer","format":"int32","description":"Maximum container volume size in GB"},"maxInGbWithLocalSystemVolume":{"type":"integer","format":"int32","description":"Maximum container volume size in GB when Local system volume is enabled"},"maxInGbWithoutLocalSystemVolume":{"type":"integer","format":"int32","description":"Maximum container volume size in GB when Local system volume is not enabled"}}},"GpuListV2SystemVolume":{"type":"object","description":"Local system volume limits for a GPU count option","properties":{"supported":{"type":"boolean","description":"Whether user-configurable Local system volume is supported"},"minInGb":{"type":"integer","format":"int32","description":"Minimum system volume size in GB"},"maxInGb":{"type":"integer","format":"int32","description":"Maximum system volume size in GB"}}},"GpuListV2Price":{"type":"object","description":"Price estimate for a GPU count option","properties":{"pricePerGpuPerHour":{"type":"string","description":"Single GPU card price per hour"},"gpuPricePerHour":{"type":"string","description":"GPU price per hour for this GPU count"},"containerVolumePricePerHour":{"type":"string","description":"Container volume price per hour"},"systemVolumePricePerHour":{"type":"string","description":"System volume price per hour"},"containerVolumePricePerGbPerHour":{"type":"string","description":"Container volume price per GB per hour"},"systemVolumePricePerGbPerHour":{"type":"string","description":"System volume price per GB per hour"},"totalPricePerHour":{"type":"string","description":"Total estimated price per hour"},"currency":{"type":"string","description":"Currency"}}},"Result":{"type":"object","properties":{"message":{"type":"string","description":"message"},"code":{"type":"integer","format":"int32","description":"code"},"data":{"description":"data"}}}}}}
```
## Get Pod Logs
> Query pod container or system logs
```json
{"openapi":"3.0.1","info":{"title":"默认模块","version":"1.0.0"},"tags":[{"name":"API v2"},{"name":"Pods v2"}],"security":[{}],"paths":{"/v2/pods/{id}/logs":{"get":{"summary":"Get Pod Logs","deprecated":false,"description":"Query pod container or system logs","operationId":"getLogs","tags":["API v2","Pods v2"],"parameters":[{"name":"id","in":"path","description":"","required":true,"schema":{"type":"integer","format":"int64"}},{"name":"type","in":"query","description":"Log type","required":false,"schema":{"type":"string","description":"Log type","enum":["CONTAINER","SYSTEM"]}},{"name":"limit","in":"query","description":"Maximum number of log lines to return","required":false,"schema":{"type":"integer","format":"int32","description":"Maximum number of log lines to return"}},{"name":"cursor","in":"query","description":"Cursor for pagination","required":false,"schema":{"type":"string","description":"Cursor for pagination"}},{"name":"startTime","in":"query","description":"Start time, epoch milliseconds","required":false,"schema":{"type":"integer","format":"int64","description":"Start time, epoch milliseconds"}},{"name":"endTime","in":"query","description":"End time, epoch milliseconds","required":false,"schema":{"type":"integer","format":"int64","description":"End time, epoch milliseconds"}},{"name":"keyword","in":"query","description":"Keyword filter","required":false,"schema":{"type":"string","description":"Keyword filter"}}],"requestBody":{"content":{"application/json":{"schema":{"type":"object","properties":{}}}}},"responses":{"200":{"description":"OK","content":{"*/*":{"schema":{"$ref":"#/components/schemas/ResultPodV2LogResponse"}}},"headers":{}},"400":{"description":"Bad Request","content":{"*/*":{"schema":{"$ref":"#/components/schemas/Result"}}},"headers":{}},"500":{"description":"Internal Server Error","content":{"*/*":{"schema":{"$ref":"#/components/schemas/Result"}}},"headers":{}}}}}},"components":{"schemas":{"ResultPodV2LogResponse":{"type":"object","properties":{"message":{"type":"string","description":"message"},"code":{"type":"integer","format":"int32","description":"code"},"data":{"$ref":"#/components/schemas/PodV2LogResponse","description":"data"}}},"PodV2LogResponse":{"type":"object","description":"Pod logs response v2","properties":{"items":{"type":"array","description":"Log items","items":{"$ref":"#/components/schemas/PodV2LogItem"}},"page":{"$ref":"#/components/schemas/PodV2LogPage","description":"Cursor pagination info"}}},"PodV2LogItem":{"type":"object","description":"Pod log item v2","properties":{"timestamp":{"type":"string","description":"Log timestamp in ISO 8601 format"},"level":{"type":"string","description":"Log level"},"content":{"type":"string","description":"Log content"}}},"PodV2LogPage":{"type":"object","description":"Pod log cursor page v2","properties":{"previousCursor":{"type":"string","description":"Previous page cursor"},"nextCursor":{"type":"string","description":"Next page cursor"},"hasPrevious":{"type":"boolean","description":"Whether a previous page exists"},"hasNext":{"type":"boolean","description":"Whether a next page exists"}}},"Result":{"type":"object","properties":{"message":{"type":"string","description":"message"},"code":{"type":"integer","format":"int32","description":"code"},"data":{"description":"data"}}}}}}
```
## Get Pod Runtime
> Get accumulated pod runtime using billing uptime semantics
```json
{"openapi":"3.0.1","info":{"title":"默认模块","version":"1.0.0"},"tags":[{"name":"API v2"},{"name":"Pods v2"}],"security":[{}],"paths":{"/v2/pods/{id}/runtime":{"get":{"summary":"Get Pod Runtime","deprecated":false,"description":"Get accumulated pod runtime using billing uptime semantics","operationId":"getRuntime","tags":["API v2","Pods v2"],"parameters":[{"name":"id","in":"path","description":"","required":true,"schema":{"type":"integer","format":"int64"}}],"responses":{"200":{"description":"OK","content":{"*/*":{"schema":{"$ref":"#/components/schemas/ResultPodV2RuntimeResponse"}}},"headers":{}},"400":{"description":"Bad Request","content":{"*/*":{"schema":{"$ref":"#/components/schemas/Result"}}},"headers":{}},"500":{"description":"Internal Server Error","content":{"*/*":{"schema":{"$ref":"#/components/schemas/Result"}}},"headers":{}}}}}},"components":{"schemas":{"ResultPodV2RuntimeResponse":{"type":"object","properties":{"message":{"type":"string","description":"message"},"code":{"type":"integer","format":"int32","description":"code"},"data":{"$ref":"#/components/schemas/PodV2RuntimeResponse","description":"data"}}},"PodV2RuntimeResponse":{"type":"object","description":"Pod runtime response v2","properties":{"id":{"type":"string","description":"Pod ID"},"name":{"type":"string","description":"Pod name"},"status":{"type":"string","description":"Current pod status","enum":["INITIALIZING","RUNNING","PAUSING","PAUSED","TERMINATING","TERMINATED","FAILED","PENDING","PREPARING"]},"createdAt":{"type":"integer","format":"int64","description":"Pod creation timestamp, epoch milliseconds"},"updatedAt":{"type":"integer","format":"int64","description":"Pod update timestamp, epoch milliseconds"},"runningMillis":{"type":"integer","format":"int64","description":"Accumulated runtime in milliseconds using the existing billing uptime logic"},"runningSeconds":{"type":"integer","format":"int64","description":"Accumulated runtime in seconds, floor(runningMillis / 1000)"}}},"Result":{"type":"object","properties":{"message":{"type":"string","description":"message"},"code":{"type":"integer","format":"int32","description":"code"},"data":{"description":"data"}}}}}}
```
# VMs
## Create VM
> Create a new virtual machine
```json
{"openapi":"3.0.1","info":{"title":"默认模块","version":"1.0.0"},"tags":[{"name":"API v2"},{"name":"VMs v2"}],"security":[{}],"paths":{"/v2/vms":{"post":{"summary":"Create VM","deprecated":false,"description":"Create a new virtual machine","operationId":"createVm","tags":["VMs v2","API v2"],"parameters":[],"requestBody":{"content":{"application/json":{"schema":{"$ref":"#/components/schemas/VmV2CreateRequest"}}},"required":true},"responses":{"200":{"description":"OK","content":{"*/*":{"schema":{"$ref":"#/components/schemas/ResultVmV2Response"}}},"headers":{}},"400":{"description":"Bad Request","content":{"*/*":{"schema":{"$ref":"#/components/schemas/Result"}}},"headers":{}},"500":{"description":"Internal Server Error","content":{"*/*":{"schema":{"$ref":"#/components/schemas/Result"}}},"headers":{}},"10000":{"description":"VM created successfully","content":{"*/*":{"schema":{"$ref":"#/components/schemas/ResultVmV2Response"}}},"headers":{}},"10001":{"description":"Invalid request parameters","content":{"*/*":{"schema":{"$ref":"#/components/schemas/Result"}}},"headers":{}}}}}},"components":{"schemas":{"VmV2CreateRequest":{"type":"object","description":"VM Create Request v2","properties":{"vmTypeId":{"type":"integer","format":"int32","description":"Machine model type ID"},"region":{"type":"string","description":"Region code","minLength":1},"name":{"type":"string","description":"VM nickname","minLength":1},"isSpot":{"type":"boolean","description":"Spot instance flag: true=spot, false=on-demand"},"volumeMountPaths":{"type":"object","additionalProperties":{"type":"string"},"description":"Volume mount paths mapping: volumeId -> mountPath. If not specified, default path will be used.","properties":{}}},"required":["isSpot","name","region","vmTypeId"]},"ResultVmV2Response":{"type":"object","properties":{"message":{"type":"string","description":"message"},"code":{"type":"integer","format":"int32","description":"code"},"data":{"$ref":"#/components/schemas/VmV2Response","description":"data"}}},"VmV2Response":{"type":"object","description":"VM Response v2","properties":{"id":{"type":"integer","format":"int64","description":"VM ID"},"orgId":{"type":"string","description":"Organization ID"},"name":{"type":"string","description":"VM nickname"},"gpuDisplayName":{"type":"string","description":"GPU display name"},"ipAddress":{"type":"string","description":"Public IP address"},"domainName":{"type":"string","description":"Domain name"},"cpuCores":{"type":"integer","format":"int32","description":"CPU cores"},"memoryInGb":{"type":"string","description":"Memory in GB"},"gpuCount":{"type":"integer","format":"int32","description":"GPU count"},"gpuMemoryInGb":{"type":"string","description":"GPU memory in GB"},"region":{"type":"string","description":"Region code"},"storageInGb":{"type":"string","description":"Storage in GB"},"notebookUrl":{"type":"string","description":"Jupyter notebook URL"},"sshTemplate":{"type":"string","description":"SSH connection template"},"status":{"type":"string","description":"VM status","enum":["INITIALIZING","RUNNING","STOPPING","STOPPED","TERMINATING","TERMINATED","FAILED"]},"createdAt":{"type":"integer","format":"int64","description":"Creation timestamp (epoch milliseconds)"},"terminatedAt":{"type":"integer","format":"int64","description":"Termination timestamp (epoch milliseconds)"},"updatedAt":{"type":"integer","format":"int64","description":"Last update timestamp (epoch milliseconds)"},"osInfo":{"type":"string","description":"Operating system info"},"gpuType":{"type":"string","description":"GPU type"},"isSpot":{"type":"boolean","description":"Spot instance flag: true=spot, false=on-demand"}}},"Result":{"type":"object","properties":{"message":{"type":"string","description":"message"},"code":{"type":"integer","format":"int32","description":"code"},"data":{"description":"data"}}}}}}
```
## Update VM
> Update an existing VM (partial update)
```json
{"openapi":"3.0.1","info":{"title":"默认模块","version":"1.0.0"},"tags":[{"name":"API v2"},{"name":"VMs v2"}],"security":[{}],"paths":{"/v2/vms/{id}":{"patch":{"summary":"Update VM","deprecated":false,"description":"Update an existing VM (partial update)","operationId":"updateVm","tags":["VMs v2","API v2"],"parameters":[{"name":"id","in":"path","description":"","required":true,"schema":{"type":"integer","format":"int64"}}],"requestBody":{"content":{"application/json":{"schema":{"$ref":"#/components/schemas/VmV2UpdateRequest"}}},"required":true},"responses":{"200":{"description":"OK","content":{"*/*":{"schema":{"$ref":"#/components/schemas/ResultVmV2Response"}}},"headers":{}},"400":{"description":"Bad Request","content":{"*/*":{"schema":{"$ref":"#/components/schemas/Result"}}},"headers":{}},"500":{"description":"Internal Server Error","content":{"*/*":{"schema":{"$ref":"#/components/schemas/Result"}}},"headers":{}},"10000":{"description":"VM updated","content":{"*/*":{"schema":{"$ref":"#/components/schemas/ResultVmV2Response"}}},"headers":{}},"11000":{"description":"VM not found","content":{"*/*":{"schema":{"$ref":"#/components/schemas/Result"}}},"headers":{}}}}}},"components":{"schemas":{"VmV2UpdateRequest":{"type":"object","description":"VM Update Request v2","properties":{"name":{"type":"string","description":"VM nickname","maxLength":255,"minLength":1}}},"ResultVmV2Response":{"type":"object","properties":{"message":{"type":"string","description":"message"},"code":{"type":"integer","format":"int32","description":"code"},"data":{"$ref":"#/components/schemas/VmV2Response","description":"data"}}},"VmV2Response":{"type":"object","description":"VM Response v2","properties":{"id":{"type":"integer","format":"int64","description":"VM ID"},"orgId":{"type":"string","description":"Organization ID"},"name":{"type":"string","description":"VM nickname"},"gpuDisplayName":{"type":"string","description":"GPU display name"},"ipAddress":{"type":"string","description":"Public IP address"},"domainName":{"type":"string","description":"Domain name"},"cpuCores":{"type":"integer","format":"int32","description":"CPU cores"},"memoryInGb":{"type":"string","description":"Memory in GB"},"gpuCount":{"type":"integer","format":"int32","description":"GPU count"},"gpuMemoryInGb":{"type":"string","description":"GPU memory in GB"},"region":{"type":"string","description":"Region code"},"storageInGb":{"type":"string","description":"Storage in GB"},"notebookUrl":{"type":"string","description":"Jupyter notebook URL"},"sshTemplate":{"type":"string","description":"SSH connection template"},"status":{"type":"string","description":"VM status","enum":["INITIALIZING","RUNNING","STOPPING","STOPPED","TERMINATING","TERMINATED","FAILED"]},"createdAt":{"type":"integer","format":"int64","description":"Creation timestamp (epoch milliseconds)"},"terminatedAt":{"type":"integer","format":"int64","description":"Termination timestamp (epoch milliseconds)"},"updatedAt":{"type":"integer","format":"int64","description":"Last update timestamp (epoch milliseconds)"},"osInfo":{"type":"string","description":"Operating system info"},"gpuType":{"type":"string","description":"GPU type"},"isSpot":{"type":"boolean","description":"Spot instance flag: true=spot, false=on-demand"}}},"Result":{"type":"object","properties":{"message":{"type":"string","description":"message"},"code":{"type":"integer","format":"int32","description":"code"},"data":{"description":"data"}}}}}}
```
## Terminate VM
> Terminate a virtual machine
```json
{"openapi":"3.0.1","info":{"title":"默认模块","version":"1.0.0"},"tags":[{"name":"API v2"},{"name":"VMs v2"}],"security":[{}],"paths":{"/v2/vms/{id}":{"delete":{"summary":"Terminate VM","deprecated":false,"description":"Terminate a virtual machine","operationId":"terminateVm","tags":["VMs v2","API v2"],"parameters":[{"name":"id","in":"path","description":"","required":true,"schema":{"type":"integer","format":"int64"}}],"responses":{"200":{"description":"OK","content":{"*/*":{"schema":{"$ref":"#/components/schemas/ResultBoolean"}}},"headers":{}},"400":{"description":"Bad Request","content":{"*/*":{"schema":{"$ref":"#/components/schemas/Result"}}},"headers":{}},"500":{"description":"Internal Server Error","content":{"*/*":{"schema":{"$ref":"#/components/schemas/Result"}}},"headers":{}},"10000":{"description":"VM terminated","content":{"*/*":{"schema":{"$ref":"#/components/schemas/ResultBoolean"}}},"headers":{}},"11000":{"description":"VM not found","content":{"*/*":{"schema":{"$ref":"#/components/schemas/Result"}}},"headers":{}},"11001":{"description":"VM status invalid","content":{"*/*":{"schema":{"$ref":"#/components/schemas/Result"}}},"headers":{}},"11002":{"description":"No terminate permissions","content":{"*/*":{"schema":{"$ref":"#/components/schemas/Result"}}},"headers":{}},"12001":{"description":"Resource status invalid","content":{"*/*":{"schema":{"$ref":"#/components/schemas/Result"}}},"headers":{}}}}}},"components":{"schemas":{"ResultBoolean":{"type":"object","properties":{"message":{"type":"string","description":"message"},"code":{"type":"integer","format":"int32","description":"code"},"data":{"type":"boolean","description":"data"}}},"Result":{"type":"object","properties":{"message":{"type":"string","description":"message"},"code":{"type":"integer","format":"int32","description":"code"},"data":{"description":"data"}}}}}}
```
## Get VM
> Get details of a specific virtual machine
```json
{"openapi":"3.0.1","info":{"title":"默认模块","version":"1.0.0"},"tags":[{"name":"API v2"},{"name":"VMs v2"}],"security":[{}],"paths":{"/v2/vms/{id}":{"get":{"summary":"Get VM","deprecated":false,"description":"Get details of a specific virtual machine","operationId":"getVm","tags":["VMs v2","API v2"],"parameters":[{"name":"id","in":"path","description":"","required":true,"schema":{"type":"integer","format":"int64"}}],"responses":{"200":{"description":"OK","content":{"*/*":{"schema":{"$ref":"#/components/schemas/ResultVmV2Response"}}},"headers":{}},"400":{"description":"Bad Request","content":{"*/*":{"schema":{"$ref":"#/components/schemas/Result"}}},"headers":{}},"500":{"description":"Internal Server Error","content":{"*/*":{"schema":{"$ref":"#/components/schemas/Result"}}},"headers":{}},"10000":{"description":"VM found","content":{"*/*":{"schema":{"$ref":"#/components/schemas/ResultVmV2Response"}}},"headers":{}},"11000":{"description":"VM not found","content":{"*/*":{"schema":{"$ref":"#/components/schemas/Result"}}},"headers":{}}}}}},"components":{"schemas":{"ResultVmV2Response":{"type":"object","properties":{"message":{"type":"string","description":"message"},"code":{"type":"integer","format":"int32","description":"code"},"data":{"$ref":"#/components/schemas/VmV2Response","description":"data"}}},"VmV2Response":{"type":"object","description":"VM Response v2","properties":{"id":{"type":"integer","format":"int64","description":"VM ID"},"orgId":{"type":"string","description":"Organization ID"},"name":{"type":"string","description":"VM nickname"},"gpuDisplayName":{"type":"string","description":"GPU display name"},"ipAddress":{"type":"string","description":"Public IP address"},"domainName":{"type":"string","description":"Domain name"},"cpuCores":{"type":"integer","format":"int32","description":"CPU cores"},"memoryInGb":{"type":"string","description":"Memory in GB"},"gpuCount":{"type":"integer","format":"int32","description":"GPU count"},"gpuMemoryInGb":{"type":"string","description":"GPU memory in GB"},"region":{"type":"string","description":"Region code"},"storageInGb":{"type":"string","description":"Storage in GB"},"notebookUrl":{"type":"string","description":"Jupyter notebook URL"},"sshTemplate":{"type":"string","description":"SSH connection template"},"status":{"type":"string","description":"VM status","enum":["INITIALIZING","RUNNING","STOPPING","STOPPED","TERMINATING","TERMINATED","FAILED"]},"createdAt":{"type":"integer","format":"int64","description":"Creation timestamp (epoch milliseconds)"},"terminatedAt":{"type":"integer","format":"int64","description":"Termination timestamp (epoch milliseconds)"},"updatedAt":{"type":"integer","format":"int64","description":"Last update timestamp (epoch milliseconds)"},"osInfo":{"type":"string","description":"Operating system info"},"gpuType":{"type":"string","description":"GPU type"},"isSpot":{"type":"boolean","description":"Spot instance flag: true=spot, false=on-demand"}}},"Result":{"type":"object","properties":{"message":{"type":"string","description":"message"},"code":{"type":"integer","format":"int32","description":"code"},"data":{"description":"data"}}}}}}
```
## List VMs
> Get all VMs for your organization with pagination
```json
{"openapi":"3.0.1","info":{"title":"默认模块","version":"1.0.0"},"tags":[{"name":"API v2"},{"name":"VMs v2"}],"security":[{}],"paths":{"/v2/vms":{"get":{"summary":"List VMs","deprecated":false,"description":"Get all VMs for your organization with pagination","operationId":"listVms","tags":["VMs v2","API v2"],"parameters":[{"name":"page","in":"query","description":"Page number (1-based)","required":false,"schema":{"type":"integer","format":"int64","default":1}},{"name":"size","in":"query","description":"Page size","required":false,"schema":{"type":"integer","format":"int64","default":10}},{"name":"status","in":"query","description":"Filter by status","required":false,"schema":{"type":"string"}}],"responses":{"200":{"description":"Success, returns paginated list of VMs","content":{"*/*":{"schema":{"$ref":"#/components/schemas/ResultV2PageResponseVmV2Response"}}},"headers":{}},"400":{"description":"Bad Request","content":{"*/*":{"schema":{"$ref":"#/components/schemas/Result"}}},"headers":{}},"500":{"description":"Internal Server Error","content":{"*/*":{"schema":{"$ref":"#/components/schemas/Result"}}},"headers":{}},"10000":{"description":"Success","content":{"*/*":{"schema":{"$ref":"#/components/schemas/ResultV2PageResponseVmV2Response"}}},"headers":{}}}}}},"components":{"schemas":{"ResultV2PageResponseVmV2Response":{"type":"object","properties":{"message":{"type":"string","description":"message"},"code":{"type":"integer","format":"int32","description":"code"},"data":{"$ref":"#/components/schemas/V2PageResponseVmV2Response","description":"data"}}},"V2PageResponseVmV2Response":{"type":"object","description":"Paginated Response","properties":{"items":{"type":"array","description":"List of items in the current page","items":{"$ref":"#/components/schemas/VmV2Response"}},"page":{"type":"integer","format":"int64","description":"Current page number (1-based)"},"size":{"type":"integer","format":"int64","description":"Number of items per page"},"total":{"type":"integer","format":"int64","description":"Total number of items across all pages"},"pages":{"type":"integer","format":"int64","description":"Total number of pages"}}},"VmV2Response":{"type":"object","description":"VM Response v2","properties":{"id":{"type":"integer","format":"int64","description":"VM ID"},"orgId":{"type":"string","description":"Organization ID"},"name":{"type":"string","description":"VM nickname"},"gpuDisplayName":{"type":"string","description":"GPU display name"},"ipAddress":{"type":"string","description":"Public IP address"},"domainName":{"type":"string","description":"Domain name"},"cpuCores":{"type":"integer","format":"int32","description":"CPU cores"},"memoryInGb":{"type":"string","description":"Memory in GB"},"gpuCount":{"type":"integer","format":"int32","description":"GPU count"},"gpuMemoryInGb":{"type":"string","description":"GPU memory in GB"},"region":{"type":"string","description":"Region code"},"storageInGb":{"type":"string","description":"Storage in GB"},"notebookUrl":{"type":"string","description":"Jupyter notebook URL"},"sshTemplate":{"type":"string","description":"SSH connection template"},"status":{"type":"string","description":"VM status","enum":["INITIALIZING","RUNNING","STOPPING","STOPPED","TERMINATING","TERMINATED","FAILED"]},"createdAt":{"type":"integer","format":"int64","description":"Creation timestamp (epoch milliseconds)"},"terminatedAt":{"type":"integer","format":"int64","description":"Termination timestamp (epoch milliseconds)"},"updatedAt":{"type":"integer","format":"int64","description":"Last update timestamp (epoch milliseconds)"},"osInfo":{"type":"string","description":"Operating system info"},"gpuType":{"type":"string","description":"GPU type"},"isSpot":{"type":"boolean","description":"Spot instance flag: true=spot, false=on-demand"}}},"Result":{"type":"object","properties":{"message":{"type":"string","description":"message"},"code":{"type":"integer","format":"int32","description":"code"},"data":{"description":"data"}}}}}}
```
## Get VM Types
> Get all available VM types (GPU models) and their regional availability
```json
{"openapi":"3.0.1","info":{"title":"默认模块","version":"1.0.0"},"tags":[{"name":"API v2"},{"name":"VMs v2"}],"security":[{}],"paths":{"/v2/vms/types":{"get":{"summary":"Get VM Types","deprecated":false,"description":"Get all available VM types (GPU models) and their regional availability","operationId":"getVmTypes","tags":["VMs v2","API v2"],"parameters":[],"responses":{"200":{"description":"Success, returns list of GPU types with regional availability","content":{"*/*":{"schema":{"$ref":"#/components/schemas/ResultListVmV2GpuTypeResponse"}}},"headers":{}},"400":{"description":"Bad Request","content":{"*/*":{"schema":{"$ref":"#/components/schemas/Result"}}},"headers":{}},"404":{"description":"Not Found","content":{"*/*":{"schema":{"$ref":"#/components/schemas/Result"}}},"headers":{}},"500":{"description":"Internal Server Error","content":{"*/*":{"schema":{"$ref":"#/components/schemas/Result"}}},"headers":{}},"10000":{"description":"Success","content":{"*/*":{"schema":{"$ref":"#/components/schemas/ResultListVmV2GpuTypeResponse"}}},"headers":{}}}}}},"components":{"schemas":{"ResultListVmV2GpuTypeResponse":{"type":"object","properties":{"message":{"type":"string","description":"message"},"code":{"type":"integer","format":"int32","description":"code"},"data":{"type":"array","description":"data","items":{"$ref":"#/components/schemas/VmV2GpuTypeResponse"}}}},"VmV2GpuTypeResponse":{"type":"object","description":"GPU type with regional availability","properties":{"gpuType":{"type":"string","description":"GPU model name (e.g. H100, RTX 4090)"},"regions":{"type":"array","description":"Regional availability for this GPU type","items":{"$ref":"#/components/schemas/VmV2RegionResponse"}}}},"VmV2RegionResponse":{"type":"object","description":"Region with available VM types","properties":{"region":{"type":"string","description":"Region code"},"types":{"type":"array","description":"Available VM types in this region","items":{"$ref":"#/components/schemas/VmV2TypeItemResponse"}}}},"VmV2TypeItemResponse":{"type":"object","description":"VM type item","properties":{"vmTypeId":{"type":"integer","format":"int32","description":"VM type ID, used when creating a VM"},"gpuCount":{"type":"integer","format":"int32","description":"Number of GPU cards"},"pricePerHour":{"type":"string","description":"On-demand price per hour (USD)"},"supportSpot":{"type":"boolean","description":"Whether spot instances are supported"},"spotPricePerHour":{"type":"string","description":"Spot price per hour (USD), present only when supportSpot is true"},"currency":{"type":"string","description":"Currency"},"displayName":{"type":"string","description":"Display name of the VM type"},"cpuCores":{"type":"integer","format":"int32","description":"Number of vCPU cores"},"memoryInGb":{"type":"string","description":"Memory in GB"},"gpuMemoryInGb":{"type":"string","description":"Single GPU card VRAM in GB"},"gpuTotalMemoryInGb":{"type":"string","description":"Total GPU VRAM in GB"},"storageType":{"type":"string","description":"Storage type (e.g. ssd)"},"storageCapacityInGb":{"type":"string","description":"Storage capacity in GB"},"osName":{"type":"string","description":"Operating system name"},"osVersion":{"type":"string","description":"Operating system version"},"supportOnDemand":{"type":"boolean","description":"Whether on-demand instances are supported"},"ondemandAvailable":{"type":"boolean","description":"Whether on-demand instances are currently available"},"spotAvailable":{"type":"boolean","description":"Whether spot instances are currently available"}}},"Result":{"type":"object","properties":{"message":{"type":"string","description":"message"},"code":{"type":"integer","format":"int32","description":"code"},"data":{"description":"data"}}}}}}
```
# Serverless
## Create Endpoint
> Create a new endpoint
```json
{"openapi":"3.0.1","info":{"title":"默认模块","version":"1.0.0"},"tags":[{"name":"API v2"},{"name":"Serverless v2"}],"security":[{}],"paths":{"/v2/serverless":{"post":{"summary":"Create Endpoint","deprecated":false,"description":"Create a new endpoint","operationId":"createEndpoint","tags":["API v2","Serverless v2"],"parameters":[],"requestBody":{"content":{"application/json":{"schema":{"$ref":"#/components/schemas/ElasticV2CreateRequest"}}},"required":true},"responses":{"200":{"description":"OK","content":{"*/*":{"schema":{"$ref":"#/components/schemas/ResultElasticV2Response"}}},"headers":{}},"400":{"description":"Bad Request","content":{"*/*":{"schema":{"$ref":"#/components/schemas/Result"}}},"headers":{}},"500":{"description":"Internal Server Error","content":{"*/*":{"schema":{"$ref":"#/components/schemas/Result"}}},"headers":{}},"10000":{"description":"Endpoint created successfully","content":{"*/*":{"schema":{"$ref":"#/components/schemas/ResultElasticV2Response"}}},"headers":{}},"10001":{"description":"Invalid request parameters","content":{"*/*":{"schema":{"$ref":"#/components/schemas/Result"}}},"headers":{}}}}}},"components":{"schemas":{"ElasticV2CreateRequest":{"type":"object","description":"Elastic Endpoint Create Request v2","properties":{"name":{"type":"string","description":"Deployment name","minLength":1,"pattern":"^(?=[A-Za-z])[A-Za-z0-9@._-]{1,20}$"},"imageRegistry":{"type":"string","description":"Docker registry URL","maxLength":255,"minLength":0},"image":{"type":"string","description":"Docker image name","maxLength":255,"minLength":1},"resources":{"type":"array","description":"GPU resources","items":{"$ref":"#/components/schemas/OpenapiElasticResource"},"minItems":1},"minSingleCardVramInGb":{"type":"integer","format":"int32","description":"Minimum GPU single card VRAM in GB","maximum":1536,"minimum":0},"minSingleCardVcpu":{"type":"integer","format":"int32","description":"Minimum GPU single card vCPU count"},"minSingleCardRamInGb":{"type":"integer","format":"int32","description":"Minimum GPU single card RAM in GB","maximum":1536,"minimum":0},"workers":{"type":"integer","format":"int32","description":"Number of workers","minimum":1},"credentialId":{"type":"integer","format":"int64","description":"Credential ID"},"containerVolumeInGb":{"type":"integer","format":"int32","description":"Container volume in GB","minimum":20},"initializationCommand":{"type":"string","description":"Initialization command"},"envVars":{"type":"array","description":"Environment variables","items":{"$ref":"#/components/schemas/KeyValuePairDTO"}},"expose":{"$ref":"#/components/schemas/ElasticV2ExposePort","description":"Exposed port"},"serviceMode":{"type":"string","description":"Service mode: ALB, QUEUE, CUSTOM","minLength":1},"webhook":{"type":"string","description":"Webhook URL for receiving task results","maxLength":512,"minLength":0,"pattern":"^https?://.*"}},"required":["containerVolumeInGb","image","name","resources","serviceMode","workers"]},"OpenapiElasticResource":{"type":"object","properties":{"region":{"type":"string","description":"Region","minLength":1},"gpuType":{"type":"string","description":"GPU Type","minLength":1},"gpuCount":{"type":"integer","format":"int32","description":"GPU Count"}},"required":["gpuCount","gpuType","region"]},"KeyValuePairDTO":{"type":"object","description":"KeyValuePairDTO","properties":{"key":{"type":"string","description":"key","minLength":1},"value":{"type":"string","description":"value","minLength":1}},"required":["key","value"]},"ElasticV2ExposePort":{"type":"object","description":"Exposed port configuration v2","properties":{"port":{"type":"integer","format":"int32","description":"Container port number","maximum":65535,"minimum":1},"protocol":{"type":"string","description":"Protocol type"}},"required":["port","protocol"]},"ResultElasticV2Response":{"type":"object","properties":{"message":{"type":"string","description":"message"},"code":{"type":"integer","format":"int32","description":"code"},"data":{"$ref":"#/components/schemas/ElasticV2Response","description":"data"}}},"ElasticV2Response":{"type":"object","description":"Elastic Endpoint Response v2","properties":{"id":{"type":"integer","format":"int64","description":"Deployment ID"},"name":{"type":"string","description":"Deployment name"},"creator":{"type":"string","description":"Creator email"},"domain":{"type":"string","description":"Custom domain"},"imageRegistry":{"type":"string","description":"Docker registry URL"},"image":{"type":"string","description":"Docker image name"},"resources":{"type":"array","description":"GPU resources","items":{"$ref":"#/components/schemas/OpenapiElasticResourceResponse"}},"minSingleCardVramInGb":{"type":"integer","format":"int32","description":"Minimum GPU single card VRAM in GB"},"minSingleCardVcpu":{"type":"integer","format":"int32","description":"Minimum GPU single card vCPU count"},"minSingleCardRamInGb":{"type":"integer","format":"int32","description":"Minimum GPU single card RAM in GB"},"credentialId":{"type":"integer","format":"int64","description":"Credential ID"},"containerVolumeInGb":{"type":"integer","format":"int32","description":"Container volume in GB"},"initializationCommand":{"type":"string","description":"Initialization command"},"environmentVars":{"type":"array","description":"Environment variables","items":{"$ref":"#/components/schemas/KeyValuePairDTO"}},"expose":{"$ref":"#/components/schemas/OpenapiExposePortResponse","description":"Exposed port"},"totalWorkers":{"type":"integer","format":"int32","description":"Total workers"},"runningWorkers":{"type":"integer","format":"int32","description":"Running workers"},"cost":{"type":"number","description":"Accumulated cost"},"perSecondPrice":{"type":"number","description":"Per-second price"},"perHourPrice":{"type":"number","description":"Per-hour price"},"serviceMode":{"type":"string","description":"Service mode","enum":["ALB","QUEUE","CUSTOM"]},"webhook":{"type":"string","description":"Webhook URL"},"status":{"type":"string","description":"Deployment status","enum":["INITIALIZING","RUNNING","STOPPING","STOPPED","FAILED"]}}},"OpenapiElasticResourceResponse":{"type":"object","description":"ElasticResource","properties":{"region":{"type":"string","description":"Region"},"regionDisplayName":{"type":"string","description":"Region Display Name"},"gpuType":{"type":"string","description":"GPU Type"},"gpuDisplayName":{"type":"string","description":"GPU DisplayName"},"gpuCount":{"type":"integer","format":"int32","description":"GPU Count"},"singleCardVramInGb":{"type":"integer","format":"int32","description":"GPU Single Card VRAM(GB)"},"singleCardVcpu":{"type":"integer","format":"int32","description":"GPU Single Card VCPU"},"singleCardRamInGb":{"type":"integer","format":"int32","description":"GPU Single Card RAM(GB)"}}},"OpenapiExposePortResponse":{"type":"object","description":"ElasticExpose","properties":{"port":{"type":"integer","format":"int32","description":"port"},"protocol":{"type":"string","description":"protocol"}}},"Result":{"type":"object","properties":{"message":{"type":"string","description":"message"},"code":{"type":"integer","format":"int32","description":"code"},"data":{"description":"data"}}}}}}
```
## Submit Task
> Submit a task to a QUEUE-mode endpoint
```json
{"openapi":"3.0.1","info":{"title":"默认模块","version":"1.0.0"},"tags":[{"name":"API v2"},{"name":"Serverless v2"}],"security":[{}],"paths":{"/v2/serverless/{id}/tasks":{"post":{"summary":"Submit Task","deprecated":false,"description":"Submit a task to a QUEUE-mode endpoint","operationId":"submitTask","tags":["API v2","Serverless v2"],"parameters":[{"name":"id","in":"path","description":"","required":true,"schema":{"type":"integer","format":"int64"}}],"requestBody":{"content":{"application/json":{"schema":{"$ref":"#/components/schemas/ElasticV2SubmitTaskRequest"}}},"required":true},"responses":{"200":{"description":"OK","content":{"*/*":{"schema":{"$ref":"#/components/schemas/ResultElasticV2SubmitTaskResponse"}}},"headers":{}},"400":{"description":"Bad Request","content":{"*/*":{"schema":{"$ref":"#/components/schemas/Result"}}},"headers":{}},"500":{"description":"Internal Server Error","content":{"*/*":{"schema":{"$ref":"#/components/schemas/Result"}}},"headers":{}},"10000":{"description":"Task submitted successfully","content":{"*/*":{"schema":{"$ref":"#/components/schemas/ResultElasticV2SubmitTaskResponse"}}},"headers":{}},"10001":{"description":"Invalid request or non-QUEUE endpoint","content":{"*/*":{"schema":{"$ref":"#/components/schemas/Result"}}},"headers":{}},"14000":{"description":"Endpoint not found","content":{"*/*":{"schema":{"$ref":"#/components/schemas/Result"}}},"headers":{}},"24000":{"description":"Serverless unavailable","content":{"*/*":{"schema":{"$ref":"#/components/schemas/Result"}}},"headers":{}},"24001":{"description":"Serverless does not exist","content":{"*/*":{"schema":{"$ref":"#/components/schemas/Result"}}},"headers":{}}}}}},"components":{"schemas":{"ElasticV2SubmitTaskRequest":{"type":"object","description":"Elastic Endpoint Submit Task Request v2","properties":{"taskId":{"type":"string","description":"User-defined task ID. Auto-generated UUID if omitted","maxLength":255,"minLength":0,"pattern":"^[A-Za-z0-9_]*$"},"input":{"description":"Task input data"},"workerPort":{"type":"integer","format":"int32","description":"Worker port (1-65535)","maximum":65535,"minimum":1},"processUri":{"type":"string","description":"Process URI on the worker","maxLength":255,"minLength":0},"webhook":{"type":"string","description":"Webhook URL for result delivery","maxLength":512,"minLength":0,"pattern":"^https?://.*"},"webhookAuthKey":{"type":"string","description":"Webhook authentication key","maxLength":255,"minLength":0},"headers":{"type":"object","additionalProperties":{"type":"string"},"description":"Headers to forward with the task request","properties":{}}},"required":["input","processUri","workerPort"]},"ResultElasticV2SubmitTaskResponse":{"type":"object","properties":{"message":{"type":"string","description":"message"},"code":{"type":"integer","format":"int32","description":"code"},"data":{"$ref":"#/components/schemas/ElasticV2SubmitTaskResponse","description":"data"}}},"ElasticV2SubmitTaskResponse":{"type":"object","description":"Elastic Endpoint Submit Task Response v2","properties":{"taskId":{"type":"string","description":"Task identifier"}}},"Result":{"type":"object","properties":{"message":{"type":"string","description":"message"},"code":{"type":"integer","format":"int32","description":"code"},"data":{"description":"data"}}}}}}
```
## Start Endpoint
> Start or resume a stopped endpoint
```json
{"openapi":"3.0.1","info":{"title":"默认模块","version":"1.0.0"},"tags":[{"name":"API v2"},{"name":"Serverless v2"}],"security":[{}],"paths":{"/v2/serverless/{id}/start":{"post":{"summary":"Start Endpoint","deprecated":false,"description":"Start or resume a stopped endpoint","operationId":"startEndpoint","tags":["API v2","Serverless v2"],"parameters":[{"name":"id","in":"path","description":"","required":true,"schema":{"type":"integer","format":"int64"}}],"responses":{"200":{"description":"OK","content":{"*/*":{"schema":{"$ref":"#/components/schemas/ResultVoid"}}},"headers":{}},"400":{"description":"Bad Request","content":{"*/*":{"schema":{"$ref":"#/components/schemas/Result"}}},"headers":{}},"500":{"description":"Internal Server Error","content":{"*/*":{"schema":{"$ref":"#/components/schemas/Result"}}},"headers":{}},"10000":{"description":"Endpoint started","content":{"*/*":{"schema":{"$ref":"#/components/schemas/ResultVoid"}}},"headers":{}},"14000":{"description":"Endpoint not found","content":{"*/*":{"schema":{"$ref":"#/components/schemas/Result"}}},"headers":{}}}}}},"components":{"schemas":{"ResultVoid":{"type":"object","properties":{"message":{"type":"string","description":"message"},"code":{"type":"integer","format":"int32","description":"code"},"data":{"description":"data"}}},"Result":{"type":"object","properties":{"message":{"type":"string","description":"message"},"code":{"type":"integer","format":"int32","description":"code"},"data":{"description":"data"}}}}}}
```
## Stop Endpoint
> Stop a running endpoint
```json
{"openapi":"3.0.1","info":{"title":"默认模块","version":"1.0.0"},"tags":[{"name":"API v2"},{"name":"Serverless v2"}],"security":[{}],"paths":{"/v2/serverless/{id}/stop":{"post":{"summary":"Stop Endpoint","deprecated":false,"description":"Stop a running endpoint","operationId":"stopEndpoint","tags":["API v2","Serverless v2"],"parameters":[{"name":"id","in":"path","description":"","required":true,"schema":{"type":"integer","format":"int64"}}],"responses":{"200":{"description":"OK","content":{"*/*":{"schema":{"$ref":"#/components/schemas/ResultVoid"}}},"headers":{}},"400":{"description":"Bad Request","content":{"*/*":{"schema":{"$ref":"#/components/schemas/Result"}}},"headers":{}},"500":{"description":"Internal Server Error","content":{"*/*":{"schema":{"$ref":"#/components/schemas/Result"}}},"headers":{}},"10000":{"description":"Endpoint stopped","content":{"*/*":{"schema":{"$ref":"#/components/schemas/ResultVoid"}}},"headers":{}},"14000":{"description":"Endpoint not found","content":{"*/*":{"schema":{"$ref":"#/components/schemas/Result"}}},"headers":{}}}}}},"components":{"schemas":{"ResultVoid":{"type":"object","properties":{"message":{"type":"string","description":"message"},"code":{"type":"integer","format":"int32","description":"code"},"data":{"description":"data"}}},"Result":{"type":"object","properties":{"message":{"type":"string","description":"message"},"code":{"type":"integer","format":"int32","description":"code"},"data":{"description":"data"}}}}}}
```
## Delete Endpoint
> Delete an endpoint
```json
{"openapi":"3.0.1","info":{"title":"默认模块","version":"1.0.0"},"tags":[{"name":"API v2"},{"name":"Serverless v2"}],"security":[{}],"paths":{"/v2/serverless/{id}":{"delete":{"summary":"Delete Endpoint","deprecated":false,"description":"Delete an endpoint","operationId":"deleteEndpoint","tags":["API v2","Serverless v2"],"parameters":[{"name":"id","in":"path","description":"","required":true,"schema":{"type":"integer","format":"int64"}}],"responses":{"200":{"description":"OK","content":{"*/*":{"schema":{"$ref":"#/components/schemas/ResultVoid"}}},"headers":{}},"400":{"description":"Bad Request","content":{"*/*":{"schema":{"$ref":"#/components/schemas/Result"}}},"headers":{}},"500":{"description":"Internal Server Error","content":{"*/*":{"schema":{"$ref":"#/components/schemas/Result"}}},"headers":{}},"10000":{"description":"Endpoint deleted","content":{"*/*":{"schema":{"$ref":"#/components/schemas/ResultVoid"}}},"headers":{}},"14000":{"description":"Endpoint not found","content":{"*/*":{"schema":{"$ref":"#/components/schemas/Result"}}},"headers":{}}}}}},"components":{"schemas":{"ResultVoid":{"type":"object","properties":{"message":{"type":"string","description":"message"},"code":{"type":"integer","format":"int32","description":"code"},"data":{"description":"data"}}},"Result":{"type":"object","properties":{"message":{"type":"string","description":"message"},"code":{"type":"integer","format":"int32","description":"code"},"data":{"description":"data"}}}}}}
```
## Get Endpoint
> Get details of a specific endpoint
```json
{"openapi":"3.0.1","info":{"title":"默认模块","version":"1.0.0"},"tags":[{"name":"API v2"},{"name":"Serverless v2"}],"security":[{}],"paths":{"/v2/serverless/{id}":{"get":{"summary":"Get Endpoint","deprecated":false,"description":"Get details of a specific endpoint","operationId":"getEndpoint","tags":["API v2","Serverless v2"],"parameters":[{"name":"id","in":"path","description":"","required":true,"schema":{"type":"integer","format":"int64"}}],"responses":{"200":{"description":"OK","content":{"*/*":{"schema":{"$ref":"#/components/schemas/ResultElasticV2Response"}}},"headers":{}},"400":{"description":"Bad Request","content":{"*/*":{"schema":{"$ref":"#/components/schemas/Result"}}},"headers":{}},"500":{"description":"Internal Server Error","content":{"*/*":{"schema":{"$ref":"#/components/schemas/Result"}}},"headers":{}},"10000":{"description":"Endpoint found","content":{"*/*":{"schema":{"$ref":"#/components/schemas/ResultElasticV2Response"}}},"headers":{}},"14000":{"description":"Endpoint not found","content":{"*/*":{"schema":{"$ref":"#/components/schemas/Result"}}},"headers":{}}}}}},"components":{"schemas":{"ResultElasticV2Response":{"type":"object","properties":{"message":{"type":"string","description":"message"},"code":{"type":"integer","format":"int32","description":"code"},"data":{"$ref":"#/components/schemas/ElasticV2Response","description":"data"}}},"ElasticV2Response":{"type":"object","description":"Elastic Endpoint Response v2","properties":{"id":{"type":"integer","format":"int64","description":"Deployment ID"},"name":{"type":"string","description":"Deployment name"},"creator":{"type":"string","description":"Creator email"},"domain":{"type":"string","description":"Custom domain"},"imageRegistry":{"type":"string","description":"Docker registry URL"},"image":{"type":"string","description":"Docker image name"},"resources":{"type":"array","description":"GPU resources","items":{"$ref":"#/components/schemas/OpenapiElasticResourceResponse"}},"minSingleCardVramInGb":{"type":"integer","format":"int32","description":"Minimum GPU single card VRAM in GB"},"minSingleCardVcpu":{"type":"integer","format":"int32","description":"Minimum GPU single card vCPU count"},"minSingleCardRamInGb":{"type":"integer","format":"int32","description":"Minimum GPU single card RAM in GB"},"credentialId":{"type":"integer","format":"int64","description":"Credential ID"},"containerVolumeInGb":{"type":"integer","format":"int32","description":"Container volume in GB"},"initializationCommand":{"type":"string","description":"Initialization command"},"environmentVars":{"type":"array","description":"Environment variables","items":{"$ref":"#/components/schemas/KeyValuePairDTO"}},"expose":{"$ref":"#/components/schemas/OpenapiExposePortResponse","description":"Exposed port"},"totalWorkers":{"type":"integer","format":"int32","description":"Total workers"},"runningWorkers":{"type":"integer","format":"int32","description":"Running workers"},"cost":{"type":"number","description":"Accumulated cost"},"perSecondPrice":{"type":"number","description":"Per-second price"},"perHourPrice":{"type":"number","description":"Per-hour price"},"serviceMode":{"type":"string","description":"Service mode","enum":["ALB","QUEUE","CUSTOM"]},"webhook":{"type":"string","description":"Webhook URL"},"status":{"type":"string","description":"Deployment status","enum":["INITIALIZING","RUNNING","STOPPING","STOPPED","FAILED"]}}},"OpenapiElasticResourceResponse":{"type":"object","description":"ElasticResource","properties":{"region":{"type":"string","description":"Region"},"regionDisplayName":{"type":"string","description":"Region Display Name"},"gpuType":{"type":"string","description":"GPU Type"},"gpuDisplayName":{"type":"string","description":"GPU DisplayName"},"gpuCount":{"type":"integer","format":"int32","description":"GPU Count"},"singleCardVramInGb":{"type":"integer","format":"int32","description":"GPU Single Card VRAM(GB)"},"singleCardVcpu":{"type":"integer","format":"int32","description":"GPU Single Card VCPU"},"singleCardRamInGb":{"type":"integer","format":"int32","description":"GPU Single Card RAM(GB)"}}},"KeyValuePairDTO":{"type":"object","description":"KeyValuePairDTO","properties":{"key":{"type":"string","description":"key","minLength":1},"value":{"type":"string","description":"value","minLength":1}},"required":["key","value"]},"OpenapiExposePortResponse":{"type":"object","description":"ElasticExpose","properties":{"port":{"type":"integer","format":"int32","description":"port"},"protocol":{"type":"string","description":"protocol"}}},"Result":{"type":"object","properties":{"message":{"type":"string","description":"message"},"code":{"type":"integer","format":"int32","description":"code"},"data":{"description":"data"}}}}}}
```
## List Tasks
> Get all tasks of a QUEUE-mode endpoint
```json
{"openapi":"3.0.1","info":{"title":"默认模块","version":"1.0.0"},"tags":[{"name":"API v2"},{"name":"Serverless v2"}],"security":[{}],"paths":{"/v2/serverless/{id}/tasks":{"get":{"summary":"List Tasks","deprecated":false,"description":"Get all tasks of a QUEUE-mode endpoint","operationId":"listTasks","tags":["API v2","Serverless v2"],"parameters":[{"name":"id","in":"path","description":"","required":true,"schema":{"type":"integer","format":"int64"}},{"name":"status","in":"query","description":"Filter by status: PROCESSING, DELIVERED, SUCCESS, FAILED","required":false,"schema":{"type":"string"}},{"name":"pageNumber","in":"query","description":"","required":false,"schema":{"type":"integer","format":"int32","default":1}},{"name":"pageSize","in":"query","description":"","required":false,"schema":{"type":"integer","format":"int32","default":10}}],"responses":{"200":{"description":"OK","content":{"*/*":{"schema":{"$ref":"#/components/schemas/ResultV2PageResponseElasticV2TaskResponse"}}},"headers":{}},"400":{"description":"Bad Request","content":{"*/*":{"schema":{"$ref":"#/components/schemas/Result"}}},"headers":{}},"500":{"description":"Internal Server Error","content":{"*/*":{"schema":{"$ref":"#/components/schemas/Result"}}},"headers":{}},"10000":{"description":"Success","content":{"*/*":{"schema":{"$ref":"#/components/schemas/ResultV2PageResponseElasticV2TaskResponse"}}},"headers":{}},"14000":{"description":"Endpoint not found","content":{"*/*":{"schema":{"$ref":"#/components/schemas/Result"}}},"headers":{}},"24000":{"description":"Serverless unavailable","content":{"*/*":{"schema":{"$ref":"#/components/schemas/Result"}}},"headers":{}},"24001":{"description":"Serverless does not exist","content":{"*/*":{"schema":{"$ref":"#/components/schemas/Result"}}},"headers":{}}}}}},"components":{"schemas":{"ResultV2PageResponseElasticV2TaskResponse":{"type":"object","properties":{"message":{"type":"string","description":"message"},"code":{"type":"integer","format":"int32","description":"code"},"data":{"$ref":"#/components/schemas/V2PageResponseElasticV2TaskResponse","description":"data"}}},"V2PageResponseElasticV2TaskResponse":{"type":"object","description":"Paginated Response","properties":{"items":{"type":"array","description":"List of items in the current page","items":{"$ref":"#/components/schemas/ElasticV2TaskResponse"}},"page":{"type":"integer","format":"int64","description":"Current page number (1-based)"},"size":{"type":"integer","format":"int64","description":"Number of items per page"},"total":{"type":"integer","format":"int64","description":"Total number of items across all pages"},"pages":{"type":"integer","format":"int64","description":"Total number of pages"}}},"ElasticV2TaskResponse":{"type":"object","description":"Elastic Endpoint Task Response v2","properties":{"taskId":{"type":"string","description":"Unique task identifier"},"endpointId":{"type":"integer","format":"int64","description":"Parent endpoint ID"},"endpointName":{"type":"string","description":"Parent endpoint name"},"status":{"type":"string","description":"Task execution status: PROCESSING, DELIVERED, SUCCESS, FAILED"},"workerUrl":{"type":"string","description":"Worker URL processing this task"},"webhook":{"type":"string","description":"Webhook URL for result delivery"},"deliveryStatus":{"type":"string","description":"Webhook delivery status: INIT, SUCCESS, FAILED, MAX_RETRIES_EXCEEDED"},"deliveryAttempts":{"type":"integer","format":"int32","description":"Number of delivery attempts"},"error":{"type":"string","description":"Error message if failed"},"createdAt":{"type":"integer","format":"int64","description":"Task creation time (epoch milliseconds)"},"deliveredAt":{"type":"integer","format":"int64","description":"Webhook delivery time (epoch milliseconds)"},"updatedAt":{"type":"integer","format":"int64","description":"Last update time (epoch milliseconds)"}}},"Result":{"type":"object","properties":{"message":{"type":"string","description":"message"},"code":{"type":"integer","format":"int32","description":"code"},"data":{"description":"data"}}}}}}
```
## List Endpoints
> Get all elastic endpoints
```json
{"openapi":"3.0.1","info":{"title":"默认模块","version":"1.0.0"},"tags":[{"name":"API v2"},{"name":"Serverless v2"}],"security":[{}],"paths":{"/v2/serverless":{"get":{"summary":"List Endpoints","deprecated":false,"description":"Get all elastic endpoints","operationId":"listEndpoints","tags":["API v2","Serverless v2"],"parameters":[{"name":"statusList","in":"query","description":"","required":false,"schema":{"type":"array","items":{"type":"string"}}}],"responses":{"200":{"description":"Success, returns list of endpoints","content":{"*/*":{"schema":{"$ref":"#/components/schemas/ResultListElasticV2Response"}}},"headers":{}},"400":{"description":"Bad Request","content":{"*/*":{"schema":{"$ref":"#/components/schemas/Result"}}},"headers":{}},"500":{"description":"Internal Server Error","content":{"*/*":{"schema":{"$ref":"#/components/schemas/Result"}}},"headers":{}},"10000":{"description":"Success","content":{"*/*":{"schema":{"$ref":"#/components/schemas/ResultListElasticV2Response"}}},"headers":{}}}}}},"components":{"schemas":{"ResultListElasticV2Response":{"type":"object","properties":{"message":{"type":"string","description":"message"},"code":{"type":"integer","format":"int32","description":"code"},"data":{"type":"array","description":"data","items":{"$ref":"#/components/schemas/ElasticV2Response"}}}},"ElasticV2Response":{"type":"object","description":"Elastic Endpoint Response v2","properties":{"id":{"type":"integer","format":"int64","description":"Deployment ID"},"name":{"type":"string","description":"Deployment name"},"creator":{"type":"string","description":"Creator email"},"domain":{"type":"string","description":"Custom domain"},"imageRegistry":{"type":"string","description":"Docker registry URL"},"image":{"type":"string","description":"Docker image name"},"resources":{"type":"array","description":"GPU resources","items":{"$ref":"#/components/schemas/OpenapiElasticResourceResponse"}},"minSingleCardVramInGb":{"type":"integer","format":"int32","description":"Minimum GPU single card VRAM in GB"},"minSingleCardVcpu":{"type":"integer","format":"int32","description":"Minimum GPU single card vCPU count"},"minSingleCardRamInGb":{"type":"integer","format":"int32","description":"Minimum GPU single card RAM in GB"},"credentialId":{"type":"integer","format":"int64","description":"Credential ID"},"containerVolumeInGb":{"type":"integer","format":"int32","description":"Container volume in GB"},"initializationCommand":{"type":"string","description":"Initialization command"},"environmentVars":{"type":"array","description":"Environment variables","items":{"$ref":"#/components/schemas/KeyValuePairDTO"}},"expose":{"$ref":"#/components/schemas/OpenapiExposePortResponse","description":"Exposed port"},"totalWorkers":{"type":"integer","format":"int32","description":"Total workers"},"runningWorkers":{"type":"integer","format":"int32","description":"Running workers"},"cost":{"type":"number","description":"Accumulated cost"},"perSecondPrice":{"type":"number","description":"Per-second price"},"perHourPrice":{"type":"number","description":"Per-hour price"},"serviceMode":{"type":"string","description":"Service mode","enum":["ALB","QUEUE","CUSTOM"]},"webhook":{"type":"string","description":"Webhook URL"},"status":{"type":"string","description":"Deployment status","enum":["INITIALIZING","RUNNING","STOPPING","STOPPED","FAILED"]}}},"OpenapiElasticResourceResponse":{"type":"object","description":"ElasticResource","properties":{"region":{"type":"string","description":"Region"},"regionDisplayName":{"type":"string","description":"Region Display Name"},"gpuType":{"type":"string","description":"GPU Type"},"gpuDisplayName":{"type":"string","description":"GPU DisplayName"},"gpuCount":{"type":"integer","format":"int32","description":"GPU Count"},"singleCardVramInGb":{"type":"integer","format":"int32","description":"GPU Single Card VRAM(GB)"},"singleCardVcpu":{"type":"integer","format":"int32","description":"GPU Single Card VCPU"},"singleCardRamInGb":{"type":"integer","format":"int32","description":"GPU Single Card RAM(GB)"}}},"KeyValuePairDTO":{"type":"object","description":"KeyValuePairDTO","properties":{"key":{"type":"string","description":"key","minLength":1},"value":{"type":"string","description":"value","minLength":1}},"required":["key","value"]},"OpenapiExposePortResponse":{"type":"object","description":"ElasticExpose","properties":{"port":{"type":"integer","format":"int32","description":"port"},"protocol":{"type":"string","description":"protocol"}}},"Result":{"type":"object","properties":{"message":{"type":"string","description":"message"},"code":{"type":"integer","format":"int32","description":"code"},"data":{"description":"data"}}}}}}
```
## Scale Workers
> Scale the number of workers for an endpoint
```json
{"openapi":"3.0.1","info":{"title":"默认模块","version":"1.0.0"},"tags":[{"name":"API v2"},{"name":"Serverless v2"}],"security":[{}],"paths":{"/v2/serverless/{id}/workers":{"put":{"summary":"Scale Workers","deprecated":false,"description":"Scale the number of workers for an endpoint","operationId":"scaleWorkers","tags":["API v2","Serverless v2"],"parameters":[{"name":"id","in":"path","description":"","required":true,"schema":{"type":"integer","format":"int64"}},{"name":"count","in":"query","description":"","required":true,"schema":{"type":"integer","format":"int32"}}],"responses":{"200":{"description":"OK","content":{"*/*":{"schema":{"$ref":"#/components/schemas/ResultVoid"}}},"headers":{}},"400":{"description":"Bad Request","content":{"*/*":{"schema":{"$ref":"#/components/schemas/Result"}}},"headers":{}},"500":{"description":"Internal Server Error","content":{"*/*":{"schema":{"$ref":"#/components/schemas/Result"}}},"headers":{}},"10000":{"description":"Workers scaled","content":{"*/*":{"schema":{"$ref":"#/components/schemas/ResultVoid"}}},"headers":{}},"14000":{"description":"Endpoint not found","content":{"*/*":{"schema":{"$ref":"#/components/schemas/Result"}}},"headers":{}}}}}},"components":{"schemas":{"ResultVoid":{"type":"object","properties":{"message":{"type":"string","description":"message"},"code":{"type":"integer","format":"int32","description":"code"},"data":{"description":"data"}}},"Result":{"type":"object","properties":{"message":{"type":"string","description":"message"},"code":{"type":"integer","format":"int32","description":"code"},"data":{"description":"data"}}}}}}
```
## Get Task
> Get details of a specific task
```json
{"openapi":"3.0.1","info":{"title":"默认模块","version":"1.0.0"},"tags":[{"name":"API v2"},{"name":"Serverless v2"}],"security":[{}],"paths":{"/v2/serverless/{id}/tasks/{taskId}":{"get":{"summary":"Get Task","deprecated":false,"description":"Get details of a specific task","operationId":"getTask","tags":["API v2","Serverless v2"],"parameters":[{"name":"id","in":"path","description":"","required":true,"schema":{"type":"integer","format":"int64"}},{"name":"taskId","in":"path","description":"","required":true,"schema":{"type":"string"}}],"responses":{"200":{"description":"OK","content":{"*/*":{"schema":{"$ref":"#/components/schemas/ResultElasticV2TaskDetailResponse"}}},"headers":{}},"400":{"description":"Bad Request","content":{"*/*":{"schema":{"$ref":"#/components/schemas/Result"}}},"headers":{}},"500":{"description":"Internal Server Error","content":{"*/*":{"schema":{"$ref":"#/components/schemas/Result"}}},"headers":{}},"10000":{"description":"Task found","content":{"*/*":{"schema":{"$ref":"#/components/schemas/ResultElasticV2TaskDetailResponse"}}},"headers":{}},"14000":{"description":"Endpoint not found","content":{"*/*":{"schema":{"$ref":"#/components/schemas/Result"}}},"headers":{}},"24000":{"description":"Serverless unavailable","content":{"*/*":{"schema":{"$ref":"#/components/schemas/Result"}}},"headers":{}},"24011":{"description":"Task does not exist","content":{"*/*":{"schema":{"$ref":"#/components/schemas/Result"}}},"headers":{}}}}}},"components":{"schemas":{"ResultElasticV2TaskDetailResponse":{"type":"object","properties":{"message":{"type":"string","description":"message"},"code":{"type":"integer","format":"int32","description":"code"},"data":{"$ref":"#/components/schemas/ElasticV2TaskDetailResponse","description":"data"}}},"ElasticV2TaskDetailResponse":{"type":"object","description":"Elastic Endpoint Task Detail Response v2","properties":{"taskId":{"type":"string","description":"Unique task identifier"},"endpointId":{"type":"integer","format":"int64","description":"Parent endpoint ID"},"endpointName":{"type":"string","description":"Parent endpoint name"},"status":{"type":"string","description":"Task execution status: PROCESSING, DELIVERED, SUCCESS, FAILED"},"workerUrl":{"type":"string","description":"Worker URL processing this task"},"webhook":{"type":"string","description":"Webhook URL for result delivery"},"deliveryStatus":{"type":"string","description":"Webhook delivery status: INIT, SUCCESS, FAILED, MAX_RETRIES_EXCEEDED"},"deliveryAttempts":{"type":"integer","format":"int32","description":"Number of delivery attempts"},"error":{"type":"string","description":"Error message if failed"},"input":{"description":"Task input data"},"output":{"description":"Task output/result data"},"headers":{"type":"object","additionalProperties":{"type":"string"},"description":"Headers forwarded with the task request","properties":{}},"createdAt":{"type":"integer","format":"int64","description":"Task creation time (epoch milliseconds)"},"updatedAt":{"type":"integer","format":"int64","description":"Last update time (epoch milliseconds)"},"deliveredAt":{"type":"integer","format":"int64","description":"Webhook delivery time (epoch milliseconds)"}}},"Result":{"type":"object","properties":{"message":{"type":"string","description":"message"},"code":{"type":"integer","format":"int32","description":"code"},"data":{"description":"data"}}}}}}
```
## Update Endpoint
> Update a specific endpoint
```json
{"openapi":"3.0.1","info":{"title":"默认模块","version":"1.0.0"},"tags":[{"name":"API v2"},{"name":"Serverless v2"}],"security":[{}],"paths":{"/v2/serverless/{id}":{"patch":{"summary":"Update Endpoint","deprecated":false,"description":"Update a specific endpoint","operationId":"updateEndpoint","tags":["API v2","Serverless v2"],"parameters":[{"name":"id","in":"path","description":"","required":true,"schema":{"type":"integer","format":"int64"}}],"requestBody":{"content":{"application/json":{"schema":{"$ref":"#/components/schemas/ElasticV2UpdateRequest"}}},"required":true},"responses":{"200":{"description":"OK","content":{"*/*":{"schema":{"$ref":"#/components/schemas/ResultElasticV2Response"}}},"headers":{}},"400":{"description":"Bad Request","content":{"*/*":{"schema":{"$ref":"#/components/schemas/Result"}}},"headers":{}},"500":{"description":"Internal Server Error","content":{"*/*":{"schema":{"$ref":"#/components/schemas/Result"}}},"headers":{}},"10000":{"description":"Endpoint updated successfully","content":{"*/*":{"schema":{"$ref":"#/components/schemas/ResultElasticV2Response"}}},"headers":{}},"14000":{"description":"Endpoint not found","content":{"*/*":{"schema":{"$ref":"#/components/schemas/Result"}}},"headers":{}}}}}},"components":{"schemas":{"ElasticV2UpdateRequest":{"type":"object","description":"Elastic Endpoint Update Request v2","properties":{"name":{"type":"string","description":"Deployment name","minLength":1,"pattern":"^(?=[A-Za-z])[A-Za-z0-9@._-]{1,20}$"},"resources":{"type":"array","description":"GPU resources","items":{"$ref":"#/components/schemas/OpenapiElasticResource"},"minItems":1},"minSingleCardVramInGb":{"type":"integer","format":"int32","description":"Minimum GPU single card VRAM in GB"},"minSingleCardVcpu":{"type":"integer","format":"int32","description":"Minimum GPU single card vCPU count"},"minSingleCardRamInGb":{"type":"integer","format":"int32","description":"Minimum GPU single card RAM in GB"},"workers":{"type":"integer","format":"int32","description":"Number of workers","minimum":1},"credentialId":{"type":"integer","format":"int64","description":"Credential ID"},"containerVolumeInGb":{"type":"integer","format":"int32","description":"Container volume in GB","minimum":20},"initializationCommand":{"type":"string","description":"Initialization command"},"envVars":{"type":"array","description":"Environment variables","items":{"$ref":"#/components/schemas/KeyValuePairDTO"}},"expose":{"$ref":"#/components/schemas/ElasticV2ExposePort","description":"Exposed port"},"webhook":{"type":"string","description":"Webhook URL for receiving task results","maxLength":512,"minLength":0,"pattern":"^https?://.*"}},"required":["containerVolumeInGb","name","resources","workers"]},"OpenapiElasticResource":{"type":"object","properties":{"region":{"type":"string","description":"Region","minLength":1},"gpuType":{"type":"string","description":"GPU Type","minLength":1},"gpuCount":{"type":"integer","format":"int32","description":"GPU Count"}},"required":["gpuCount","gpuType","region"]},"KeyValuePairDTO":{"type":"object","description":"KeyValuePairDTO","properties":{"key":{"type":"string","description":"key","minLength":1},"value":{"type":"string","description":"value","minLength":1}},"required":["key","value"]},"ElasticV2ExposePort":{"type":"object","description":"Exposed port configuration v2","properties":{"port":{"type":"integer","format":"int32","description":"Container port number","maximum":65535,"minimum":1},"protocol":{"type":"string","description":"Protocol type"}},"required":["port","protocol"]},"ResultElasticV2Response":{"type":"object","properties":{"message":{"type":"string","description":"message"},"code":{"type":"integer","format":"int32","description":"code"},"data":{"$ref":"#/components/schemas/ElasticV2Response","description":"data"}}},"ElasticV2Response":{"type":"object","description":"Elastic Endpoint Response v2","properties":{"id":{"type":"integer","format":"int64","description":"Deployment ID"},"name":{"type":"string","description":"Deployment name"},"creator":{"type":"string","description":"Creator email"},"domain":{"type":"string","description":"Custom domain"},"imageRegistry":{"type":"string","description":"Docker registry URL"},"image":{"type":"string","description":"Docker image name"},"resources":{"type":"array","description":"GPU resources","items":{"$ref":"#/components/schemas/OpenapiElasticResourceResponse"}},"minSingleCardVramInGb":{"type":"integer","format":"int32","description":"Minimum GPU single card VRAM in GB"},"minSingleCardVcpu":{"type":"integer","format":"int32","description":"Minimum GPU single card vCPU count"},"minSingleCardRamInGb":{"type":"integer","format":"int32","description":"Minimum GPU single card RAM in GB"},"credentialId":{"type":"integer","format":"int64","description":"Credential ID"},"containerVolumeInGb":{"type":"integer","format":"int32","description":"Container volume in GB"},"initializationCommand":{"type":"string","description":"Initialization command"},"environmentVars":{"type":"array","description":"Environment variables","items":{"$ref":"#/components/schemas/KeyValuePairDTO"}},"expose":{"$ref":"#/components/schemas/OpenapiExposePortResponse","description":"Exposed port"},"totalWorkers":{"type":"integer","format":"int32","description":"Total workers"},"runningWorkers":{"type":"integer","format":"int32","description":"Running workers"},"cost":{"type":"number","description":"Accumulated cost"},"perSecondPrice":{"type":"number","description":"Per-second price"},"perHourPrice":{"type":"number","description":"Per-hour price"},"serviceMode":{"type":"string","description":"Service mode","enum":["ALB","QUEUE","CUSTOM"]},"webhook":{"type":"string","description":"Webhook URL"},"status":{"type":"string","description":"Deployment status","enum":["INITIALIZING","RUNNING","STOPPING","STOPPED","FAILED"]}}},"OpenapiElasticResourceResponse":{"type":"object","description":"ElasticResource","properties":{"region":{"type":"string","description":"Region"},"regionDisplayName":{"type":"string","description":"Region Display Name"},"gpuType":{"type":"string","description":"GPU Type"},"gpuDisplayName":{"type":"string","description":"GPU DisplayName"},"gpuCount":{"type":"integer","format":"int32","description":"GPU Count"},"singleCardVramInGb":{"type":"integer","format":"int32","description":"GPU Single Card VRAM(GB)"},"singleCardVcpu":{"type":"integer","format":"int32","description":"GPU Single Card VCPU"},"singleCardRamInGb":{"type":"integer","format":"int32","description":"GPU Single Card RAM(GB)"}}},"OpenapiExposePortResponse":{"type":"object","description":"ElasticExpose","properties":{"port":{"type":"integer","format":"int32","description":"port"},"protocol":{"type":"string","description":"protocol"}}},"Result":{"type":"object","properties":{"message":{"type":"string","description":"message"},"code":{"type":"integer","format":"int32","description":"code"},"data":{"description":"data"}}}}}}
```
## Get Task Count
> Get task statistics grouped by status
```json
{"openapi":"3.0.1","info":{"title":"默认模块","version":"1.0.0"},"tags":[{"name":"API v2"},{"name":"Serverless v2"}],"security":[{}],"paths":{"/v2/serverless/{id}/tasks/count":{"get":{"summary":"Get Task Count","deprecated":false,"description":"Get task statistics grouped by status","operationId":"getTaskCount","tags":["API v2","Serverless v2"],"parameters":[{"name":"id","in":"path","description":"","required":true,"schema":{"type":"integer","format":"int64"}}],"responses":{"200":{"description":"OK","content":{"*/*":{"schema":{"$ref":"#/components/schemas/ResultElasticV2TaskCountResponse"}}},"headers":{}},"400":{"description":"Bad Request","content":{"*/*":{"schema":{"$ref":"#/components/schemas/Result"}}},"headers":{}},"500":{"description":"Internal Server Error","content":{"*/*":{"schema":{"$ref":"#/components/schemas/Result"}}},"headers":{}},"10000":{"description":"Success","content":{"*/*":{"schema":{"$ref":"#/components/schemas/ResultElasticV2TaskCountResponse"}}},"headers":{}},"14000":{"description":"Endpoint not found","content":{"*/*":{"schema":{"$ref":"#/components/schemas/Result"}}},"headers":{}},"24000":{"description":"Serverless unavailable","content":{"*/*":{"schema":{"$ref":"#/components/schemas/Result"}}},"headers":{}},"24001":{"description":"Serverless does not exist","content":{"*/*":{"schema":{"$ref":"#/components/schemas/Result"}}},"headers":{}}}}}},"components":{"schemas":{"ResultElasticV2TaskCountResponse":{"type":"object","properties":{"message":{"type":"string","description":"message"},"code":{"type":"integer","format":"int32","description":"code"},"data":{"$ref":"#/components/schemas/ElasticV2TaskCountResponse","description":"data"}}},"ElasticV2TaskCountResponse":{"type":"object","description":"Elastic Endpoint Task Count Response v2","properties":{"processing":{"type":"integer","format":"int32","description":"Currently processing"}}},"Result":{"type":"object","properties":{"message":{"type":"string","description":"message"},"code":{"type":"integer","format":"int32","description":"code"},"data":{"description":"data"}}}}}}
```
# Metrics
## Get pod CPU metrics
> Returns CPU usage ratio time series.\
> Unit: ratio, where 1.0 means 100% of requested CPU cores.
```json
{"openapi":"3.0.1","info":{"title":"默认模块","version":"1.0.0"},"tags":[{"name":"Metrics"}],"security":[{"ApiKeyAuth":[]}],"components":{"securitySchemes":{"ApiKeyAuth":{"type":"apiKey","name":"x-api-key","in":"header"}},"schemas":{"Response":{"type":"object","description":"Standard API envelope","properties":{"code":{"type":"integer"},"message":{"type":"string"},"data":{"description":"Response payload; varies by endpoint"}}},"MetricResultNoCapacity":{"type":"object","description":"Metric result for utilization metrics (CPU, GPU) without capacity information","properties":{"metric_name":{"type":"string","description":"Name of the metric (e.g. cpu_usage, gpu_utilization)"},"series":{"type":"array","description":"Array of time series data without capacity metrics","items":{"$ref":"#/components/schemas/TimeSeriesNoCapacity"}}},"required":["metric_name","series"]},"TimeSeriesNoCapacity":{"type":"object","description":"Time series data without capacity metrics (for CPU and GPU utilization)","properties":{"labels":{"type":"object","description":"Key-value label set identifying this series (e.g. pod_id, gpu_show_index)","additionalProperties":{"type":"string"},"properties":{}},"data_points":{"type":"array","description":"Array of timestamped metric values","items":{"$ref":"#/components/schemas/DataPoint"}}},"required":["labels","data_points"]},"DataPoint":{"type":"object","description":"A single time-series data point","properties":{"timestamp":{"type":"integer","format":"int64","description":"Unix timestamp in milliseconds"},"value":{"type":"number","format":"double"}}}},"responses":{"BadRequest":{"description":"Bad Request","content":{"application/json":{"schema":{"$ref":"#/components/schemas/Response"}}}},"Unauthorized":{"description":"Unauthorized — missing or invalid x-api-key","content":{"application/json":{"schema":{"$ref":"#/components/schemas/Response"}}}},"Forbidden":{"description":"Forbidden — valid key but insufficient permissions","content":{"application/json":{"schema":{"$ref":"#/components/schemas/Response"}}}},"NotFound":{"description":"Not Found — pod does not exist","content":{"application/json":{"schema":{"$ref":"#/components/schemas/Response"}}}},"InternalServerError":{"description":"Internal Server Error","content":{"application/json":{"schema":{"$ref":"#/components/schemas/Response"}}}},"ServiceUnavailable":{"description":"Service Unavailable","content":{"application/json":{"schema":{"$ref":"#/components/schemas/Response"}}}}}},"paths":{"/v2/metrics/cpu/pods/{pod_id}":{"get":{"summary":"Get pod CPU metrics","deprecated":false,"description":"Returns CPU usage ratio time series.\nUnit: ratio, where 1.0 means 100% of requested CPU cores. ","operationId":"getCpuMetrics","tags":["Metrics"],"parameters":[{"name":"pod_id","in":"path","description":"SaaS platform Pod ID","required":true,"schema":{"type":"integer"}},{"name":"start","in":"query","description":"Unix timestamp in milliseconds. Example: 1747898910001. If only `start` is provided, `end` defaults to `start + 1h`.","required":false,"schema":{"type":"integer","format":"int64"}},{"name":"end","in":"query","description":"Unix timestamp in milliseconds. Example: 1747902510001. If only `end` is provided, `start` defaults to `end - 1h`.","required":false,"schema":{"type":"integer","format":"int64"}},{"name":"step","in":"query","description":"Time-series resolution step. Max windows: `30s`=3h, `5m`=12h, `15m`=2d, `1h`=7d, `4h`=30d, `1d`=90d.","required":false,"schema":{"type":"string","enum":["auto","30s","5m","15m","1h","4h","1d"]}}],"responses":{"200":{"description":"OK","content":{"application/json":{"schema":{"allOf":[{"$ref":"#/components/schemas/Response"},{"type":"object","properties":{"data":{"$ref":"#/components/schemas/MetricResultNoCapacity"}}}]}}},"headers":{}},"400":{"$ref":"#/components/responses/BadRequest","description":"Bad Request"},"401":{"$ref":"#/components/responses/Unauthorized","description":"Unauthorized — missing or invalid x-api-key"},"403":{"$ref":"#/components/responses/Forbidden","description":"Forbidden — valid key but insufficient permissions"},"404":{"$ref":"#/components/responses/NotFound","description":"Not Found — pod does not exist"},"500":{"$ref":"#/components/responses/InternalServerError","description":"Internal Server Error"},"503":{"$ref":"#/components/responses/ServiceUnavailable","description":"Service Unavailable"}}}}}}
```
## Get pod GPU utilization metrics
> Returns GPU SM utilization percentage time series.\
> Unit: percent, range 0-100.
```json
{"openapi":"3.0.1","info":{"title":"默认模块","version":"1.0.0"},"tags":[{"name":"Metrics"}],"security":[{"ApiKeyAuth":[]}],"components":{"securitySchemes":{"ApiKeyAuth":{"type":"apiKey","name":"x-api-key","in":"header"}},"schemas":{"Response":{"type":"object","description":"Standard API envelope","properties":{"code":{"type":"integer"},"message":{"type":"string"},"data":{"description":"Response payload; varies by endpoint"}}},"MetricResultNoCapacity":{"type":"object","description":"Metric result for utilization metrics (CPU, GPU) without capacity information","properties":{"metric_name":{"type":"string","description":"Name of the metric (e.g. cpu_usage, gpu_utilization)"},"series":{"type":"array","description":"Array of time series data without capacity metrics","items":{"$ref":"#/components/schemas/TimeSeriesNoCapacity"}}},"required":["metric_name","series"]},"TimeSeriesNoCapacity":{"type":"object","description":"Time series data without capacity metrics (for CPU and GPU utilization)","properties":{"labels":{"type":"object","description":"Key-value label set identifying this series (e.g. pod_id, gpu_show_index)","additionalProperties":{"type":"string"},"properties":{}},"data_points":{"type":"array","description":"Array of timestamped metric values","items":{"$ref":"#/components/schemas/DataPoint"}}},"required":["labels","data_points"]},"DataPoint":{"type":"object","description":"A single time-series data point","properties":{"timestamp":{"type":"integer","format":"int64","description":"Unix timestamp in milliseconds"},"value":{"type":"number","format":"double"}}}},"responses":{"BadRequest":{"description":"Bad Request","content":{"application/json":{"schema":{"$ref":"#/components/schemas/Response"}}}},"Unauthorized":{"description":"Unauthorized — missing or invalid x-api-key","content":{"application/json":{"schema":{"$ref":"#/components/schemas/Response"}}}},"Forbidden":{"description":"Forbidden — valid key but insufficient permissions","content":{"application/json":{"schema":{"$ref":"#/components/schemas/Response"}}}},"NotFound":{"description":"Not Found — pod does not exist","content":{"application/json":{"schema":{"$ref":"#/components/schemas/Response"}}}},"InternalServerError":{"description":"Internal Server Error","content":{"application/json":{"schema":{"$ref":"#/components/schemas/Response"}}}},"ServiceUnavailable":{"description":"Service Unavailable","content":{"application/json":{"schema":{"$ref":"#/components/schemas/Response"}}}}}},"paths":{"/v2/metrics/gpu/pods/{pod_id}":{"get":{"summary":"Get pod GPU utilization metrics","deprecated":false,"description":"Returns GPU SM utilization percentage time series.\nUnit: percent, range 0-100. ","operationId":"getGpuMetrics","tags":["Metrics"],"parameters":[{"name":"pod_id","in":"path","description":"SaaS platform Pod ID","required":true,"schema":{"type":"integer"}},{"name":"start","in":"query","description":"Unix timestamp in milliseconds. Example: 1747898910001. If only `start` is provided, `end` defaults to `start + 1h`.","required":false,"schema":{"type":"integer","format":"int64"}},{"name":"end","in":"query","description":"Unix timestamp in milliseconds. Example: 1747902510001. If only `end` is provided, `start` defaults to `end - 1h`.","required":false,"schema":{"type":"integer","format":"int64"}},{"name":"step","in":"query","description":"Time-series resolution step. Max windows: `30s`=3h, `5m`=12h, `15m`=2d, `1h`=7d, `4h`=30d, `1d`=90d.","required":false,"schema":{"type":"string","enum":["auto","30s","5m","15m","1h","4h","1d"]}}],"responses":{"200":{"description":"OK","content":{"application/json":{"schema":{"allOf":[{"$ref":"#/components/schemas/Response"},{"type":"object","properties":{"data":{"$ref":"#/components/schemas/MetricResultNoCapacity"}}}]}}},"headers":{}},"400":{"$ref":"#/components/responses/BadRequest","description":"Bad Request"},"401":{"$ref":"#/components/responses/Unauthorized","description":"Unauthorized — missing or invalid x-api-key"},"403":{"$ref":"#/components/responses/Forbidden","description":"Forbidden — valid key but insufficient permissions"},"404":{"$ref":"#/components/responses/NotFound","description":"Not Found — pod does not exist"},"500":{"$ref":"#/components/responses/InternalServerError","description":"Internal Server Error"},"503":{"$ref":"#/components/responses/ServiceUnavailable","description":"Service Unavailable"}}}}}}
```
## Get pod memory metrics
> Returns memory usage bytes time series with latest total memory.\
> Unit: bytes for data\_points.value and latest\_total.
```json
{"openapi":"3.0.1","info":{"title":"默认模块","version":"1.0.0"},"tags":[{"name":"Metrics"}],"security":[{"ApiKeyAuth":[]}],"components":{"securitySchemes":{"ApiKeyAuth":{"type":"apiKey","name":"x-api-key","in":"header"}},"schemas":{"Response":{"type":"object","description":"Standard API envelope","properties":{"code":{"type":"integer"},"message":{"type":"string"},"data":{"description":"Response payload; varies by endpoint"}}},"MetricResultWithCapacity":{"type":"object","description":"Metric result for capacity metrics (memory, GPU memory) with total capacity information","properties":{"metric_name":{"type":"string","description":"Name of the metric (e.g. memory_usage, gpu_memory)"},"series":{"type":"array","description":"Array of time series data with capacity metrics","items":{"$ref":"#/components/schemas/TimeSeriesWithCapacity"}}},"required":["metric_name","series"]},"TimeSeriesWithCapacity":{"type":"object","description":"Time series data with capacity metrics (for memory and GPU memory)","properties":{"labels":{"type":"object","description":"Key-value label set identifying this series (e.g. pod_id, gpu_show_index)","additionalProperties":{"type":"string"},"properties":{}},"data_points":{"type":"array","description":"Array of timestamped metric values","items":{"$ref":"#/components/schemas/DataPoint"}},"latest_total":{"type":"number","format":"double","description":"Latest total/request value for capacity metrics (e.g. total memory bytes, total GPU memory bytes)"}},"required":["labels","data_points","latest_total"]},"DataPoint":{"type":"object","description":"A single time-series data point","properties":{"timestamp":{"type":"integer","format":"int64","description":"Unix timestamp in milliseconds"},"value":{"type":"number","format":"double"}}}},"responses":{"BadRequest":{"description":"Bad Request","content":{"application/json":{"schema":{"$ref":"#/components/schemas/Response"}}}},"Unauthorized":{"description":"Unauthorized — missing or invalid x-api-key","content":{"application/json":{"schema":{"$ref":"#/components/schemas/Response"}}}},"Forbidden":{"description":"Forbidden — valid key but insufficient permissions","content":{"application/json":{"schema":{"$ref":"#/components/schemas/Response"}}}},"NotFound":{"description":"Not Found — pod does not exist","content":{"application/json":{"schema":{"$ref":"#/components/schemas/Response"}}}},"InternalServerError":{"description":"Internal Server Error","content":{"application/json":{"schema":{"$ref":"#/components/schemas/Response"}}}},"ServiceUnavailable":{"description":"Service Unavailable","content":{"application/json":{"schema":{"$ref":"#/components/schemas/Response"}}}}}},"paths":{"/v2/metrics/memory/pods/{pod_id}":{"get":{"summary":"Get pod memory metrics","deprecated":false,"description":"Returns memory usage bytes time series with latest total memory.\nUnit: bytes for data_points.value and latest_total. ","operationId":"getMemoryMetrics","tags":["Metrics"],"parameters":[{"name":"pod_id","in":"path","description":"SaaS platform Pod ID","required":true,"schema":{"type":"integer"}},{"name":"start","in":"query","description":"Unix timestamp in milliseconds. Example: 1747898910001. If only `start` is provided, `end` defaults to `start + 1h`.","required":false,"schema":{"type":"integer","format":"int64"}},{"name":"end","in":"query","description":"Unix timestamp in milliseconds. Example: 1747902510001. If only `end` is provided, `start` defaults to `end - 1h`.","required":false,"schema":{"type":"integer","format":"int64"}},{"name":"step","in":"query","description":"Time-series resolution step. Max windows: `30s`=3h, `5m`=12h, `15m`=2d, `1h`=7d, `4h`=30d, `1d`=90d.","required":false,"schema":{"type":"string","enum":["auto","30s","5m","15m","1h","4h","1d"]}}],"responses":{"200":{"description":"OK","content":{"application/json":{"schema":{"allOf":[{"$ref":"#/components/schemas/Response"},{"type":"object","properties":{"data":{"$ref":"#/components/schemas/MetricResultWithCapacity"}}}]}}},"headers":{}},"400":{"$ref":"#/components/responses/BadRequest","description":"Bad Request"},"401":{"$ref":"#/components/responses/Unauthorized","description":"Unauthorized — missing or invalid x-api-key"},"403":{"$ref":"#/components/responses/Forbidden","description":"Forbidden — valid key but insufficient permissions"},"404":{"$ref":"#/components/responses/NotFound","description":"Not Found — pod does not exist"},"500":{"$ref":"#/components/responses/InternalServerError","description":"Internal Server Error"},"503":{"$ref":"#/components/responses/ServiceUnavailable","description":"Service Unavailable"}}}}}}
```
## Get pod GPU memory metrics
> Returns GPU memory used bytes time series with latest total memory.\
> Unit: bytes for data\_points.value and latest\_total.
```json
{"openapi":"3.0.1","info":{"title":"默认模块","version":"1.0.0"},"tags":[{"name":"Metrics"}],"security":[{"ApiKeyAuth":[]}],"components":{"securitySchemes":{"ApiKeyAuth":{"type":"apiKey","name":"x-api-key","in":"header"}},"schemas":{"Response":{"type":"object","description":"Standard API envelope","properties":{"code":{"type":"integer"},"message":{"type":"string"},"data":{"description":"Response payload; varies by endpoint"}}},"MetricResultWithCapacity":{"type":"object","description":"Metric result for capacity metrics (memory, GPU memory) with total capacity information","properties":{"metric_name":{"type":"string","description":"Name of the metric (e.g. memory_usage, gpu_memory)"},"series":{"type":"array","description":"Array of time series data with capacity metrics","items":{"$ref":"#/components/schemas/TimeSeriesWithCapacity"}}},"required":["metric_name","series"]},"TimeSeriesWithCapacity":{"type":"object","description":"Time series data with capacity metrics (for memory and GPU memory)","properties":{"labels":{"type":"object","description":"Key-value label set identifying this series (e.g. pod_id, gpu_show_index)","additionalProperties":{"type":"string"},"properties":{}},"data_points":{"type":"array","description":"Array of timestamped metric values","items":{"$ref":"#/components/schemas/DataPoint"}},"latest_total":{"type":"number","format":"double","description":"Latest total/request value for capacity metrics (e.g. total memory bytes, total GPU memory bytes)"}},"required":["labels","data_points","latest_total"]},"DataPoint":{"type":"object","description":"A single time-series data point","properties":{"timestamp":{"type":"integer","format":"int64","description":"Unix timestamp in milliseconds"},"value":{"type":"number","format":"double"}}}},"responses":{"BadRequest":{"description":"Bad Request","content":{"application/json":{"schema":{"$ref":"#/components/schemas/Response"}}}},"Unauthorized":{"description":"Unauthorized — missing or invalid x-api-key","content":{"application/json":{"schema":{"$ref":"#/components/schemas/Response"}}}},"Forbidden":{"description":"Forbidden — valid key but insufficient permissions","content":{"application/json":{"schema":{"$ref":"#/components/schemas/Response"}}}},"NotFound":{"description":"Not Found — pod does not exist","content":{"application/json":{"schema":{"$ref":"#/components/schemas/Response"}}}},"InternalServerError":{"description":"Internal Server Error","content":{"application/json":{"schema":{"$ref":"#/components/schemas/Response"}}}},"ServiceUnavailable":{"description":"Service Unavailable","content":{"application/json":{"schema":{"$ref":"#/components/schemas/Response"}}}}}},"paths":{"/v2/metrics/gpu/pods/{pod_id}/memory":{"get":{"summary":"Get pod GPU memory metrics","deprecated":false,"description":"Returns GPU memory used bytes time series with latest total memory.\nUnit: bytes for data_points.value and latest_total. ","operationId":"getGpuMemoryMetrics","tags":["Metrics"],"parameters":[{"name":"pod_id","in":"path","description":"SaaS platform Pod ID","required":true,"schema":{"type":"integer"}},{"name":"start","in":"query","description":"Unix timestamp in milliseconds. Example: 1747898910001. If only `start` is provided, `end` defaults to `start + 1h`.","required":false,"schema":{"type":"integer","format":"int64"}},{"name":"end","in":"query","description":"Unix timestamp in milliseconds. Example: 1747902510001. If only `end` is provided, `start` defaults to `end - 1h`.","required":false,"schema":{"type":"integer","format":"int64"}},{"name":"step","in":"query","description":"Time-series resolution step. Max windows: `30s`=3h, `5m`=12h, `15m`=2d, `1h`=7d, `4h`=30d, `1d`=90d.","required":false,"schema":{"type":"string","enum":["auto","30s","5m","15m","1h","4h","1d"]}}],"responses":{"200":{"description":"OK","content":{"application/json":{"schema":{"allOf":[{"$ref":"#/components/schemas/Response"},{"type":"object","properties":{"data":{"$ref":"#/components/schemas/MetricResultWithCapacity"}}}]}}},"headers":{}},"400":{"$ref":"#/components/responses/BadRequest","description":"Bad Request"},"401":{"$ref":"#/components/responses/Unauthorized","description":"Unauthorized — missing or invalid x-api-key"},"403":{"$ref":"#/components/responses/Forbidden","description":"Forbidden — valid key but insufficient permissions"},"404":{"$ref":"#/components/responses/NotFound","description":"Not Found — pod does not exist"},"500":{"$ref":"#/components/responses/InternalServerError","description":"Internal Server Error"},"503":{"$ref":"#/components/responses/ServiceUnavailable","description":"Service Unavailable"}}}}}}
```
## Get pod storage information
> Returns current ephemeral storage usage. Volumes are managed by SaaS and are not returned by data-monitor. start, end, and step are ignored.\
> Units: used\_bytes and total\_bytes are bytes, usage\_ratio is a unitless ratio, last\_updated is Unix milliseconds.
```json
{"openapi":"3.0.1","info":{"title":"默认模块","version":"1.0.0"},"tags":[{"name":"Metrics"}],"security":[{"ApiKeyAuth":[]}],"components":{"securitySchemes":{"ApiKeyAuth":{"type":"apiKey","name":"x-api-key","in":"header"}},"schemas":{"Response":{"type":"object","description":"Standard API envelope","properties":{"code":{"type":"integer"},"message":{"type":"string"},"data":{"description":"Response payload; varies by endpoint"}}},"PodStorageResponse":{"type":"object","description":"Pod ephemeral storage response","properties":{"pod_id":{"type":"integer","format":"int64","description":"SaaS platform Pod ID"},"ephemeral_storage":{"description":"Ephemeral storage usage information","$ref":"#/components/schemas/EphemeralStorageInfo"}}},"EphemeralStorageInfo":{"type":"object","properties":{"total_bytes":{"type":"integer","format":"int64"},"used_bytes":{"type":"integer","format":"int64"},"usage_ratio":{"type":"number","format":"double","description":"Used / total (unitless ratio)"},"last_updated":{"type":"integer","format":"int64","description":"Unix timestamp in milliseconds"}}}},"responses":{"Unauthorized":{"description":"Unauthorized — missing or invalid x-api-key","content":{"application/json":{"schema":{"$ref":"#/components/schemas/Response"}}}},"Forbidden":{"description":"Forbidden — valid key but insufficient permissions","content":{"application/json":{"schema":{"$ref":"#/components/schemas/Response"}}}},"NotFound":{"description":"Not Found — pod does not exist","content":{"application/json":{"schema":{"$ref":"#/components/schemas/Response"}}}},"InternalServerError":{"description":"Internal Server Error","content":{"application/json":{"schema":{"$ref":"#/components/schemas/Response"}}}}}},"paths":{"/v2/metrics/storage/pods/{pod_id}":{"get":{"summary":"Get pod storage information","deprecated":false,"description":"Returns current ephemeral storage usage. Volumes are managed by SaaS and are not returned by data-monitor. start, end, and step are ignored.\nUnits: used_bytes and total_bytes are bytes, usage_ratio is a unitless ratio, last_updated is Unix milliseconds. ","operationId":"getStorageMetrics","tags":["Metrics"],"parameters":[{"name":"pod_id","in":"path","description":"SaaS platform Pod ID","required":true,"schema":{"type":"integer"}}],"responses":{"200":{"description":"OK","content":{"application/json":{"schema":{"allOf":[{"$ref":"#/components/schemas/Response"},{"type":"object","properties":{"data":{"$ref":"#/components/schemas/PodStorageResponse"}}}]}}},"headers":{}},"401":{"$ref":"#/components/responses/Unauthorized","description":"Unauthorized — missing or invalid x-api-key"},"403":{"$ref":"#/components/responses/Forbidden","description":"Forbidden — valid key but insufficient permissions"},"404":{"$ref":"#/components/responses/NotFound","description":"Not Found — pod does not exist"},"500":{"$ref":"#/components/responses/InternalServerError","description":"Internal Server Error"}}}}}}
```
# Reserves
## List Pod Reserves
> List the authenticated organization's Pod/Serverless reserved capacity and active Pod usage
```json
{"openapi":"3.0.1","info":{"title":"默认模块","version":"1.0.0"},"tags":[{"name":"API v2"},{"name":"Pod Reserves v2"}],"security":[{}],"paths":{"/v2/reserves/pods":{"get":{"summary":"List Pod Reserves","deprecated":false,"description":"List the authenticated organization's Pod/Serverless reserved capacity and active Pod usage","operationId":"listPodReserves","tags":["API v2","Pod Reserves v2"],"parameters":[{"name":"page","in":"query","description":"Page number, 1-based","required":false,"schema":{"type":"integer","format":"int64","description":"Page number, 1-based"}},{"name":"size","in":"query","description":"Page size from 1 to 100","required":false,"schema":{"type":"integer","format":"int64","description":"Page size from 1 to 100"}},{"name":"region","in":"query","description":"Reserved machine region","required":false,"schema":{"type":"string","description":"Reserved machine region"}},{"name":"reserveNodeId","in":"query","description":"Stable customer-facing reserved node ID","required":false,"schema":{"type":"string","description":"Stable customer-facing reserved node ID"}},{"name":"gpuType","in":"query","description":"Exact canonical v2 or raw/database GPU type; GPU display names are not queried","required":false,"schema":{"type":"string","description":"Exact canonical v2 or raw/database GPU type; GPU display names are not queried"}},{"name":"reservationStatus","in":"query","description":"Reservation status","required":false,"schema":{"type":"string","description":"Reservation status","enum":["RESERVED","EXPIRED"]}},{"name":"machineStatus","in":"query","description":"Reserved machine status","required":false,"schema":{"type":"string","description":"Reserved machine status","enum":["IN_USE","IDLE","UNKNOWN","NOT_APPLICABLE"]}}],"responses":{"200":{"description":"OK","content":{"*/*":{"schema":{"$ref":"#/components/schemas/ResultV2PageResponseReserveV2Response"}}},"headers":{}},"400":{"description":"Bad Request","content":{"*/*":{"schema":{"$ref":"#/components/schemas/Result"}}},"headers":{}},"500":{"description":"Internal Server Error","content":{"*/*":{"schema":{"$ref":"#/components/schemas/Result"}}},"headers":{}},"10000":{"description":"Success","content":{"*/*":{"schema":{"$ref":"#/components/schemas/ResultV2PageResponseReserveV2Response"}}},"headers":{}}}}}},"components":{"schemas":{"ResultV2PageResponseReserveV2Response":{"type":"object","properties":{"message":{"type":"string","description":"message"},"code":{"type":"integer","format":"int32","description":"code"},"data":{"$ref":"#/components/schemas/V2PageResponseReserveV2Response","description":"data"}}},"V2PageResponseReserveV2Response":{"type":"object","description":"Paginated Response","properties":{"items":{"type":"array","description":"List of items in the current page","items":{"$ref":"#/components/schemas/ReserveV2Response"}},"page":{"type":"integer","format":"int64","description":"Current page number (1-based)"},"size":{"type":"integer","format":"int64","description":"Number of items per page"},"total":{"type":"integer","format":"int64","description":"Total number of items across all pages"},"pages":{"type":"integer","format":"int64","description":"Total number of pages"}}},"ReserveV2Response":{"type":"object","description":"Reserve response v2","properties":{"id":{"type":"integer","format":"int64","description":"Reserve ID"},"reserveNodeId":{"type":"string","description":"Stable customer-facing reserved node ID"},"region":{"type":"string","description":"Reserved machine region"},"gpuType":{"type":"string","description":"Canonical v2 GPU type"},"gpuDisplayName":{"type":"string","description":"GPU display name"},"gpuCount":{"type":"integer","format":"int32","description":"Total reserved GPU count"},"availableGpuCount":{"type":"integer","format":"int32","description":"Currently available GPU count"},"usedGpuCount":{"type":"integer","format":"int32","description":"GPU count used by owner non-Spot workloads"},"unavailableGpuCount":{"type":"integer","format":"int32","description":"Offline or unavailable GPU count"},"reservationStatus":{"type":"string","nullable":true,"description":"Reservation status","enum":["RESERVED","EXPIRED"]},"machineStatus":{"type":"string","nullable":true,"description":"Reserved machine status","enum":["IN_USE","IDLE","UNKNOWN","NOT_APPLICABLE"]},"startAt":{"type":"integer","format":"int64","description":"Reservation start epoch milliseconds"},"endAt":{"type":"integer","format":"int64","description":"Reservation end epoch milliseconds"},"pods":{"type":"array","description":"Active Pod usage relationships","items":{"$ref":"#/components/schemas/ReserveV2PodResponse"}}}},"ReserveV2PodResponse":{"type":"object","description":"Active Pod usage on a Reserve","properties":{"podId":{"type":"integer","format":"int64","description":"Pod ID"},"gpuCount":{"type":"integer","format":"int32","description":"GPU count used by the Pod"}}},"Result":{"type":"object","properties":{"message":{"type":"string","description":"message"},"code":{"type":"integer","format":"int32","description":"code"},"data":{"description":"data"}}}}}}
```
# Volume
## Get Volume
> Get volume detail
```json
{"openapi":"3.0.1","info":{"title":"默认模块","version":"1.0.0"},"tags":[{"name":"API v2"},{"name":"Volumes v2"}],"security":[{}],"paths":{"/v2/volumes/{id}":{"get":{"summary":"Get Volume","deprecated":false,"description":"Get volume detail","operationId":"getVolume","tags":["API v2","Volumes v2"],"parameters":[{"name":"id","in":"path","description":"","required":true,"schema":{"type":"integer","format":"int64"}}],"responses":{"200":{"description":"OK","content":{"*/*":{"schema":{"$ref":"#/components/schemas/ResultVolumeV2Response"}}},"headers":{}},"400":{"description":"Bad Request","content":{"*/*":{"schema":{"$ref":"#/components/schemas/Result"}}},"headers":{}},"500":{"description":"Internal Server Error","content":{"*/*":{"schema":{"$ref":"#/components/schemas/Result"}}},"headers":{}}}}}},"components":{"schemas":{"ResultVolumeV2Response":{"type":"object","properties":{"message":{"type":"string","description":"message"},"code":{"type":"integer","format":"int32","description":"code"},"data":{"$ref":"#/components/schemas/VolumeV2Response","description":"data"}}},"VolumeV2Response":{"type":"object","description":"Volume v2 response","properties":{"id":{"type":"string","description":"Volume ID as string to avoid JavaScript int64 precision loss"},"name":{"type":"string","description":"Volume name"},"type":{"type":"string","description":"Volume type"},"status":{"type":"string","description":"Volume status"},"sizeBytes":{"type":"string","description":"Actual used size in bytes as string"},"sizeInGb":{"type":"integer","format":"int32","description":"Actual used size in GiB, floored integer"},"cost":{"type":"string","description":"Accumulated cost as string"},"currency":{"type":"string","description":"Currency"},"mountStatus":{"type":"string","description":"Mount status","enum":["MOUNTED","UNMOUNTED"]},"mountCount":{"type":"integer","format":"int32","description":"Current mount count"},"createdAt":{"type":"string","description":"Creation time in ISO 8601 UTC"},"region":{"type":"string","description":"Region. Cloud storage can be null."},"failReason":{"type":"string","description":"Failure reason when creation/deletion fails"}}},"Result":{"type":"object","properties":{"message":{"type":"string","description":"message"},"code":{"type":"integer","format":"int32","description":"code"},"data":{"description":"data"}}}}}}
```
## List Volumes
> List cloud storage volumes
```json
{"openapi":"3.0.1","info":{"title":"默认模块","version":"1.0.0"},"tags":[{"name":"API v2"},{"name":"Volumes v2"}],"security":[{}],"paths":{"/v2/volumes":{"get":{"summary":"List Volumes","deprecated":false,"description":"List cloud storage volumes","operationId":"listVolumes","tags":["API v2","Volumes v2"],"parameters":[{"name":"page","in":"query","description":"Page number, 1-based","required":false,"schema":{"type":"integer","format":"int64","description":"Page number, 1-based"}},{"name":"size","in":"query","description":"Page size","required":false,"schema":{"type":"integer","format":"int64","description":"Page size"}},{"name":"type","in":"query","description":"Volume type. First version only supports CLOUD_STORAGE.","required":false,"schema":{"type":"string","description":"Volume type. First version only supports CLOUD_STORAGE.","enum":["CLOUD_STORAGE"]}}],"requestBody":{"content":{"application/json":{"schema":{"type":"object","properties":{}}}}},"responses":{"200":{"description":"OK","content":{"*/*":{"schema":{"$ref":"#/components/schemas/ResultV2PageResponseVolumeV2Response"}}},"headers":{}},"400":{"description":"Bad Request","content":{"*/*":{"schema":{"$ref":"#/components/schemas/Result"}}},"headers":{}},"500":{"description":"Internal Server Error","content":{"*/*":{"schema":{"$ref":"#/components/schemas/Result"}}},"headers":{}}}}}},"components":{"schemas":{"ResultV2PageResponseVolumeV2Response":{"type":"object","properties":{"message":{"type":"string","description":"message"},"code":{"type":"integer","format":"int32","description":"code"},"data":{"$ref":"#/components/schemas/V2PageResponseVolumeV2Response","description":"data"}}},"V2PageResponseVolumeV2Response":{"type":"object","description":"Paginated Response","properties":{"items":{"type":"array","description":"List of items in the current page","items":{"$ref":"#/components/schemas/VolumeV2Response"}},"page":{"type":"integer","format":"int64","description":"Current page number (1-based)"},"size":{"type":"integer","format":"int64","description":"Number of items per page"},"total":{"type":"integer","format":"int64","description":"Total number of items across all pages"},"pages":{"type":"integer","format":"int64","description":"Total number of pages"}}},"VolumeV2Response":{"type":"object","description":"Volume v2 response","properties":{"id":{"type":"string","description":"Volume ID as string to avoid JavaScript int64 precision loss"},"name":{"type":"string","description":"Volume name"},"type":{"type":"string","description":"Volume type"},"status":{"type":"string","description":"Volume status"},"sizeBytes":{"type":"string","description":"Actual used size in bytes as string"},"sizeInGb":{"type":"integer","format":"int32","description":"Actual used size in GiB, floored integer"},"cost":{"type":"string","description":"Accumulated cost as string"},"currency":{"type":"string","description":"Currency"},"mountStatus":{"type":"string","description":"Mount status","enum":["MOUNTED","UNMOUNTED"]},"mountCount":{"type":"integer","format":"int32","description":"Current mount count"},"createdAt":{"type":"string","description":"Creation time in ISO 8601 UTC"},"region":{"type":"string","description":"Region. Cloud storage can be null."},"failReason":{"type":"string","description":"Failure reason when creation/deletion fails"}}},"Result":{"type":"object","properties":{"message":{"type":"string","description":"message"},"code":{"type":"integer","format":"int32","description":"code"},"data":{"description":"data"}}}}}}
```
## Create Volume
> Create a cloud storage volume
```json
{"openapi":"3.0.1","info":{"title":"默认模块","version":"1.0.0"},"tags":[{"name":"API v2"},{"name":"Volumes v2"}],"security":[{}],"paths":{"/v2/volumes":{"post":{"summary":"Create Volume","deprecated":false,"description":"Create a cloud storage volume","operationId":"createVolume","tags":["API v2","Volumes v2"],"parameters":[{"name":"sizeInGb","in":"query","description":"","required":false,"schema":{"type":"integer"}}],"requestBody":{"content":{"application/json":{"schema":{"$ref":"#/components/schemas/VolumeV2CreateRequest"}}},"required":true},"responses":{"200":{"description":"OK","content":{"*/*":{"schema":{"$ref":"#/components/schemas/ResultVolumeV2Response"}}},"headers":{}},"400":{"description":"Bad Request","content":{"*/*":{"schema":{"$ref":"#/components/schemas/Result"}}},"headers":{}},"500":{"description":"Internal Server Error","content":{"*/*":{"schema":{"$ref":"#/components/schemas/Result"}}},"headers":{}}}}}},"components":{"schemas":{"VolumeV2CreateRequest":{"type":"object","description":"Volume v2 create request","properties":{"name":{"type":"string","description":"Volume name","minLength":1},"type":{"type":"string","description":"Volume type. First version only supports CLOUD_STORAGE.","enum":["CLOUD_STORAGE"]}},"required":["name"]},"ResultVolumeV2Response":{"type":"object","properties":{"message":{"type":"string","description":"message"},"code":{"type":"integer","format":"int32","description":"code"},"data":{"$ref":"#/components/schemas/VolumeV2Response","description":"data"}}},"VolumeV2Response":{"type":"object","description":"Volume v2 response","properties":{"id":{"type":"string","description":"Volume ID as string to avoid JavaScript int64 precision loss"},"name":{"type":"string","description":"Volume name"},"type":{"type":"string","description":"Volume type"},"status":{"type":"string","description":"Volume status"},"sizeBytes":{"type":"string","description":"Actual used size in bytes as string"},"sizeInGb":{"type":"integer","format":"int32","description":"Actual used size in GiB, floored integer"},"cost":{"type":"string","description":"Accumulated cost as string"},"currency":{"type":"string","description":"Currency"},"mountStatus":{"type":"string","description":"Mount status","enum":["MOUNTED","UNMOUNTED"]},"mountCount":{"type":"integer","format":"int32","description":"Current mount count"},"createdAt":{"type":"string","description":"Creation time in ISO 8601 UTC"},"region":{"type":"string","description":"Region. Cloud storage can be null."},"failReason":{"type":"string","description":"Failure reason when creation/deletion fails"}}},"Result":{"type":"object","properties":{"message":{"type":"string","description":"message"},"code":{"type":"integer","format":"int32","description":"code"},"data":{"description":"data"}}}}}}
```
## Delete Volume
> Delete a volume
```json
{"openapi":"3.0.1","info":{"title":"默认模块","version":"1.0.0"},"tags":[{"name":"API v2"},{"name":"Volumes v2"}],"security":[{}],"paths":{"/v2/volumes/{id}":{"delete":{"summary":"Delete Volume","deprecated":false,"description":"Delete a volume","operationId":"deleteVolume","tags":["API v2","Volumes v2"],"parameters":[{"name":"id","in":"path","description":"","required":true,"schema":{"type":"integer","format":"int64"}}],"responses":{"200":{"description":"OK","content":{"*/*":{"schema":{"$ref":"#/components/schemas/ResultVoid"}}},"headers":{}},"400":{"description":"Bad Request","content":{"*/*":{"schema":{"$ref":"#/components/schemas/Result"}}},"headers":{}},"500":{"description":"Internal Server Error","content":{"*/*":{"schema":{"$ref":"#/components/schemas/Result"}}},"headers":{}}}}}},"components":{"schemas":{"ResultVoid":{"type":"object","properties":{"message":{"type":"string","description":"message"},"code":{"type":"integer","format":"int32","description":"code"},"data":{"description":"data"}}},"Result":{"type":"object","properties":{"message":{"type":"string","description":"message"},"code":{"type":"integer","format":"int32","description":"code"},"data":{"description":"data"}}}}}}
```
# Platform Setup
# How to Build Custom Images
## Deployment Overview
```mermaid
graph TD
A[Prepare Environment] --> B[Create Dockerfile]
B --> C[Build Custom Image]
C --> D[Test Locally]
D --> E[Push to Docker Hub]
E --> F[Pull Image on Yottalabs as Templates]
F --> G[Run in pods]
G --> H[✅ Deployment Complete]
```
***
## Step-by-step Guide
{% stepper %}
{% step %}
#### Prepare a Working Directory
```bash
# Navigate to a proper directory
# For example, this is a working directory "~/projects/tutorial" created on my machine
cd ~/projects
cd tutorial
```
{% endstep %}
{% step %}
#### Create Dockerfile
```bash
# Create Dockerfile and edit it.
nano Dockerfile
```
Dockerfile content:
```dockerfile
# take vllm just as an example here. Replace this line with any image you prefer. Find them on Dockerhub and please keep the formats right ↓
# vllm / vllm-openai : latest
# / :
# In most cases, you can simply find official images on Dockerhub as base.
FROM vllm/vllm-openai:latest
# Set environment to avoid interactive prompts
ENV DEBIAN_FRONTEND=noninteractive
# Install OpenSSH server for optional SSH access
# Important! Please don't skip this in order to make sure you have proper ssh connection on our platform.
RUN apt-get update \
&& apt-get install -y openssh-server \
&& apt-get clean \
&& mkdir -p /run/sshd \
&& chmod 755 /run/sshd
# Expose ports for API and SSH
# Port 22 is ALWAYS necessary.
# For which other ports you expose, check the official docs of your project.
EXPOSE 22
# Example for vllm:
EXPOSE 22 8000
```
{% hint style="info" %}
Make sure to replace the base image with the one appropriate for your project (found on Docker Hub). Keep the image name and tag format correct.
{% endhint %}
{% endstep %}
{% step %}
#### Build Docker Image
```bash
# Build the custom image
docker build -t : .
# for instance, in our vllm example:
docker build -t custom:latest .
# Verify image creation
docker images | grep custom
```
Expected output example:
```
REPOSITORY TAG IMAGE ID CREATED SIZE
custom latest a57d0d735be4 5 minutes ago 15.2GB
```
{% endstep %}
{% step %}
#### Test Local Run
```bash
# Run with GPU support
docker run --gpus all -d -p 8000:8000 :
# Or if you use CPU
docker run -d -p 8000:8000 :
# Example:
docker run --gpus all -d -p 8000:8000 custom:latest
# Check container status
docker ps
# View logs
docker logs -f $(docker ps -q)
```
Key log indicators to look for:
* ✅ `vLLM API server version 0.14.0`
* ✅ `Starting vLLM API server 0 on http://0.0.0.0:8000`
* ✅ `Application startup complete`
{% endstep %}
{% step %}
#### Push to Docker Hub
```bash
# Login to Docker Hub (if not logged in)
docker login
# Or general form:
docker tag :/:
# Push to your Docker Hub
docker push /vllm-yotta:latest
```
{% endstep %}
{% step %}
#### Create Private Template
Visit Compute -> Launch Templates -> Private -> Create
Follow these fields on the Create page:
* Name: Type in a name.
* Registry: Choose Docker Hub.
* Image: Fill in `/:`.
* Command: Example for vllm: `/usr/sbin/sshd -D & vllm serve Qwen/Qwen3-0.6B`
* /usr/sbin/sshd -D & is necessary to start the SSH service.
* Add whatever is needed after `&` to initialize your program (check the official project docs for startup commands).
* Environment variables: Add any required env vars (e.g., model\_path, API keys) if needed.
* Ports: Add ports you exposed (e.g., 8000 for vllm).
* Container Disk: Define the container disk size.
Hit Save. You will see a template card — click Deploy to create a pod.
{% endstep %}
{% step %}
#### Verification & Testing
Replace SERVER\_IP with your Yotta Labs server IP.
```bash
# Replace with your Yottalabs server IP
SERVER_IP="12.34.56.78"
# Test connectivity
curl http://$SERVER_IP:8000/v1/models
# Test full API
curl http://$SERVER_IP:8000/v1/chat/completions \
-H "Content-Type: application/json" \
-d '{
"model": "Qwen/Qwen3-0.6B",
"messages": [
{"role": "user", "content": "What is the capital of France?"}
],
"max_tokens": 100
}'
```
Expected successful response for `/v1/models`:
```json
{
"object": "list",
"data": [
{
"id": "Qwen/Qwen3-0.6B",
"object": "model",
"created": 1768965066,
"owned_by": "vllm",
"root": "Qwen/Qwen3-0.6B",
"parent": null,
"max_model_len": 40960,
"permission": [...]
}
]
}
```
{% endstep %}
{% endstepper %}
***
## Additional Resources
* [vLLM Official Documentation](https://docs.vllm.ai/)
* [Docker Documentation](https://docs.docker.com/)
* [NVIDIA Container Toolkit](https://docs.nvidia.com/datacenter/cloud-native/container-toolkit)
***
# Training & Fine-tuning
# Get Started in LLM Training with Pytorch 2.8.0
:shushing\_face:**Before we get started:**
From the jupyter notebook, type:
```
!python
```
then enter the following code:
```
import torch
x = torch.rand(5, 3)
print(x)
```
The output should be something similar to:
```
tensor([[0.3380, 0.3845, 0.3217],
[0.8337, 0.9050, 0.2650],
[0.2979, 0.7141, 0.9069],
[0.1449, 0.1132, 0.1375],
[0.4675, 0.3947, 0.1426]])
```
### **Let’s Get Started!**
This tutorial is going to guide you through a complete MNIST handwritten digit recognition project using PyTorch, from data loading to model training and testing:hugging:
***
### 1. Environment Setup
First, ensure you have the necessary Python packages installed:
```python
%pip install torch torchvision matplotlib numpy
```
### 2. Import Libraries
```python
import torch
import torch.nn as nn
import torch.optim as optim
import torchvision
import torchvision.transforms as transforms
import matplotlib.pyplot as plt
import numpy as np
```
### 3. Data Loading and Preprocessing
The MNIST dataset contains 60,000 training images and 10,000 test images. Each image is a 28x28 pixel grayscale handwritten digit (0-9).
So, for any starters, we should first clarify the concept of "training set" and "test set". Usually, we divide a classification dataset into 2 basic subparts: a training set to help our machine learn the hidden patterns, and a test set to examine if it actually "learns" instead of simply memorizing the data- for which the LLM researchers have a fancy name called "overfitting".
In our MNIST project:
🔧**Training set**: 60,000 handwritten digit images - the model learns from these
📝**Test set**: 10,000 handwritten digit images - the model has never seen these before
The golden rule: **Never let your model peek at the test set during training!** Otherwise, you're essentially letting a student see the exam questions while studying - the grades won't reflect true understanding.
The MNIST dataset contains 60,000 training images and 10,000 test images. Each image is a 28x28 pixel grayscale handwritten digit (0-9).

```python
# Set batch size
BATCH_SIZE = 32
# Data transformation: convert images to tensors
transform = transforms.Compose([
transforms.ToTensor() # Convert PIL image or numpy array to tensor and normalize to [0,1]
])
```
**What's happening here?** The `transforms.ToTensor()` does two things:
1️⃣Translates the image from a PIL Image or NumPy array into a PyTorch tensor (the format-or "language"- PyTorch understands).
2️⃣Automatically scales pixel values from \[0, 255] to \[0, 1] - this normalization helps the model train more effectively
```python
# Download and load training dataset
trainset = torchvision.datasets.MNIST(
root='./data', # Data storage path
train=True, # Load training set
download=True, # Download if data doesn't exist
transform=transform # Apply the transformation defined above
)
trainloader = torch.utils.data.DataLoader(
trainset,
batch_size=BATCH_SIZE, # 32 samples per batch
shuffle=True, # Shuffle the data
num_workers=2 # Use 2 subprocesses for data loading
)
# Download and load test dataset
testset = torchvision.datasets.MNIST(
root='./data',
train=False, # Load test set
download=True,
transform=transform
)
testloader = torch.utils.data.DataLoader(
testset,
batch_size=BATCH_SIZE,
shuffle=False, # No need to shuffle test set
num_workers=2
)
print(f"Training set size: {len(trainset)}")
print(f"Test set size: {len(testset)}")
```
✔️**Why do we use DataLoader?**
Instead of feeding all 60,000 images at once (which would overwhelm your computer's memory), we use batches!A batch is just a small group of images processed together. Here we use batches of 32 images - think of it as studying 32 flashcards at a time instead of trying to memorize all 60,000 at once.
❓Also, think about this question: Why shuffle=True for training but False for testing?
> Shuffling the training data prevents the model from learning the order of examples rather than the actual patterns. For testing, order doesn't matter since we're just evaluating - no learning happens.
### 4. Data Exploration
Before training, it's important to understand the structure and content of the data. As the old saying goes: "garbage in, garbage out" - understanding your data is crucial for successful machine learning.
```python
# Visualize some training samples
def show_sample_images():
# Get one batch of data
dataiter = iter(trainloader)
images, labels = next(dataiter)
# Create figure
fig, axes = plt.subplots(2, 5, figsize=(12, 6))
axes = axes.ravel()
# Display first 10 images
for i in range(10):
axes[i].imshow(images[i].squeeze(), cmap='gray')
axes[i].set_title(f'Label: {labels[i].item()}')
axes[i].axis('off')
plt.tight_layout()
plt.show()
show_sample_images()
```
This visualization helps you catch potential issues early - are the images rotated correctly? Are they actually digits? Is the quality good enough?
```python
# Check data dimensions
dataiter = iter(trainloader)
images, labels = next(dataiter)
print(f"Image batch dimensions: {images.shape}") # [batch_size, channels, height, width]
print(f"Label batch dimensions: {labels.shape}") # [batch_size]
```
**Expected Output:**
```python
Image batch dimensions: torch.Size([32, 1, 28, 28])
Label batch dimensions: torch.Size([32])
```
Wow, wait!
Are these numbers and brackets making your head spin?
Here is explanation:
1️⃣`32`: Batch size - we're processing 32 images at once
2️⃣`1`: Number of channels - grayscale images have 1 channel (RGB images would have 3)
3️⃣`28, 28`: Height and width of each image in pixels
4️⃣Labels are just a 1D array of 32 numbers, each indicating which digit (0-9) the corresponding image represents
### 5. Build CNN Model
Now comes the fun part - building our neural network! We'll use a Convolutional Neural Network (CNN), which is particularly good at recognizing visual patterns.
**Why CNN for images?** Traditional neural networks treat each pixel independently, but CNNs are smart enough to recognize that nearby pixels form patterns (like edges, curves, and eventually whole digits). It's like how you recognize a face by seeing eyes, nose, and mouth in specific spatial arrangements, not just as random dots.
python
```python
class SimpleCNN(nn.Module):
def __init__(self):
super(SimpleCNN, self).__init__()
# Convolutional layer: input 1 channel, output 32 channels, kernel size 3x3
self.conv = nn.Conv2d(in_channels=1, out_channels=32, kernel_size=3)
# First fully connected layer
# Input dimension: 26*26*32 (feature map size after convolution)
# Output dimension: 128
self.d1 = nn.Linear(26 * 26 * 32, 128)
# Second fully connected layer
# Input dimension: 128
# Output dimension: 10 (corresponding to 10 digit classes: 0-9)
self.d2 = nn.Linear(128, 10)
def forward(self, x):
# Convolutional layer + ReLU activation
x = self.conv(x)
x = torch.relu(x)
# Flatten feature maps: from [batch, 32, 26, 26] to [batch, 26*26*32]
x = x.view(-1, 26 * 26 * 32)
# First fully connected layer + ReLU
x = self.d1(x)
x = torch.relu(x)
# Second fully connected layer
x = self.d2(x)
# Softmax to get probability distribution
x = torch.softmax(x, dim=1)
return x
# Create model instance and move to device
model = SimpleCNN().to(device)
print(model)
```
**Let's break down what each component does:**
1. **Convolutional Layer (`self.conv`)**: This is like a pattern detector. It slides a 3x3 window across the image, looking for 32 different patterns (edges, curves, corners, etc.). Each of these 32 "filters" learns to detect a different feature.
2. **ReLU Activation**: Stands for "Rectified Linear Unit" - it's a simple function that helps the network learn non-linear patterns. Without it, the network could only learn straight-line relationships, which isn't useful for complex images.
3. **Flatten (`view`)**: After convolution, we have a 3D structure (32 feature maps of size 26x26). We need to flatten this into a 1D array before feeding it to regular neural network layers.
4. **Fully Connected Layers (`self.d1`, `self.d2`)**: These layers combine all the patterns detected by the convolutional layer to make the final decision about which digit it is.
5. **Softmax**: Converts the final layer's outputs into probabilities that sum to 1. For example: \[0.1, 0.05, 0.7, 0.05, ...] means 70% confidence it's a "2", 10% confidence it's a "0", etc.
**Where does 26×26 come from?**
The convolutional layer shrinks the image slightly. Here's the formula:
```python
H_out = (H_in - kernel_size) / stride + 1
```
In our case:
* Input: 28 × 28
* Kernel: 3 × 3
* Stride (default): 1
* Padding (default): 0
Calculation: `H_out = (28 - 3) / 1 + 1 = 26`
So each of our 32 feature maps is 26 × 26 pixels, giving us 26 × 26 × 32 = 21,632 features to feed into the first fully connected layer.
```python
# Test model forward pass
dataiter = iter(trainloader)
images, labels = next(dataiter)
print(f"Input batch size: {images.shape}")
# Move data to device and pass through model
images = images.to(device)
output = model(images)
print(f"Output dimensions: {output.shape}") # Should be [32, 10]
```
**Expected output:** `torch.Size([32, 10])` - for each of the 32 images in the batch, we get 10 probabilities (one for each digit 0-9).
### 7. Train the Model
Training is where the magic happens - this is where the model actually learns from the data!
```python
# Define loss function
criterion = nn.CrossEntropyLoss()
# Define optimizer (Adam)
optimizer = optim.Adam(model.parameters(), lr=0.001)
# Function to calculate accuracy
def get_accuracy(logit, target, batch_size):
"""Calculate accuracy for the current batch"""
corrects = (torch.max(logit, 1)[1].view(target.size()).data == target.data).sum()
accuracy = 100.0 * corrects / batch_size
return accuracy.item()
```
**What are these components?**
* **Loss Function (CrossEntropyLoss)**: Measures how wrong the model's predictions are. Lower loss = better predictions. It's like a grading system that tells the model how badly it messed up.
* **Optimizer (Adam)**: Decides how to adjust the model's weights to reduce the loss. Think of it as a GPS that guides the model toward better performance. Adam is popular because it adapts the learning speed automatically - taking bigger steps when far from the goal, smaller steps when getting close.
* **Learning Rate (lr=0.001)**: Controls how big each adjustment step is. Too large, and the model overshoots the optimal solution; too small, and training takes forever.
```python
# Training loop
def train_model(epochs=5):
for epoch in range(epochs):
train_running_loss = 0.0
train_acc = 0.0
# Set model to training mode
model.train()
# Iterate through training data
for i, (images, labels) in enumerate(trainloader):
# Move data to device
images = images.to(device)
labels = labels.to(device)
# Forward pass
outputs = model(images)
loss = criterion(outputs, labels)
# Backward pass and optimization
optimizer.zero_grad() # Zero the gradients
loss.backward() # Backward propagation
optimizer.step() # Update parameters
# Accumulate loss and accuracy
train_running_loss += loss.item()
train_acc += get_accuracy(outputs, labels, BATCH_SIZE)
# Calculate averages
avg_loss = train_running_loss / len(trainloader)
avg_acc = train_acc / len(trainloader)
print(f'Epoch: {epoch} | Loss: {avg_loss:.4f} | Train Accuracy: {avg_acc:.2f}%')
# Start training
train_model(epochs=5)
```
**Understanding the training loop:**
An **epoch** is one complete pass through the entire training dataset. We typically need multiple epochs because the model learns gradually - like reading a textbook multiple times to fully understand it.
For each batch of images:
1. **Forward Pass**: Feed images through the model to get predictions
2. **Calculate Loss**: Compare predictions to true labels to see how wrong we are
3. **Backward Pass**: Calculate how each weight contributed to the error (using calculus!)
4. **Update Weights**: Adjust weights to reduce the error
**Why `optimizer.zero_grad()`?** PyTorch accumulates gradients by default. If we don't reset them to zero, gradients from previous batches would interfere with the current batch - like trying to navigate with directions from your last trip still on the GPS.
**Expected Output:**
```python
Epoch: 0 | Loss: 0.2145 | Train Accuracy: 93.47%
Epoch: 1 | Loss: 0.0812 | Train Accuracy: 97.53%
Epoch: 2 | Loss: 0.0565 | Train Accuracy: 98.24%
Epoch: 3 | Loss: 0.0436 | Train Accuracy: 98.66%
Epoch: 4 | Loss: 0.0355 | Train Accuracy: 98.91%
```
Notice how the loss decreases and accuracy increases with each epoch - the model is learning! The improvements get smaller over time because the easy patterns are learned first.
### 8. Test the Model
Now for the moment of truth - let's see how well our model performs on data it has never seen before!
```python
def test_model():
# Set model to evaluation mode
model.eval()
test_acc = 0.0
# Don't calculate gradients to save memory and computation
with torch.no_grad():
for i, (images, labels) in enumerate(testloader):
# Move data to device
images = images.to(device)
labels = labels.to(device)
# Forward pass
outputs = model(images)
# Calculate accuracy
test_acc += get_accuracy(outputs, labels, BATCH_SIZE)
# Calculate average accuracy
avg_test_acc = test_acc / len(testloader)
print(f'Test Accuracy: {avg_test_acc:.2f}%')
# Test the model
test_model()
```
**Key differences from training:**
* **`model.eval()`**: Tells the model we're evaluating, not training. Some layers (like Dropout, which we don't have here) behave differently during evaluation.
* **`torch.no_grad()`**: Disables gradient calculation. Since we're not updating weights during testing, we don't need gradients - this saves memory and speeds things up.
* **No backward pass**: We only do forward propagation to get predictions. No learning happens here!
**Expected Output:**
```python
Test Accuracy: 98.45%
```
**How to interpret the results:**
* **98.45% test accuracy**: Our model correctly identifies about 98 out of every 100 handwritten digits it's never seen before. Pretty impressive!
* **Compare with training accuracy (98.91%)**: The test accuracy is slightly lower than training accuracy, which is normal and expected. A small gap like this indicates healthy generalization.
* Red flag scenarios
:
* Training: 99%, Test: 65% → **Severe overfitting** (the model memorized instead of learned)
* Training: 65%, Test: 64% → **Underfitting** (the model didn't learn enough)
* Training: 98%, Test: 98.5% → **Suspicious** (test shouldn't be better; might indicate data leakage)
Happy learning! 🎉
# Accelerating PyTorch Training with TorchDynamo and JIT
#### :checkered\_flag:What is TorchDynamo?
TorchDynamo is a **dynamic optimization engine** introduced in PyTorch 2.9.0. Think of it as a smart assistant that observes your code at runtime and transforms it into an optimized computation graph.
**What makes it special?**
* It's dynamic - handles Python control flow (if statements, loops, etc.)
* Works great with RNNs, Transformers, and other dynamic models
* No need to change your code structure, it just accelerates what you already have
#### :checkered\_flag:What is the JIT Compiler?
The JIT (Just-In-Time) compiler is like adding a turbo boost to your Python code. It converts Python code into more efficient C++ code, dramatically improving performance.
Using `torch.jit.script` or `torch.jit.trace`, your model transforms into TorchScript, which runs significantly faster.
***
### Step 1: Environment Setup
First, let's get our environment ready. Make sure you're using PyTorch 2.9.0.
```python
# Install PyTorch 2.9.0 using the magic command
%pip install torch==2.9.0 torchvision torchaudio --quiet
```
**Note:** If you're using a GPU, verify your CUDA version is compatible. Check with `nvidia-smi` in your terminal.
***
### Step 2: Import Required Libraries
Let's prepare our toolkit with all the necessary imports.
```python
# Import PyTorch and related libraries
import torch
import torch.nn as nn
import torch.optim as optim
import torch.nn.functional as F
from torch.utils.data import DataLoader
from torchvision import datasets, transforms
# Utility imports
import time
import torch._dynamo as dynamo
print("All libraries imported successfully")
print(f"PyTorch version: {torch.__version__}")
print(f"CUDA available: {torch.cuda.is_available()}")
if torch.cuda.is_available():
print(f"GPU: {torch.cuda.get_device_name(0)}")
```
***
### Step 3: Define the Neural Network
We'll use a simple but effective fully-connected neural network for our experiments. It's straightforward yet demonstrates the optimization techniques well.
```python
# Define a simple feedforward neural network
class SimpleNN(nn.Module):
def __init__(self):
super(SimpleNN, self).__init__()
# Input layer to hidden layer: 784 pixels -> 128 neurons
self.fc1 = nn.Linear(28 * 28, 128)
# Hidden layer to output layer: 128 neurons -> 10 classes
self.fc2 = nn.Linear(128, 10)
def forward(self, x):
# Flatten the image into a 1D vector
x = x.view(-1, 28 * 28)
# ReLU activation (classic choice)
x = F.relu(self.fc1(x))
# Output layer
x = self.fc2(x)
# Log-Softmax for classification
return F.log_softmax(x, dim=1)
print("Neural network defined")
print("Architecture: 784 -> 128 -> 10")
```
***
### Step 4: Prepare the MNIST Dataset
We'll use the classic MNIST handwritten digits dataset - the "Hello World" of deep learning.
```python
# Data preprocessing: convert to tensor and normalize
transform = transforms.Compose([
transforms.ToTensor(),
transforms.Normalize((0.5,), (0.5,)) # Normalize to [-1, 1]
])
print("Downloading MNIST dataset...")
print("(First run will download, subsequent runs use local cache)\n")
# Training set
train_dataset = datasets.MNIST(
'./data',
train=True,
download=True,
transform=transform
)
train_loader = DataLoader(
train_dataset,
batch_size=64,
shuffle=True
)
# Test set
test_dataset = datasets.MNIST(
'./data',
train=False,
download=True,
transform=transform
)
test_loader = DataLoader(
test_dataset,
batch_size=64,
shuffle=False
)
print(f"Dataset ready")
print(f"Training samples: {len(train_dataset)}")
print(f"Test samples: {len(test_dataset)}")
print(f"Batch size: 64")
```
***
### Step 5: Baseline Test - Original Training Speed
Let's establish our baseline by measuring training speed without any optimizations. This gives us a reference point.
```python
# Initialize model, loss function, and optimizer
model = SimpleNN().cuda() if torch.cuda.is_available() else SimpleNN()
criterion = nn.CrossEntropyLoss()
optimizer = optim.Adam(model.parameters(), lr=0.001)
print("Model loaded to:", "GPU" if torch.cuda.is_available() else "CPU")
# Define training function
def train(model, train_loader, optimizer, criterion):
model.train()
for batch_idx, (data, target) in enumerate(train_loader):
# Move data to GPU (if available)
if torch.cuda.is_available():
data, target = data.cuda(), target.cuda()
# Zero gradients
optimizer.zero_grad()
# Forward pass
output = model(data)
# Calculate loss
loss = criterion(output, target)
# Backward pass
loss.backward()
# Update parameters
optimizer.step()
print("\nStarting baseline test (no optimization)...")
print("Training for 5 epochs, please wait...\n")
# Record start time
start_time = time.time()
for epoch in range(5):
train(model, train_loader, optimizer, criterion)
print(f"Epoch {epoch+1}/5 completed")
# Record end time
end_time = time.time()
baseline_time = end_time - start_time
print(f"\nBaseline training time: {baseline_time:.2f} seconds")
print("This is our starting speed - let's see how much we can improve")
```
***
### Step 6: JIT Optimization - First Wave of Acceleration
Now, let's apply JIT compiler optimization to convert our model to TorchScript for better performance.
```python
print("Applying JIT optimization...")
# Reinitialize model (for fair comparison)
model = SimpleNN().cuda() if torch.cuda.is_available() else SimpleNN()
optimizer = optim.Adam(model.parameters(), lr=0.001)
# Key step: compile the model using JIT
model_jit = torch.jit.script(model)
print("Model converted to TorchScript")
print("\nStarting JIT-optimized training...")
print("Training for 5 epochs...\n")
# Record start time
start_time = time.time()
for epoch in range(5):
train(model_jit, train_loader, optimizer, criterion)
print(f"Epoch {epoch+1}/5 completed (JIT optimized)")
# Record end time
end_time = time.time()
jit_time = end_time - start_time
print(f"\nJIT-optimized training time: {jit_time:.2f} seconds")
print(f"Improvement over baseline: {((baseline_time - jit_time) / baseline_time * 100):.1f}%")
print("Notice the speedup? That's JIT at work")
```
***
### Step 7: TorchDynamo Optimization - Ultimate Acceleration
Let's try TorchDynamo - PyTorch 2.x's killer feature for dynamic optimization.
```python
print("Enabling TorchDynamo optimization...")
# Reinitialize model
model = SimpleNN().cuda() if torch.cuda.is_available() else SimpleNN()
optimizer = optim.Adam(model.parameters(), lr=0.001)
# Enable TorchDynamo with the inductor backend (strongest optimization)
dynamo.config.verbose = False # Keep output clean
# Use compile for optimization (PyTorch 2.0+ API)
model_dynamo = torch.compile(model, backend="inductor")
print("TorchDynamo optimization enabled")
print("\nStarting TorchDynamo-optimized training...")
print("Training for 5 epochs...\n")
print("Note: First epoch may be slower (compilation overhead), then it gets fast")
# Record start time
start_time = time.time()
for epoch in range(5):
train(model_dynamo, train_loader, optimizer, criterion)
print(f"Epoch {epoch+1}/5 completed (TorchDynamo optimized)")
# Record end time
end_time = time.time()
dynamo_time = end_time - start_time
print(f"\nTorchDynamo-optimized training time: {dynamo_time:.2f} seconds")
print(f"Improvement over baseline: {((baseline_time - dynamo_time) / baseline_time * 100):.1f}%")
print(f"Improvement over JIT: {((jit_time - dynamo_time) / jit_time * 100):.1f}%")
print("This is the power of dynamic optimization")
```
***
### Step 8: Performance Comparison - Let the Data Speak
Let's visualize the optimization results with a clear comparison chart.
```python
import matplotlib.pyplot as plt
import numpy as np
print("Generating performance comparison chart...\n")
# Prepare data
methods = ['Baseline', 'JIT Optimization', 'TorchDynamo Optimization']
times = [baseline_time, jit_time, dynamo_time]
colors = ['#ff6b6b', '#4ecdc4', '#45b7d1']
# Create bar chart
plt.figure(figsize=(10, 6))
bars = plt.bar(methods, times, color=colors, alpha=0.8, edgecolor='black', linewidth=1.5)
# Add value labels on bars
for bar, t in zip(bars, times):
height = bar.get_height()
plt.text(bar.get_x() + bar.get_width()/2., height,
f'{t:.2f}s',
ha='center', va='bottom', fontsize=12, fontweight='bold')
# Beautify the chart
plt.ylabel('Training Time (seconds)', fontsize=12, fontweight='bold')
plt.title('PyTorch Training Optimization Results - 5 Epochs', fontsize=14, fontweight='bold')
plt.grid(axis='y', alpha=0.3, linestyle='--')
plt.tight_layout()
# Display chart
plt.show()
# Print detailed comparison
print("=" * 60)
print("Performance Comparison Report")
print("=" * 60)
print(f"Baseline: {baseline_time:.2f} seconds [reference]")
print(f"JIT Optimization: {jit_time:.2f} seconds [speedup: {((baseline_time - jit_time) / baseline_time * 100):.1f}%]")
print(f"TorchDynamo: {dynamo_time:.2f} seconds [speedup: {((baseline_time - dynamo_time) / baseline_time * 100):.1f}%]")
print("=" * 60)
# Calculate best method
fastest = min(times)
fastest_method = methods[times.index(fastest)]
speedup = baseline_time / fastest
print(f"\nWinner: {fastest_method}")
print(f"Total speedup: {speedup:.2f}x")
print(f"Time saved: {baseline_time - fastest:.2f} seconds")
print(f"\nIf you were training 100 epochs...")
print(f" Time saved: {(baseline_time - fastest) * 20:.2f} seconds ≈ {(baseline_time - fastest) * 20 / 60:.1f} minutes")
```
***
### Step 9: Verify Model Accuracy
Optimization is important, but accuracy matters too. Let's test our model's performance.
```python
def test(model, test_loader):
model.eval()
correct = 0
total = 0
with torch.no_grad():
for data, target in test_loader:
if torch.cuda.is_available():
data, target = data.cuda(), target.cuda()
output = model(data)
pred = output.argmax(dim=1, keepdim=True)
correct += pred.eq(target.view_as(pred)).sum().item()
total += target.size(0)
accuracy = 100. * correct / total
return accuracy
print("Testing model accuracy...\n")
# Test the optimized model
accuracy = test(model_dynamo, test_loader)
print(f"Test accuracy: {accuracy:.2f}%")
print(f"Correct predictions: {int(accuracy * len(test_dataset) / 100)}/{len(test_dataset)}")
if accuracy > 95:
print("Excellent - accuracy above 95%")
elif accuracy > 90:
print("Good - accuracy above 90%")
else:
print("Room for improvement - try training more epochs")
```
***
### Step 10: Practical Tips and Best Practices
Let me share some insights from real-world projects.
```python
print("PyTorch Optimization Tips")
print("=" * 60)
print()
print("1. Choosing the Right Optimization:")
print(" • Small models → JIT is sufficient")
print(" • Large/complex models → TorchDynamo is stronger")
print(" • Production → combine both for best results")
print()
print("2. Important Notes:")
print(" • TorchDynamo first run includes compilation (slower)")
print(" • Ensure PyTorch version >= 2.0")
print(" • GPU training shows more dramatic improvements")
print()
print("3. Advanced Optimizations:")
print(" • Use mixed precision training (torch.cuda.amp)")
print(" • Enable cudnn.benchmark (torch.backends.cudnn.benchmark = True)")
print(" • Set appropriate num_workers for data loading")
print()
print("4. Debugging Tips:")
print(" • If issues arise, disable optimization first")
print(" • Use torch._dynamo.explain() to see optimization details")
print(" • Check torch._dynamo.config settings")
print("=" * 60)
```
# Fine-tuning Orpheus\_(3B)-TTS with Unsloth
> :sloth:This tutorial is created based on [Unsloth official notebooks](https://unsloth.ai/docs/get-started/unsloth-notebooks).
Welcome to the Orpheus text-to-speech model fine-tuning tutorial. I'll walk you through the entire process step by step, from zero to having your own custom-trained TTS model up and running.
### What is a TTS model?
A TTS (Text-to-Speech) model converts written text into spoken audio. It reads text and generates a voice that sounds natural and human-like.
### What You'll Need
First things first - this tutorial is designed to run on pods with our official template of unsloth. Create one and get started!
{% stepper %}
{% step %}
#### Step 1: Installing Dependencies
This part's a bit boring but crucial. We need to install a bunch of libraries. Run this in your `/workspace/notebook.ipynb`:
```python
%%capture
# Install Unsloth and core dependencies
%pip install unsloth
# These specific versions are important - don't change them
%pip install transformers==4.56.2
%pip install --no-deps trl==0.22.2
%pip install snac torchcodec "datasets>=3.4.1,<4.0.0"
```
**Note**: If you encounter any CUDA version mismatches or xformers errors, you might need to install a specific xformers version matching your PyTorch installation. Check your PyTorch version with `torch.__version__` and install the corresponding xformers.
{% hint style="info" %}
After installation, restart your kernel (Kernel → Restart Kernel in Jupyter).
{% endhint %}
{% endstep %}
{% step %}
#### Loading the Model
We're using the Unsloth framework, which is awesome because it's fast and memory-efficient. The base model is `orpheus-3b-0.1-ft`, which has about 3 billion parameters:
```python
from unsloth import FastLanguageModel
import torch
model, tokenizer = FastLanguageModel.from_pretrained(
model_name = "unsloth/orpheus-3b-0.1-ft",
max_seq_length = 2048, # Sequence length - leave this as is
dtype = None, # Auto-detect precision
load_in_4bit = False, # Set to True if you're low on VRAM
)
```
You'll see something like this :arrow\_down: This indicates that unsloth has successfully started and loaded the model's safetensors.
{% endstep %}
{% step %}
#### Setting Up LoRA
LoRA is a lifesaver - it lets us train only a small portion (1-10%) of the model's parameters, drastically reducing training costs:
```python
model = FastLanguageModel.get_peft_model(
model,
r = 64, # LoRA rank - higher = better quality but slower
target_modules = ["q_proj", "k_proj", "v_proj", "o_proj",
"gate_proj", "up_proj", "down_proj"],
lora_alpha = 64,
lora_dropout = 0,
bias = "none",
use_gradient_checkpointing = "unsloth", # Unsloth's magic - saves 30% VRAM!
random_state = 3407,
)
```
* `r = 64`: This is adjustable - try 8/16/32/64/128. Higher values train slower but theoretically give better results
* `lora_alpha`: Usually best to keep this equal to `r`
* `use_gradient_checkpointing = "unsloth"`: This is Unsloth's secret sauce - always use it!
You'll see this after running the cell above:
```python
##Unsloth 2026.2.1 patched 28 layers with 28 QKV layers, 28 O layers and 28 MLP layers.
```
{% endstep %}
{% step %}
#### Preparing Your Data (Important!)
This is the most complex part of the whole pipeline, and where things most often go wrong. We need to convert audio into tokens the model can understand.
:checkered\_flag:**Data Format Requirements**
* **Single speaker**: You need `text` and `audio` fields
* **Multi-speaker**: You need `source` (speaker name), `text`, and `audio` fields
This example uses the `MrDragonFox/Elise` dataset, which is single-speaker. If you're using your own dataset, make sure the format matches:
```python
from datasets import load_dataset
# Load the dataset
dataset = load_dataset("MrDragonFox/Elise", split="train")
# Or load from local files:
# dataset = load_dataset("json", data_files="your_data.json", split="train")
```
:checkered\_flag:**Audio Encoding (SNAC)**
We now use the SNAC model to convert audio waveforms into discrete tokens. Don't let the code volume intimidate you - the concept is simple:
1. Resample audio to 24kHz
2. Use SNAC to encode into multi-layer codes
3. Interleave these codes in a specific order
```python
import torchaudio.transforms as T
from snac import SNAC
# Load the SNAC model
snac_model = SNAC.from_pretrained("hubertsiuzdak/snac_24khz").to("cuda")
def tokenise_audio(waveform):
"""Convert audio waveform to tokens"""
waveform = torch.from_numpy(waveform).unsqueeze(0)
waveform = waveform.to(dtype=torch.float32)
# Resample to 24kHz
resample_transform = T.Resample(orig_freq=ds_sample_rate, new_freq=24000)
waveform = resample_transform(waveform).unsqueeze(0).to("cuda")
# Encode
with torch.inference_mode():
codes = snac_model.encode(waveform)
# Interleave codes in the correct order (this order matters!)
all_codes = []
for i in range(codes[0].shape[1]):
all_codes.append(codes[0][0][i].item() + 128266)
all_codes.append(codes[1][0][2*i].item() + 128266 + 4096)
all_codes.append(codes[2][0][4*i].item() + 128266 + (2*4096))
all_codes.append(codes[2][0][(4*i)+1].item() + 128266 + (3*4096))
all_codes.append(codes[1][0][(2*i)+1].item() + 128266 + (4*4096))
all_codes.append(codes[2][0][(4*i)+2].item() + 128266 + (5*4096))
all_codes.append(codes[2][0][(4*i)+3].item() + 128266 + (6*4096))
return all_codes
def add_codes(example):
codes_list = None
try:
answer_audio = example.get("audio")
if answer_audio and "array" in answer_audio:
audio_array = answer_audio["array"]
codes_list = tokenise_audio(audio_array)
except Exception as e:
print(f"Skipping row due to error: {e}")
example["codes_list"] = codes_list
return example
```
Now apply this to your entire dataset:
{% hint style="info" %}
Use `%pip install librosa` and `%pip install soundfile` if you cannot import them.
{% endhint %}
```python
ds_sample_rate = dataset[0]["audio"]["sampling_rate"]
dataset = dataset.map(add_codes, remove_columns=["audio"])
# Filter out any failed conversions
dataset = dataset.filter(lambda x: x["codes_list"] is not None)
dataset = dataset.filter(lambda x: len(x["codes_list"]) > 0)
```
:checkered\_flag:**Removing Duplicate Frames**
This is a small optimization - removing consecutive duplicate audio frames speeds up training:
```python
def remove_duplicate_frames(example):
"""Remove consecutive duplicate audio frames"""
vals = example["codes_list"]
if len(vals) % 7 != 0:
raise ValueError("Input list length must be divisible by 7")
result = vals[:7]
for i in range(7, len(vals), 7):
if vals[i] != result[-7]:
result.extend(vals[i:i+7])
example["codes_list"] = result
return example
dataset = dataset.map(remove_duplicate_frames)
```
:checkered\_flag:**Building Input Sequences**
Final step - combine text and audio tokens into the format the model expects:
```python
# Define special tokens
tokeniser_length = 128256
start_of_text = 128000
end_of_text = 128009
start_of_speech = tokeniser_length + 1
end_of_speech = tokeniser_length + 2
start_of_human = tokeniser_length + 3
end_of_human = tokeniser_length + 4
start_of_ai = tokeniser_length + 5
end_of_ai = tokeniser_length + 6
def create_input_ids(example):
# Single-speaker model
text_prompt = example['text']
# For multi-speaker, use:
# text_prompt = f"{example['source']}: {example['text']}"
text_ids = tokenizer.encode(text_prompt, add_special_tokens=True)
text_ids.append(end_of_text)
# Assemble the full sequence: [human start] [text] [human end] [ai start] [audio] [ai end]
input_ids = (
[start_of_human] +
text_ids +
[end_of_human] +
[start_of_ai] +
[start_of_speech] +
example["codes_list"] +
[end_of_speech] +
[end_of_ai]
)
example["input_ids"] = input_ids
example["labels"] = input_ids
example["attention_mask"] = [1] * len(input_ids)
return example
dataset = dataset.map(create_input_ids, remove_columns=["text", "codes_list"])
```
If you're training a multi-speaker model (like the original orpheus), remember to modify the `text_prompt` line to include speaker information!
{% endstep %}
{% step %}
#### Training Time
Configure your training parameters:
```python
from transformers import TrainingArguments, Trainer
trainer = Trainer(
model = model,
train_dataset = dataset,
args = TrainingArguments(
per_device_train_batch_size = 1, # Batch size - be careful with >1 on multi-GPU
gradient_accumulation_steps = 4, # Gradient accumulation - effectively batch=4
warmup_steps = 5,
max_steps = 60, # Quick test - for real training use num_train_epochs=1
# num_train_epochs = 1, # Use this for full training
learning_rate = 2e-4,
logging_steps = 1,
optim = "adamw_8bit", # 8-bit optimizer saves memory
weight_decay = 0.001,
lr_scheduler_type = "linear",
seed = 3407,
output_dir = "outputs",
),
)
```
**Tuning suggestions**:
* `learning_rate`: 2e-4 is pretty stable, but if training is unstable try 1e-4
* `max_steps = 60`: This is just for demo - real training needs hundreds or thousands of steps
* `per_device_train_batch_size`: Try 2 if you have enough VRAM, but stick with 1 for multi-GPU setups
Check if you have enough memory:
```python
gpu_stats = torch.cuda.get_device_properties(0)
start_gpu_memory = round(torch.cuda.max_memory_reserved() / 1024 / 1024 / 1024, 3)
max_memory = round(gpu_stats.total_memory / 1024 / 1024 / 1024, 3)
print(f"GPU = {gpu_stats.name}. Max memory = {max_memory} GB.")
print(f"{start_gpu_memory} GB of memory reserved.")
```
Now let's train:
```python
trainer_stats = trainer.train()
```
Grab a coffee - this will take a while. After training, check out the stats:
```python
used_memory = round(torch.cuda.max_memory_reserved() / 1024 / 1024 / 1024, 3)
print(f"Training time: {round(trainer_stats.metrics['train_runtime']/60, 2)} minutes")
print(f"Peak memory usage: {used_memory} GB")
```
{% endstep %}
{% step %}
#### Testing Your Model
Time to hear how it sounds!
```python
FastLanguageModel.for_inference(model) # Switch to inference mode
snac_model.to("cpu") # Move SNAC to CPU to save VRAM
# Prepare test prompts
prompts = [
"Hey there my name is Elise, and I'm a speech generation model.",
"This is a test of the fine-tuned voice synthesis system.",
]
chosen_voice = None # None for single-speaker, or speaker name for multi-speaker
```
Then run the inference code (it's a bit long because it handles token decoding and audio reconstruction):
```python
# Prepare prompts with speaker prefix if needed
prompts_ = [(f"{chosen_voice}: " + p) if chosen_voice else p for p in prompts]
all_input_ids = []
for prompt in prompts_:
input_ids = tokenizer(prompt, return_tensors="pt").input_ids
all_input_ids.append(input_ids)
# Add special tokens
start_token = torch.tensor([[128259]], dtype=torch.int64) # Start of human
end_tokens = torch.tensor([[128009, 128260]], dtype=torch.int64) # End of text, End of human
all_modified_input_ids = []
for input_ids in all_input_ids:
modified_input_ids = torch.cat([start_token, input_ids, end_tokens], dim=1)
all_modified_input_ids.append(modified_input_ids)
# Pad sequences
max_length = max([modified_input_ids.shape[1] for modified_input_ids in all_modified_input_ids])
all_padded_tensors = []
all_attention_masks = []
for modified_input_ids in all_modified_input_ids:
padding = max_length - modified_input_ids.shape[1]
padded_tensor = torch.cat([torch.full((1, padding), 128263, dtype=torch.int64), modified_input_ids], dim=1)
attention_mask = torch.cat([torch.zeros((1, padding), dtype=torch.int64), torch.ones((1, modified_input_ids.shape[1]), dtype=torch.int64)], dim=1)
all_padded_tensors.append(padded_tensor)
all_attention_masks.append(attention_mask)
input_ids = torch.cat(all_padded_tensors, dim=0).to("cuda")
attention_mask = torch.cat(all_attention_masks, dim=0).to("cuda")
# Generate!
generated_ids = model.generate(
input_ids = input_ids,
attention_mask = attention_mask,
max_new_tokens = 1200,
do_sample = True,
temperature = 0.6,
top_p = 0.95,
repetition_penalty = 1.1,
num_return_sequences = 1,
eos_token_id = 128258,
use_cache = True
)
# Extract audio tokens
token_to_find = 128257
token_to_remove = 128258
token_indices = (generated_ids == token_to_find).nonzero(as_tuple=True)
if len(token_indices[1]) > 0:
last_occurrence_idx = token_indices[1][-1].item()
cropped_tensor = generated_ids[:, last_occurrence_idx+1:]
else:
cropped_tensor = generated_ids
# Process tokens
processed_rows = []
for row in cropped_tensor:
masked_row = row[row != token_to_remove]
processed_rows.append(masked_row)
code_lists = []
for row in processed_rows:
row_length = row.size(0)
new_length = (row_length // 7) * 7
trimmed_row = row[:new_length]
trimmed_row = [t - 128266 for t in trimmed_row]
code_lists.append(trimmed_row)
# Decode audio
def redistribute_codes(code_list):
layer_1 = []
layer_2 = []
layer_3 = []
for i in range(len(code_list) // 7):
layer_1.append(code_list[7*i])
layer_2.append(code_list[7*i+1] - 4096)
layer_3.append(code_list[7*i+2] - (2*4096))
layer_3.append(code_list[7*i+3] - (3*4096))
layer_2.append(code_list[7*i+4] - (4*4096))
layer_3.append(code_list[7*i+5] - (5*4096))
layer_3.append(code_list[7*i+6] - (6*4096))
# Validate and clip codes to valid range (0-4095)
layer_1 = [max(0, min(4095, x)) for x in layer_1]
layer_2 = [max(0, min(4095, x)) for x in layer_2]
layer_3 = [max(0, min(4095, x)) for x in layer_3]
codes = [torch.tensor(layer_1).unsqueeze(0),
torch.tensor(layer_2).unsqueeze(0),
torch.tensor(layer_3).unsqueeze(0)]
audio_hat = snac_model.decode(codes)
return audio_hat
my_samples = []
for code_list in code_lists:
try:
samples = redistribute_codes(code_list)
my_samples.append(samples)
except Exception as e:
print(f"Error decoding audio: {e}")
# Add empty sample as placeholder
my_samples.append(torch.zeros(1, 1, 24000))
# Save and play the audio!
import scipy.io.wavfile as wavfile
from IPython.display import display, Audio
import os
# Create output directory if it doesn't exist
os.makedirs("generated_audio", exist_ok=True)
for i in range(len(my_samples)):
print(f"\n{i+1}. {prompts[i]}")
samples = my_samples[i]
# Convert to numpy array
audio_array = samples.detach().squeeze().to("cpu").numpy()
# Save as WAV file
output_path = f"generated_audio/output_{i+1}.wav"
wavfile.write(output_path, 24000, audio_array)
print(f" ✓ Saved to: {output_path}")
# Try to display audio player (works in Jupyter)
try:
display(Audio(audio_array, rate=24000))
except:
print(f" → Play the audio file directly: {output_path}")
```
How does it sound :hugging: ?If it's not great, you might need to:
* Increase training steps
* Adjust learning rate
* Check your data quality
* Try a larger LoRA rank
{% endstep %}
{% endstepper %}
### :grey\_question:FAQ
#### Q: Running out of memory?
A: Try these:
* Enable `load_in_4bit = True`
* Reduce `max_seq_length`
* Lower the LoRA `r` value to 32 or 16
* Decrease batch size (though it's already 1)
#### Q: Training is super slow?
A:
* Make sure you're using GPU, not CPU (run `nvidia-smi` to check)
* Check that your CUDA version matches your PyTorch version
* Consider renting a more powerful GPU pod (RTX 6000 PRO or A100)
#### Q: Results aren't great?
A:
* **Data quality is king!** Make sure audio is clear and text is accurate
* Increase training time (more epochs or steps)
* Check if your learning rate is appropriate
* Ensure your dataset is large enough (at least a few hundred samples)
#### Q: Multi-GPU errors?
A: Set `CUDA_VISIBLE_DEVICES=0` to use only one GPU - this model has issues with multi-GPU setups.
#### Q: Can I train on non-English data?
A: Absolutely! Just make sure your dataset has audio + text in your target language. The tokenizer supports multiple languages.
### Advanced Tips
1. **Data augmentation**: Apply subtle transformations to audio (speed variation, light noise) to increase diversity
2. **Staged training**: Train with higher learning rate first, then fine-tune with lower rate
3. **Mixed precision**: Unsloth already optimizes this automatically - you don't need to worry about it
4. **Monitor training**: Change `report_to` to `"wandb"` or `"tensorboard"` for visual training monitoring
### Happy training! 🎉
# GRPO on GSM8K with SkyRL
This guide shows how to run a **working SkyRL training job on YottaLabs** virtual machine using:
* **1 H200 GPU**
* **Docker**
* **SkyRL**
* **GSM8K**
* **Qwen/Qwen2.5-1.5B-Instruct**
* **GRPO + FSDP2**
* **vLLM backend**
***
{% stepper %}
{% step %}
#### Connect to your YottaLabs instance
Start a virtual machine on our platform. See our [Virtual Machine Guide](https://docs.yottalabs.ai/products/virtual-machines/launching-a-virtual-machine) for step-to-step tutorial.
From your local machine, SSH into the YottaLabs host, for example:
```bash
ssh root@instance-2037157542617944064.yottadeos.com -i private_key.pem
```
Once connected, you should be on the remote machine as `root`.
{% endstep %}
{% step %}
#### Start the SkyRL Docker container
Run the official training container with GPU access enabled:
```bash
docker run -it \
--runtime=nvidia \
--gpus all \
--shm-size=16g \
--name skyrl \
novaskyai/skyrl-train-ray-2.51.1-py3.12-cu12.8 \
/bin/bash
```
This container already includes the right CUDA-compatible environment for SkyRL training. We also give Docker a larger shared memory segment with:
```bash
--shm-size=16g
```
That helps Ray and PyTorch behave better during training.
Once the container starts, you should land inside a shell that looks roughly like this:
```
(base) ray@...:~$
```
{% endstep %}
{% step %}
#### Clone the SkyRL repository
Inside the container, run:
```bash
git clone https://github.com/novasky-ai/SkyRL.git
cd SkyRL
```
At this point you should be in:
/home/ray/SkyRL
{% endstep %}
{% step %}
#### Prepare the GSM8K dataset
Generate the parquet files SkyRL expects for training and validation:
```bash
uv run --isolated examples/train/gsm8k/gsm8k_dataset.py --output_dir $HOME/data/gsm8k
```
This command downloads and preprocesses GSM8K into parquet format.
When it finishes, verify that the dataset files exist:
```bash
ls -lh $HOME/data/gsm8k
```
You should see files such as:
```
train.parquet
validation.parquet
```
That confirms the data preparation step is done.
{% endstep %}
{% step %}
#### Export your W\&B API key
SkyRL logs this run to Weights & Biases, so set your API key before training:
```bash
export WANDB_API_KEY=your_wandb_api_key_here
```
Use your real key in place of the placeholder above.
If you want to confirm the variable exists without printing the key itself, you can run:
```bash
echo $WANDB_API_KEY | wc -c
```
A nonzero result means the variable is present.
{% endstep %}
{% step %}
#### Launch training
Here is the exact single-GPU training command.
Use the **one-line version** for the least error-prone performance in shell environments:
```bash
uv run --isolated --extra fsdp -m skyrl.train.entrypoints.main_base data.train_data="['$HOME/data/gsm8k/train.parquet']" data.val_data="['$HOME/data/gsm8k/validation.parquet']" trainer.algorithm.advantage_estimator="grpo" trainer.policy.model.path="Qwen/Qwen2.5-1.5B-Instruct" trainer.strategy=fsdp2 trainer.placement.colocate_all=true trainer.placement.policy_num_gpus_per_node=1 trainer.eval_batch_size=1024 trainer.eval_before_train=true trainer.eval_interval=5 trainer.ckpt_interval=10 generator.inference_engine.backend=vllm generator.inference_engine.num_engines=1 generator.inference_engine.tensor_parallel_size=1 generator.inference_engine.weight_sync_backend=nccl environment.env_class=gsm8k
```
Let us briefly decode the important parts so the command is not just a magic spell.
#### Data
```
data.train_data="['$HOME/data/gsm8k/train.parquet']"
data.val_data="['$HOME/data/gsm8k/validation.parquet']"
```
These point SkyRL to the GSM8K parquet files you just generated.
#### Algorithm
```
trainer.algorithm.advantage_estimator="grpo"
```
This tells SkyRL to train with **GRPO**.
#### Base model
```
trainer.policy.model.path="Qwen/Qwen2.5-1.5B-Instruct"
```
This is the policy model being trained.
#### Training strategy
```
trainer.strategy=fsdp2
trainer.placement.colocate_all=true
trainer.placement.policy_num_gpus_per_node=1
```
This configures a **single-GPU FSDP2 run** and keeps the components colocated appropriately for a one-GPU machine.
#### Evaluation
```
trainer.eval_batch_size=1024
trainer.eval_before_train=true
trainer.eval_interval=5
trainer.ckpt_interval=10
```
This tells SkyRL to:
* run evaluation before training starts
* evaluate every 5 steps
* save checkpoints every 10 steps
#### Inference engine
```
generator.inference_engine.backend=vllm
generator.inference_engine.num_engines=1
generator.inference_engine.tensor_parallel_size=1
generator.inference_engine.weight_sync_backend=nccl
```
This uses **vLLM** for rollout generation with a **single engine** and **tensor parallel size 1**, which matches a single-GPU setup.
#### Environment
```
environment.env_class=gsm8k
```
This tells SkyRL to use the GSM8K task environment for reward computation and evaluation.
{% endstep %}
{% step %}
#### What a healthy startup looks like
After launching training, you should see logs that indicate the system is booting correctly.
Here are the kinds of messages you want to see:
```
Started a local Ray instance.
Infrastructure logs will be written to: /tmp/skyrl-logs/...
Synced registries to ray actor
InferenceEngineClient initialized with 1 engines.
Total steps: 7
Validation set size: 2
init policy/ref/critic models done
No checkpoint found, starting training from scratch
Started: 'eval'
```
These lines tell you:
* Ray started
* SkyRL initialized its worker stack
* the inference engine came up
* the dataset loaded
* the trainer is entering evaluation and then training
{% endstep %}
{% step %}
#### What is happening during training?
One full **reinforcement learning training step** in SkyRL looks like:
```bash
(skyrl_entrypoint pid=8455) Input: [{'content': 'The selling price of a bicycle that had sold for $220 last year was increased by 15%. What is the new price? Let\'s think step by step and output the final answer after "####".', 'role': 'user'}]
(skyrl_entrypoint pid=8455) Output (Total Reward: 0.0000):
(skyrl_entrypoint pid=8455) To find the new price of the bicycle after a 15% increase from the original price of $220, we can follow these steps:
(skyrl_entrypoint pid=8455)
(skyrl_entrypoint pid=8455) 1. Calculate the amount of the increase by multiplying the original price by 15%. We will use 15% as 0.15 in decimal form, so we calculate:
(skyrl_entrypoint pid=8455) \[
(skyrl_entrypoint pid=8455) 220 \times 0.15
(skyrl_entrypoint pid=8455) \]
(skyrl_entrypoint pid=8455)
(skyrl_entrypoint pid=8455) 2. Perform the multiplication:
(skyrl_entrypoint pid=8455) \[
(skyrl_entrypoint pid=8455) 220 \times 0.15 = 33
(skyrl_entrypoint pid=8455) \]
(skyrl_entrypoint pid=8455)
(skyrl_entrypoint pid=8455) 3. Add the increase to the original price to find the new price:
(skyrl_entrypoint pid=8455) \[
(skyrl_entrypoint pid=8455) 220 + 33 = 253
(skyrl_entrypoint pid=8455) \]
(skyrl_entrypoint pid=8455)
(skyrl_entrypoint pid=8455) Therefore, the new price of the bicycle is **$253**.<|im_end|>
(skyrl_entrypoint pid=8455) 2026-03-26 14:44:59.431 | INFO | skyrl.train.trainer:train:261 - Started: 'convert_to_training_input'
(skyrl_entrypoint pid=8455) 2026-03-26 14:45:00.969 | INFO | skyrl.train.trainer:convert_to_training_input:665 - batch_num_seq: 5120, batch_padded_seq_len: 1172
(skyrl_entrypoint pid=8455) 2026-03-26 14:45:00.970 | INFO | skyrl.train.trainer:convert_to_training_input:683 - Number of sequences before padding: 5120
(skyrl_entrypoint pid=8455) 2026-03-26 14:45:00.970 | INFO | skyrl.train.trainer:convert_to_training_input:685 - Number of sequences after padding: 5120
(skyrl_entrypoint pid=8455) 2026-03-26 14:45:00.970 | INFO | skyrl.train.trainer:train:261 - Finished: 'convert_to_training_input', time cost: 1.54s
(skyrl_entrypoint pid=8455) 2026-03-26 14:45:00.970 | INFO | skyrl.train.trainer:train:265 - Started: 'fwd_logprobs_values_reward'
(skyrl_entrypoint pid=8455) 2026-03-26 14:51:18.325 | INFO | skyrl.train.trainer:train:265 - Finished: 'fwd_logprobs_values_reward', time cost: 377.36s
(skyrl_entrypoint pid=8455) 2026-03-26 14:51:18.326 | INFO | skyrl.train.trainer:train:274 - Started: 'compute_advantages_and_returns'
(skyrl_entrypoint pid=8455) 2026-03-26 14:51:18.430 | INFO | skyrl.train.trainer:compute_advantages_and_returns:873 - avg_final_rewards: 0.13398437201976776, avg_response_length: 273.6802734375
(skyrl_entrypoint pid=8455) 2026-03-26 14:51:18.431 | INFO | skyrl.train.trainer:train:274 - Finished: 'compute_advantages_and_returns', time cost: 0.11s
(skyrl_entrypoint pid=8455) 2026-03-26 14:51:18.431 | INFO | skyrl.train.trainer:train:291 - Started: 'train_critic_and_policy'
(skyrl_entrypoint pid=8455) 2026-03-26 14:51:18.431 | INFO | skyrl.train.trainer:train_critic_and_policy:1121 - Started: 'policy_train'
(skyrl_entrypoint pid=8455) 2026-03-26 15:05:44.917 | INFO | skyrl.train.trainer:train_critic_and_policy:1121 - Finished: 'policy_train', time cost: 866.49s
(skyrl_entrypoint pid=8455) 2026-03-26 15:05:44.938 | INFO | skyrl.train.trainer:train:291 - Finished: 'train_critic_and_policy', time cost: 866.51s
(skyrl_entrypoint pid=8455) 2026-03-26 15:05:44.938 | INFO | skyrl.train.trainer:train:316 - Started: 'sync_weights'
(skyrl_entrypoint pid=8455) 2026-03-26 15:05:51.979 | INFO | skyrl.train.trainer:train:316 - Finished: 'sync_weights', time cost: 7.04s
(skyrl_entrypoint pid=8455) 2026-03-26 15:05:51.980 | INFO | skyrl.train.trainer:train:210 - Finished: 'step', time cost: 1331.13s
(skyrl_entrypoint pid=8455) 2026-03-26 15:05:51.980 | INFO | skyrl.train.trainer:train:320 - {'final_loss': -0.0001395885121230879, 'policy_loss': -0.0001400031556840986, 'policy_entropy': 0.36564826631365577, 'response_length': 1024.0, 'policy_lr': 9.999999974752427e-07, 'loss_metrics/clip_ratio': 0.000960409866502232, 'policy_kl': 0.00041451671746912667, 'grad_norm': 0.3702232241630554}
Training Batches Processed: 14%|█▍ | 1/7 [22:36<2:15:37, 1356.23s/it]
(skyrl_entrypoint pid=8455) 2026-03-26 15:05:52.046 | INFO | skyrl.train.trainer:train:210 - Started: 'step'
(skyrl_entrypoint pid=8455)
(skyrl_entrypoint pid=8455) 2026-03-26 15:05:52.075 | INFO | skyrl.train.trainer:train:227 - Started: 'generate'
(skyrl_entrypoint pid=8455) %| | 0/5120 [00:00
```
This means the current policy model has already done rollout generation for that prompt. In other words, the model is not being trained on a fixed answer here — it is **producing its own answer first**, and that answer becomes part of the RL batch.
So in plain English:
* the model saw a math word problem
* it generated a chain-of-thought style response
* that generated response is now part of the training material for this step
***
**2. SkyRL converts the generated outputs into training tensors**
Next you see:
```
Started: 'convert_to_training_input'
batch_num_seq: 5120, batch_padded_seq_len: 1172
Number of sequences before padding: 5120
Number of sequences after padding: 5120
Finished: 'convert_to_training_input', time cost: 1.54s
```
This stage takes all of the newly generated samples and prepares them for training.
What that means in practice:
* SkyRL has collected **5120 generated sequences**
* each sequence is a prompt plus a model-generated response
* they are padded to a common length, here **1172 tokens**
* then they are packed into tensors that the trainer can feed into the model
So this is the “data formatting” phase of the RL step.
A good mental model is:
> generation produces raw text, and `convert_to_training_input` turns that raw text into something the optimizer can use
***
**3. SkyRL computes logprobs, values, and rewards**
Then training enters one of the expensive stages:
```
Started: 'fwd_logprobs_values_reward'
Finished: 'fwd_logprobs_values_reward', time cost: 377.36s
```
This is where the trainer runs forward passes to compute the quantities needed for RL optimization.
That stage typically includes:
* **logprobs**: how likely the policy thought each generated token was
* **values**: the value function / critic estimate for the trajectory
* **reward-related information**: the signals used to determine whether the output was good or bad
This phase took **377.36 seconds**, which tells you it is one of the heavy parts of the step.
That makes sense because the batch is large:
* **5120 sequences**
* padded to **1172 tokens**
So the trainer is doing a lot of token-level computation here.
***
**4. SkyRL computes advantages and returns**
Next:
```
Started: 'compute_advantages_and_returns'
avg_final_rewards: 0.13398437201976776, avg_response_length: 273.6802734375
Finished: 'compute_advantages_and_returns', time cost: 0.11s
```
This is the stage where RL training targets are prepared.
The important number here is:
```
avg_final_rewards: 0.13398437201976776
```
That means the average reward across this batch was about **0.134**.
The other useful number is:
```
avg_response_length: 273.68
```
So even though sequences were padded to a much larger common length for batching, the average actual generated response was around **274 tokens**.
Conceptually, this step answers:
* which sampled outputs were better?
* by how much?
* what learning signal should the optimizer use?
This stage is fast because the heavy model forward work already happened in the previous phase.
***
**5. SkyRL updates the policy**
Then the trainer starts the actual model update:
```
Started: 'train_critic_and_policy'
Started: 'policy_train'
Finished: 'policy_train', time cost: 866.49s
Finished: 'train_critic_and_policy', time cost: 866.51s
```
This is the point where the policy is actually being trained.
The important thing to understand is:
* the model has already generated outputs
* those outputs have already been scored
* advantages have already been computed
* now the optimizer uses that information to **change the model weights**
This took **866.49 seconds**, which is even longer than the forward-statistics phase. So in this run, the biggest chunk of time in the step is the actual policy update.
In human terms:
> this is where the model learns from the answers it just produced
***
**6. The updated weights are synced back to inference**
After the policy update, you see:
```
Started: 'sync_weights'
Finished: 'sync_weights', time cost: 7.04s
```
SkyRL uses a training stack and an inference stack together. After the policy changes, the inference engine needs the newest weights so the next rollout uses the updated model instead of the old one.
That is what this sync step is doing.
It is short compared with the training phases, but it is important because it closes the loop between:
* training the model
* using the updated model to generate the next batch
***
**7. One full RL step is now complete**
Then SkyRL reports:
```
Finished: 'step', time cost: 1331.13s
```
So one complete RL step took:
* about **1331 seconds**
* roughly **22.2 minutes**
That full step included:
* converting generated outputs into training input
* computing logprobs / values / rewards
* computing advantages and returns
* training the policy
* syncing the updated weights
Immediately after that, SkyRL prints training metrics:
```
{'final_loss': -0.0001395885121230879,
'policy_loss': -0.0001400031556840986,
'policy_entropy': 0.36564826631365577,
'response_length': 1024.0,
'policy_lr': 9.999999974752427e-07,
'loss_metrics/clip_ratio': 0.000960409866502232,
'policy_kl': 0.00041451671746912667,
'grad_norm': 0.3702232241630554}
```
These are the summary numbers for that training update.
And then the progress bar confirms the trainer has completed **1 out of 7** batches:
```
Training Batches Processed: 14%|█▍ | 1/7
```
So at this point:
* the first RL training step is done
* the model has been updated once
* training is moving on to step 2
**On the next step, the run showed higher reward metrics:**
```
reward/avg_pass_at_5: 0.6533203125
reward/avg_raw_reward: 0.2173828125
```
Compared to the earlier step:
```
reward/avg_pass_at_5: 0.4912109375
reward/avg_raw_reward: 0.133984375
```
That is a useful sign that training is not just running — it is moving in a promising direction.
{% endstep %}
{% endstepper %}
***
## Useful output locations
During the run, SkyRL wrote outputs to a few standard locations.
### Checkpoints
```bash
/home/ray/ckpts/
```
### Exported evaluation results
```bash
/home/ray/exports/dumped_evals/
```
For example:
```bash
/home/ray/exports/dumped_evals/global_step_0_evals/openai_gsm8k.jsonl
/home/ray/exports/dumped_evals/global_step_0_evals/aggregated_results.jsonl
```
### Infrastructure logs
```bash
/tmp/skyrl-logs/
```
These are useful if you want to inspect trainer or Ray-side behavior later.
# GRPO on MathVista with Unsloth
> :sloth:This tutorial is created based on [Unsloth official notebooks](https://unsloth.ai/docs/get-started/unsloth-notebooks).
**Model:** Qwen3-VL-8B-Instruct (4-bit QLoRA)\
**Algorithm:** Group Relative Policy Optimization\
**Task:** Teaching a VLM to solve math problems from images
### What Are We Solving?
We train the model to answer visual math questions like these:
The model must look at an image, reason about it, and output a numeric answer in a structured format.
***
### Why GRPO on a VLM?
Standard supervised fine-tuning (SFT) requires ground-truth reasoning traces. GRPO instead uses **reward signals** — we only need the final answer label, and the model learns *how* to reason on its own. This is the same technique used to build o1-style thinking models.
| Method | Needs reasoning traces? | Sample efficiency |
| -------- | ----------------------- | ----------------- |
| SFT | ✅ Yes | Moderate |
| **GRPO** | ❌ No | High |
***
## Section 1 — YottaLabs Platform
Before running any code in this notebook, you need to spin up a vitrual machine on YottaLabs.
{% stepper %}
{% step %}
#### Recommended GPU Configuration
GPU
VRAM
Speed vs A100
Recommended?
Note
H100 80GB
80 GB
2×
⭐ Best
Plenty of headroom, fastest training
{% hint style="info" %}
**TL;DR:** Use **1× H100 80GB**. With 4-bit QLoRA the model uses \~25 GB, giving you lots of room.
{% endhint %}
{% endstep %}
{% step %}
#### Launch the VM
To get started with our VM , see our [official doc](https://docs.yottalabs.ai/products/virtual-machines/launching-a-virtual-machine)
{% endstep %}
{% endstepper %}
***
## Section 2 — Environment Setup
{% hint style="info" %}
✅ **Run all remaining cells inside your YottaLabs Pod** (via Jupyter at `http://:8888`).
{% endhint %}
The YottaLabs base image already has **PyTorch 2.8 + CUDA 12.8** pre-installed. We only need to add the Unsloth fine-tuning stack on top.
```python
# Install Unsloth and the full training stack
# This takes ~2-3 minutes on first run
%%capture
import os, re
!pip install unsloth
!pip install transformers==4.57.0
!pip install --no-deps trl==0.26.2
print("\n✅ All dependencies installed successfully!")
```
```python
# Verify GPU is available and check VRAM
import torch
assert torch.cuda.is_available(), "❌ No GPU detected — check your Pod configuration!"
gpu_name = torch.cuda.get_device_name(0)
vram_gb = torch.cuda.get_device_properties(0).total_memory / 1e9
vram_free = torch.cuda.mem_get_info()[0] / 1e9
print(f"✅ GPU: {gpu_name}")
print(f" Total VRAM: {vram_gb:.1f} GB")
print(f" Free VRAM: {vram_free:.1f} GB")
if vram_gb < 40:
print("⚠️ WARNING: < 40 GB VRAM detected. Reduce num_generations to 2 and keep load_in_4bit=True.")
else:
print(" This GPU has plenty of headroom for Qwen3-VL 8B GRPO training! 🚀")
```
***
## Section 3 — Load Qwen3-VL 8B with QLoRA
We load **Qwen3-VL-8B-Instruct** in **4-bit quantization** (QLoRA). This reduces the model's memory footprint from \~16 GB (BF16) to \~5 GB, while preserving most of the model's capability.
### Key Parameters Explained
| Parameter | Value | Why |
| ------------------------ | ----- | ----------------------------------------------------------------- |
| `max_seq_length` | 16384 | VLMs need long context for image tokens (\~1000 tokens per image) |
| `load_in_4bit` | True | QLoRA — reduces VRAM from \~16 GB to \~5 GB |
| `gpu_memory_utilization` | 0.85 | Leave 15% buffer for GRPO rollout buffers |
| `fast_inference` | False | Disable vLLM for training (enable only for inference-only use) |
```python
from unsloth import FastVisionModel
import torch
max_seq_length = 16384 # Must be this long for VLMs
lora_rank = 16 # Larger rank = smarter, but slower
model, tokenizer = FastVisionModel.from_pretrained(
model_name = "unsloth/Qwen3-VL-8B-Instruct-unsloth-bnb-4bit",
max_seq_length = max_seq_length,
load_in_4bit = True, # False for LoRA 16bit
fast_inference = False, # Enable vLLM fast inference
gpu_memory_utilization = 0.8, # Reduce if out of memory
)
print("\n✅ Model loaded!")
print(f" Model dtype: {model.dtype}")
print(f" VRAM used: {torch.cuda.memory_allocated() / 1e9:.2f} GB")
```
### Attach LoRA Adapters
Instead of fine-tuning all 8B parameters, LoRA injects small trainable matrices into the attention and MLP layers. Only these adapter weights are updated during training — the base model stays frozen in 4-bit.
**Why freeze the vision encoder?**\
`finetune_vision_layers = False` — The vision encoder (which converts images to tokens) is already well-trained and generalises well. Training it risks overfitting on a small dataset and uses extra VRAM.
```python
model = FastVisionModel.get_peft_model(
model,
# Which components to fine-tune:
finetune_vision_layers = False, # Keep vision encoder frozen (saves VRAM, prevents overfit)
finetune_language_layers = True, # Fine-tune the LLM decoder layers ✅
finetune_attention_modules = True, # Fine-tune attention (Q, K, V, O projections) ✅
finetune_mlp_modules = True, # Fine-tune feed-forward MLP blocks ✅
# LoRA hyperparameters:
r = LORA_RANK, # Adapter rank — higher = more capacity
lora_alpha = LORA_RANK, # Scale factor; keeping alpha == r is recommended
lora_dropout = 0, # Dropout on LoRA weights (0 = disabled, works best)
bias = "none", # Don't add bias terms to adapters
# Other:
random_state = 3407,
use_rslora = False, # Rank-stabilized LoRA (try True for rank > 32)
loftq_config = None,
use_gradient_checkpointing = "unsloth", # Unsloth's memory-efficient checkpointing
)
print(f"✅ LoRA adapters attached!")
print(f" Trainable params: {trainable:,} ({100*trainable/total:.2f}% of total)")
print(f" Total params: {total:,}")
print(f" VRAM used: {torch.cuda.memory_allocated() / 1e9:.2f} GB")
```
## Section 4 — Prepare the MathVista Dataset
[MathVista](https://mathvista.github.io/) is a benchmark of math problems that require understanding visual context (charts, geometry diagrams, tables, etc.). We use the `testmini` split (\~1000 examples) as our training set.
### Data Pipeline
```
Raw MathVista
│
▼ filter: keep only numeric answers
│ (regression task — float comparison)
▼ preprocess: resize to 512×512, convert to RGB
│
▼ format: wrap in Qwen3-VL chat template
│ with and tags
▼
Train Dataset (ready for GRPOTrainer)
```
### Why 512×512?
The original images vary in size. Resizing to a fixed 512×512:
* Keeps image token count predictable (\~1000 tokens per image)
* Prevents sequence length from exceeding `max_seq_length`
* Speeds up training (smaller feature maps in the vision encoder)
{% stepper %}
{% step %}
#### Step 1 — Load the dataset
```python
from datasets import load_dataset
from trl import GRPOConfig, GRPOTrainer
dataset = load_dataset("AI4Math/MathVista", split = "testmini")
```
{% endstep %}
{% step %}
#### Step 2 — Keep only numeric answers and preprocess images
```python
# Step 1: Keep only numeric answers
# GRPO uses exact float comparison for the correctness reward.
# Text answers like "blue" or "triangle" can't be compared numerically.
def is_numeric_answer(example):
try:
float(example["answer"])
return True
except:
return False
dataset = dataset.filter(is_numeric_answer)
```
```python
# Step 2: Resize images to 512×512 and ensure RGB format
# This keeps token count consistent and avoids memory spikes on large images.
def resize_images(example):
image = example["decoded_image"]
image = image.resize((512, 512))
example["decoded_image"] = image
return example
dataset = dataset.map(resize_images)
# Then convert to RGB
def convert_to_rgb(example):
image = example["decoded_image"]
if image.mode != "RGB":
image = image.convert("RGB")
example["decoded_image"] = image
return example
dataset = dataset.map(convert_to_rgb)
print(f"✅ Images preprocessed: {len(dataset)} examples")
print(f" Image size: {dataset[0]['decoded_image'].size}")
print(f" Image mode: {dataset[0]['decoded_image'].mode}")
```
{% endstep %}
{% step %}
#### Step 3 — Build the prompt template
We use a structured output format with XML-style tags to make it easy for reward functions to parse the model's response:
```
... model's step-by-step working ...
3.14
```
This is similar to DeepSeek-R1's `` / `` format. The two-part structure lets us:
1. **Reward format compliance** — did the model produce both tags?
2. **Reward correctness** — is the number inside `` correct?
```python
# Define the delimiter variables for clarity and easy modification
REASONING_START = ""
REASONING_END = ""
SOLUTION_START = ""
SOLUTION_END = ""
def make_conversation(example):
# Define placeholder constants if they are not defined globally
# The user's text prompt
text_content = (
f"{example['question']}. Also first provide your reasoning or working out"\
f" on how you would go about solving the question between {REASONING_START} and {REASONING_END}"
f" and then your final answer between {SOLUTION_START} and (put a single float here) {SOLUTION_END}"
)
# Construct the prompt in the desired multi-modal format
prompt = [
{
"role": "user",
"content": [
{"type": "image"}, # Placeholder for the image
{"type": "text", "text": text_content}, # The text part of the prompt
],
},
]
# The actual image data is kept separate for the processor
return {"prompt": prompt, "image": example["decoded_image"], "answer": example["answer"]}
train_dataset = dataset.map(make_conversation)
# We're reformatting dataset like this because decoded_images are the actual images
# The "image": example["decoded_image"] does not properly format the dataset correctly
# 1. Remove the original 'image' column
train_dataset = train_dataset.remove_columns("image")
# 2. Rename 'decoded_image' to 'image'
train_dataset = train_dataset.rename_column("decoded_image", "image")
```
{% endstep %}
{% endstepper %}
***
## Section 5 — Design Reward Functions
Reward functions are the heart of GRPO. Instead of manually labelling reasoning traces, we define two automatic signals that tell the model what "good" looks like:
### Reward 1 — Format Compliance (`formatting_reward_func`)
Checks whether the response contains **exactly one** `...` block and **exactly one** `...` block.
| Condition | Points |
| -------------------------------------------- | -------- |
| Has exactly 1 `` block | +1.0 |
| Has exactly 1 `` block | +1.0 |
| >50% of output is `addCriterion` / `\n` spam | −2.0 |
| **Max possible** | **+2.0** |
### Reward 2 — Correctness (`correctness_reward_func`)
Checks whether the number inside `` exactly matches the ground-truth answer.
| Condition | Points |
| --------------------------- | ------ |
| Answer matches ground truth | +2.0 |
| Answer is wrong or missing | 0.0 |
### Total Reward Range: −2.0 to +4.0
The model learns to maximise this sum across its GRPO rollouts.
{% hint style="info" %}
**What is the `addCriterion` penalty?**\
Qwen-VL models have a known degenerate mode where they repeat `addCriterion` and newlines endlessly instead of generating meaningful text. The penalty shuts this down early.
{% endhint %}
```python
# Reward functions
import re
def formatting_reward_func(completions,**kwargs):
import re
thinking_pattern = f'{REASONING_START}(.*?){REASONING_END}'
answer_pattern = f'{SOLUTION_START}(.*?){SOLUTION_END}'
scores = []
for completion in completions:
if isinstance(completion, list):
completion = completion[0]["content"] if completion else ""
score = 0
thinking_matches = re.findall(thinking_pattern, completion, re.DOTALL)
answer_matches = re.findall(answer_pattern, completion, re.DOTALL)
if len(thinking_matches) == 1:
score += 1.0
if len(answer_matches) == 1:
score += 1.0
# Fix up addCriterion issues
# See https://unsloth.ai/docs/new/vision-reinforcement-learning-vlm-rl#qwen-2.5-vl-vision-rl-issues-and-quirks
# Penalize on excessive addCriterion and newlines
if len(completion) != 0:
removal = completion.replace("addCriterion", "").replace("\n", "")
if (len(completion)-len(removal))/len(completion) >= 0.5:
score -= 2.0
scores.append(score)
return scores
def correctness_reward_func(prompts, completions, answer, **kwargs) -> list[float]:
answer_pattern = f'{SOLUTION_START}(.*?){SOLUTION_END}'
completions = [(c[0]["content"] if c else "") if isinstance(c, list) else c for c in completions]
responses = [re.findall(answer_pattern, completion, re.DOTALL) for completion in completions]
q = prompts[0]
print('-'*20, f"Question:\n{q}", f"\nAnswer:\n{answer[0]}", f"\nResponse:{completions[0]}")
return [
2.0 if len(r)==1 and a == r[0].replace('\n','') else 0.0
for r, a in zip(responses, answer)
]
print(f" Good response score: {formatting_reward_func([test_good])} (expected [2.0])")
print(f" Missing tags score: {formatting_reward_func([test_bad])} (expected [0.0])")
print(f" Spam response score: {formatting_reward_func([test_spam])} (expected [-2.0])")
```
***
## Section 6 — Pre-Training Baseline Inference
Before training, let's run the model on a sample problem to establish a **baseline**. This shows us what the model can already do, and gives us a qualitative benchmark to compare against after training.
```python
image = train_dataset[100]["image"]
prompt = train_dataset[100]["prompt"]
inputs = tokenizer(
image,
prompt,
add_special_tokens = False,
return_tensors = "pt",
).to("cuda")
from transformers import TextStreamer
text_streamer = TextStreamer(tokenizer, skip_prompt = True)
_ = model.generate(**inputs, streamer = text_streamer, max_new_tokens = 1024,
use_cache = True, temperature = 1.0, min_p = 0.1)
```
{% hint style="info" %}
Use `%pip install "jinja2>=3.1.0"` if there are any compatible errors.
{% endhint %}
***
## Section 7 — Configure & Launch GRPO Training
### How GRPO Works (Briefly)
For each training step, GRPO:
1. **Samples** `num_generations` completions from the current policy (the model)
2. **Scores** each completion with the reward functions
3. **Updates** the policy to increase the probability of high-reward completions relative to the group mean
This is fundamentally different from PPO (which needs a separate value network) — GRPO only needs the policy model, making it much more memory-efficient.
### GSPO Extension (Enabled Here)
We also enable **GSPO (Group Sequence Policy Optimisation)** via:
* `importance_sampling_level = "sequence"` — importance weights at sequence level
* `loss_type = "dr_grpo"` — doubly robust GRPO loss
This improves training stability, especially for long completions typical of VLMs.
### Key Hyperparameters
| Parameter | Value | Effect |
| ----------------------------- | ----------- | -------------------------------------------------------- |
| `learning_rate` | 5e-6 | Small LR — RL is sensitive to overshooting |
| `num_generations` | 4 | More rollouts = better gradient estimate (H100 has room) |
| `per_device_train_batch_size` | 1 | VLMs are memory-heavy; batch=1 is standard |
| `gradient_accumulation_steps` | 4 | Effective batch of 4 without extra VRAM |
| `max_grad_norm` | 0.1 | Gradient clipping — critical for RL stability |
| `optim` | adamw\_8bit | 8-bit Adam: same quality, half the optimizer state VRAM |
| `num_train_epochs` | 1.0 | Full pass over the dataset (\~600 steps) |
```python
from trl import GRPOConfig, GRPOTrainer
training_args = GRPOConfig(
learning_rate = 5e-6,
adam_beta1 = 0.9,
adam_beta2 = 0.99,
weight_decay = 0.1,
warmup_ratio = 0.1,
lr_scheduler_type = "cosine",
optim = "adamw_8bit",
logging_steps = 1,
log_completions = False,
per_device_train_batch_size = 1,
gradient_accumulation_steps = 1, # Increase to 4 for smoother training
num_generations = 2, # Decrease if out of memory
max_prompt_length = 1024,
max_completion_length = 1024,
num_train_epochs = 0.5, # Set to 1 for a full training run
# max_steps = 60,
save_steps = 60,
max_grad_norm = 0.1,
report_to = "none", # Can use Weights & Biases
output_dir = "outputs",
# Below enables GSPO:
importance_sampling_level = "sequence",
mask_truncated_completions = False,
loss_type = "dr_grpo",
)
print("✅ Training configuration set!")
print(f" Output dir: {OUTPUT_DIR}")
print(f" Epochs: {training_args.num_train_epochs}")
print(f" Num generations: {training_args.num_generations}")
print(f" Effective batch: {training_args.per_device_train_batch_size * training_args.gradient_accumulation_steps}")
print(f" Max grad norm: {training_args.max_grad_norm}")
```
```python
trainer = GRPOTrainer(
model = model,
args = training_args,
# Pass the processor to handle multimodal inputs
processing_class = tokenizer,
reward_funcs = [
formatting_reward_func,
correctness_reward_func,
],
train_dataset = train_dataset,
)
print("✅ GRPOTrainer initialised. Starting training ...")
print(" (You will see reward values logged each step)")
print(" Watch for 'rewards/formatting' and 'rewards/correctness' to increase over time.\n")
trainer.train()
print("\n🎉 Training complete!")
```
***
## Section 8 — Post-Training Inference
Now let's run the same inference test as Section 6, but with the trained model. You should see:
1. **Structured output** — the model reliably uses `` and `` tags
2. **Better accuracy** — the numeric answer inside `` should be closer to correct
3. **Coherent reasoning** — the `` block should show sensible working-out steps
```python
image = train_dataset[165]["image"]
prompt = train_dataset[165]["prompt"]
inputs = tokenizer(
image,
prompt,
add_special_tokens = False,
return_tensors = "pt",
).to("cuda")
from transformers import TextStreamer
text_streamer = TextStreamer(tokenizer, skip_prompt = True)
_ = model.generate(**inputs, streamer = text_streamer, max_new_tokens = 1024,
use_cache = True, temperature = 1.0, min_p = 0.1)
```
***
## Section 9 — Save & Export
There are several ways to save the trained model depending on your use case:
| Method | File size | Use case |
| ---------------------- | --------- | ----------------------------------------- |
| **LoRA adapters only** | \~100 MB | Fine-tune further, share on HuggingFace |
| **Merged 16-bit** | \~16 GB | Deploy with vLLM or standard transformers |
| **Merged 4-bit** | \~5 GB | Memory-constrained deployment |
| **GGUF q4\_k\_m** | \~5 GB | llama.cpp / Ollama local inference |
| **GGUF f16** | \~16 GB | llama.cpp high-quality inference |
```python
import os
LORA_SAVE_DIR = "/workspace/grpo_lora"
os.makedirs(LORA_SAVE_DIR, exist_ok=True)
# ── Option 1: Save LoRA adapters only (recommended — smallest, most flexible) ─
print("Saving LoRA adapters ...")
model.save_pretrained(LORA_SAVE_DIR)
tokenizer.save_pretrained(LORA_SAVE_DIR)
print(f"✅ LoRA adapters saved to: {LORA_SAVE_DIR}")
# List saved files
import subprocess
result = subprocess.run(f"ls -lh {LORA_SAVE_DIR}", shell=True, capture_output=True, text=True)
print(result.stdout)
```
```python
# ── Option 2: Push LoRA adapters to HuggingFace Hub ─────────────────────────
# Uncomment and fill in your username/token to publish the model
# import os
# HF_TOKEN = os.environ.get("HF_TOKEN", "YOUR_TOKEN_HERE")
# model.push_to_hub("your_username/qwen3vl-8b-mathvista-grpo", token=HF_TOKEN)
# tokenizer.push_to_hub("your_username/qwen3vl-8b-mathvista-grpo", token=HF_TOKEN)
# print("✅ Model pushed to HuggingFace Hub!")
# ── Option 3: Merge to full 16-bit and save locally ───────────────────────────
# WARNING: This requires ~16 GB disk space. Uncomment to use.
# model.save_pretrained_merged("/workspace/model_merged_16bit", tokenizer, save_method="merged_16bit")
# print("✅ Merged 16-bit model saved!")
# ── Option 4: Export to GGUF (for llama.cpp / Ollama) ───────────────────────
# model.save_pretrained_gguf("/workspace/model_gguf", tokenizer, quantization_method="q4_k_m")
# print("✅ GGUF model saved!")
print("Uncomment the block you need above and re-run this cell.")
```
***
# Fine-tune a Reasoning Model to Think in Target Language with Unsloth
> 🦥 This tutorial is created based on [Unsloth official notebooks](https://unsloth.ai/docs/get-started/unsloth-notebooks).
**Model:** DeepSeek-R1-0528-Qwen3-8B (4-bit QLoRA + vLLM fast inference)\
**Algorithm:** GRPO (Group Relative Policy Optimization)\
**Dataset:** [DAPO-Math-17k](https://huggingface.co/datasets/open-r1/DAPO-Math-17k-Processed)
***
Most GRPO tutorials only reward correctness. This notebook adds a language-consistency reward — inspired directly by the DeepSeek-R1 paper — that forces the model's internal `` reasoning chain to use Bahasa Indonesia. The technique generalises to any target language.
```
Reward signal breakdown (max total = 16.5 per step):
match_format_exactly +3.0 — ... tags present and correct
match_format_approximately +1.0 — partial credit for tag structure
check_answer +5.0 — exact answer match (with ratio-based partial credit)
check_numbers +3.5 — float comparison with comma normalisation
language_consistency +5.0 — reasoning trace detected as Bahasa Indonesia
```
***
## Section 1 — YottaLabs Platform
Before running any code in this notebook, you need to spin up a virtual machine on YottaLabs.
### Recommended GPU Configuration
| GPU | VRAM | Speed vs A100 | Recommended? | Note |
| ------------- | ----- | ------------- | ------------ | ------------------------------------ |
| **H100 80GB** | 80 GB | 2× | ⭐ **Best** | Plenty of headroom, fastest training |
> **TL;DR:** Use **1× H100 80GB**. With 4-bit QLoRA the model uses \~25 GB, giving you lots of room.
### Launch the VM
To get started with our VM, see our [official doc](https://docs.yottalabs.ai/products/virtual-machines/launching-a-virtual-machine).
***
## Section 2 — Environment Setup
{% hint style="info" %}
Run all cells from here inside your YottaLabs Pod via Jupyter.
{% endhint %}
### Key Differences from Standard Unsloth Setup
This notebook uses **vLLM** for fast GRPO rollout generation. vLLM dramatically speeds up the `num_generations` sampling step — instead of running the model sequentially for each rollout, vLLM batches them with continuous batching and PagedAttention.
Additionally, we install `langid` — a fast language identification library used in our language-consistency reward function.
| Package | Version | Why pinned |
| -------------- | ------- | ------------------------------------------------------- |
| `transformers` | 4.56.2 | Compatible with DeepSeek-R1 tokenizer + Unsloth patches |
| `trl` | 0.22.2 | GRPO trainer version tested with vLLM integration |
| `vllm` | auto | Fast inference engine for GRPO rollouts |
| `langid` | latest | Language detection for the consistency reward |
```python
%%capture
import os
os.environ["UNSLOTH_VLLM_STANDBY"] = "1" # [NEW] Extra 30% context lengths!
!pip install unsloth vllm
```
```python
%pip install langid -qq
```
***
## Section 3 — Load DeepSeek-R1-0528-Qwen3-8B
### Why `fast_inference = True`?
Unlike the Vision GRPO notebook, this text-only model enables **vLLM fast inference** during training. This is possible because:
1. vLLM is installed and compatible with this model architecture
2. Text-only GRPO rollouts can be batched efficiently with vLLM's continuous batching
3. On an H100, vLLM generates \~4 rollouts in roughly the same time standard generation produces 1
### LoRA Configuration
We use `lora_alpha = rank * 2` here (alpha = 64 for rank 32). This is a common trick that effectively **doubles the learning rate for LoRA layers** without changing the base LR, leading to faster convergence in RL settings.
| Parameter | Value | Why |
| ------------------------ | ----------- | ------------------------------------------------------------------------ |
| `lora_rank` | 32 | Higher than vision notebook — text reasoning benefits from more capacity |
| `lora_alpha` | 64 (rank×2) | 2× alpha speeds up LoRA convergence |
| `max_seq_length` | 1024 | Short for speed; increase to 4096+ for longer reasoning |
| `fast_inference` | True | Enable vLLM — critical for GRPO rollout speed |
| `gpu_memory_utilization` | 0.9 | High — vLLM needs KV cache VRAM |
```python
from unsloth import FastLanguageModel
import torch
max_seq_length = 1024 # Can increase for longer reasoning traces
lora_rank = 32 # Larger rank = smarter, but slower
model, tokenizer = FastLanguageModel.from_pretrained(
model_name = "unsloth/DeepSeek-R1-0528-Qwen3-8B",
max_seq_length = max_seq_length,
load_in_4bit = True, # False for LoRA 16bit
fast_inference = True, # Enable vllm fast inference
max_lora_rank = lora_rank,
gpu_memory_utilization = 0.9, # Reduce if out of memory
)
model = FastLanguageModel.get_peft_model(
model,
r = lora_rank, # Choose any number > 0 ! Suggested 8, 16, 32, 64, 128
target_modules = [
"q_proj", "k_proj", "v_proj", "o_proj",
"gate_proj", "up_proj", "down_proj",
],
lora_alpha = lora_rank*2, # *2 speeds up training
use_gradient_checkpointing = "unsloth", # Reduces memory usage
random_state = 3407,
)
```
***
## Section 4 — Understanding the DeepSeek-R1 Chat Template
DeepSeek-R1 models use special tokens to delimit the **internal reasoning chain** from the **final answer**. The GRPOTrainer automatically prepends the `` opening token to every completion, so the model always starts in reasoning mode.
### Token Discovery
We programmatically find the special tokens rather than hardcoding them, making this code robust across model variants:
```python
reasoning_start = None
reasoning_end = None
user_token = None
assistant_token = None
for token in tokenizer.get_added_vocab().keys():
if "think" in token and "/" in token:
reasoning_end = token
elif "think" in token:
reasoning_start = token
elif "user" in token:
user_token = token
elif "assistant" in token:
assistant_token = token
system_prompt = \
f"""You are given a problem.
Think about the problem and provide your working out.
You must think in Bahasa Indonesia."""
system_prompt
```
### System Prompt for Language Targeting
We instruct the model to reason in **Bahasa Indonesia** via the system prompt. The language-consistency reward function (Section 6) then reinforces this behaviour during training.
{% hint style="info" %}
Design principle: the system prompt *asks* for the target language; the reward function *enforces* it. Neither alone is sufficient — both are needed for reliable steering.
{% endhint %}
```python
print(tokenizer.apply_chat_template([
{"role" : "user", "content" : "What is 1+1?"},
{"role" : "assistant", "content" : f"I think it's 2.22"},
{"role" : "user", "content" : "What is 1+1?"},
{"role" : "assistant", "content" : f"I think it's 2.22"},
], tokenize = False, add_generation_prompt = True))
```
***
## Section 5 — Prepare the DAPO-Math Dataset
We use [DAPO-Math-17k](https://huggingface.co/datasets/open-r1/DAPO-Math-17k-Processed) — a curated math reasoning dataset from the Open-R1 project, containing 17k problems with ground-truth solutions compatible with GRPO training.
### Why Filter by Token Length?
GRPO requires every prompt in a batch to fit within `max_prompt_length`. Rather than truncating (which corrupts problems), we **remove the top 10% longest prompts**. This ensures:
* No silent truncation of math problem statements
* Predictable memory usage per step
* Faster per-step time (no padding to extreme lengths)
### Data Pipeline
```python
from datasets import load_dataset
dataset = load_dataset("open-r1/DAPO-Math-17k-Processed", "en", split = "train")
dataset
```
```python
dataset[0]["prompt"]
```
```python
dataset[0]["solution"]
```
```python
def extract_hash_answer(text):
# if "####" not in text: return None
# return text.split("####")[1].strip()
return text
extract_hash_answer(dataset[0]["solution"])
```
```python
dataset = dataset.map(lambda x: {
"prompt" : [
{"role": "system", "content": system_prompt},
{"role": "user", "content": x["prompt"]},
],
"answer": extract_hash_answer(x["solution"]),
})
dataset[0]
```
```python
tokenized = dataset.map(
lambda x: {"tokens" : tokenizer.apply_chat_template(x["prompt"], add_generation_prompt = True, tokenize = True)},
batched = True,
)
print(tokenizer.decode(tokenized[0]["tokens"]))
tokenized = tokenized.map(lambda x: {"L" : len(x["tokens"])})
import numpy as np
maximum_length = int(np.quantile(tokenized["L"], 0.9))
print("Max Length = ", maximum_length)
# Filter only samples smaller than 90% max length
dataset = dataset.select(np.where(np.array(tokenized["L"]) <= maximum_length)[0])
del tokenized
```
***
## Section 6 — Five Reward Functions
This notebook uses **five complementary reward functions** that together guide the model towards structured, correct, and Indonesian-language reasoning. Each targets a different aspect of quality.
### Reward Architecture Overview
```
Completion
│
├─► match_format_exactly → Does appear? (+3.0)
├─► match_format_approximately → Are / counts right? (+1.0 max)
├─► check_answer → Does extracted answer match ground truth? (+5.0 max)
├─► check_numbers → Does extracted float match ground truth? (+3.5 max)
└─► language_consistency → Is the reasoning in Bahasa Indonesia? (+5.0)
───────────────
Max total: +17.5 per completion
```
### Why Multiple Rewards?
* `match_format_exactly` gives a strong binary signal for correct structure
* `match_format_approximately` provides gradient even for near-miss formatting
* `check_answer` rewards exact string matches and ratio-based proximity
* `check_numbers` catches cases where the answer is embedded in a sentence
* `language_consistency` is the novel reward that steers the reasoning language
Using multiple rewards is better than one composite reward because each signal is cleaner and easier to tune independently.
```python
import re
# Add optional EOS token matching
solution_end_regex = rf"{reasoning_end}(.*)"
match_format = re.compile(solution_end_regex, re.DOTALL)
match_format
```
```python
match_format.findall(
"Let me think!"\
f"Hence, the solution is 2.",
)
```
```python
match_format.findall(
"Let me think!"\
f"\n\nHence, the solution is 2",
)
```
```python
def match_format_exactly(completions, **kwargs):
scores = []
for completion in completions:
score = 0
response = completion[0]["content"]
# Match if format is seen exactly!
if match_format.search(response) is not None: score += 3.0
scores.append(score)
return scores
```
```python
def match_format_approximately(completions, **kwargs):
scores = []
for completion in completions:
score = 0
response = completion[0]["content"]
# Count how many keywords are seen - we penalize if too many!
# If we see 1, then plus some points!
# No need to reward since we always prepend it!
score += 0.5 if response.count(reasoning_start) == 1 else -1.0
score += 0.5 if response.count(reasoning_end) == 1 else -1.0
scores.append(score)
return scores
```
```python
def check_answer(prompts, completions, answer, **kwargs):
question = prompts[0][-1]["content"]
responses = [completion[0]["content"] for completion in completions]
extracted_responses = [
guess.group(1)
if (guess := match_format.search(r)) is not None else None \
for r in responses
]
scores = []
for guess, true_answer in zip(extracted_responses, answer):
score = 0
if guess is None:
scores.append(-2.0)
continue
# Correct answer gets 5 points!
if guess == true_answer:
score += 5.0
# Match if spaces are seen, but less reward
elif guess.strip() == true_answer.strip():
score += 3.5
else:
# We also reward it if the answer is close via ratios!
# Ie if the answer is within some range, reward it!
try:
ratio = float(guess) / float(true_answer)
if ratio >= 0.9 and ratio <= 1.1: score += 2.0
elif ratio >= 0.8 and ratio <= 1.2: score += 1.5
else: score -= 2.5 # Penalize wrong answers
except:
score -= 4.5 # Penalize
scores.append(score)
return scores
```
```python
match_numbers = re.compile(
r".*?[\s]{0,}([-]?[\d\.\,]{1,})",
flags = re.MULTILINE | re.DOTALL
)
print(match_numbers.findall(" 0.34 "))
print(match_numbers.findall(" 123,456 "))
print(match_numbers.findall(" -0.234 "))
print(match_numbers.findall("17"))
```
```python
import langid
def get_lang(text: str) -> str:
if not text:
return "und"
lang, _ = langid.classify(text)
return lang
print(get_lang("Hello, How are you")) # This should return en
print(get_lang("Aku berpikir kalau aku adalah kamu")) # This should return id
print(get_lang("我在这里")) # This should return zh
```
```python
import re
def format_and_language_reward_func(completions, **kwargs):
scores = []
for completion_item in completions:
if not completion_item or not isinstance(completion_item[0], dict) or "content" not in completion_item[0]:
scores.append(-5.0)
print(f"Warning: Malformed completion item, assigning default low score: {completion_item}")
continue
content = completion_item[0]["content"]
lang = get_lang(content)
if lang == 'id':
score = 5.0
elif lang == 'en':
score = -3.0
elif lang == 'zh':
score = -3.0
else:
score = -5.0
scores.append(score)
return scores
```
```python
prompts = [
[{"role": "assistant", "content": "What is the result of (1 + 2) * 4?"}],
[{"role": "assistant", "content": "What is the result of (3 + 1) * 2?"}],
]
completions = [
[{"role": "assistant", "content": "The sum of 1 and 2 is 3, which we multiply by 4 to get 12.(1 + 2) * 4 = 12"}],
[{"role": "assistant", "content": "The sum of 3 and 1 is 4, which we multiply by 2 to get 8. So (3 + 1) * 2 = 8."}],
]
format_and_language_reward_func(prompts = prompts, completions = completions)
```
```python
global PRINTED_TIMES
PRINTED_TIMES = 0
global PRINT_EVERY_STEPS
PRINT_EVERY_STEPS = 5
def check_numbers(prompts, completions, answer, **kwargs):
question = prompts[0][-1]["content"]
responses = [completion[0]["content"] for completion in completions]
extracted_responses = [
guess.group(1)
if (guess := match_numbers.search(r)) is not None else None \
for r in responses
]
scores = []
# Print only every few steps
global PRINTED_TIMES
global PRINT_EVERY_STEPS
if PRINTED_TIMES % PRINT_EVERY_STEPS == 0:
print(
'*'*20 + f"Question:\n{question}", f"\nAnswer:\n{answer[0]}", f"\nResponse:\n{responses[0]}", f"\nExtracted:\n{extracted_responses[0]}"
)
PRINTED_TIMES += 1
for guess, true_answer in zip(extracted_responses, answer):
if guess is None:
scores.append(-2.5)
continue
# Convert to numbers
try:
true_answer = float(true_answer.strip())
# Remove commas like in 123,456
guess = float(guess.strip().replace(",", ""))
scores.append(3.5 if guess == true_answer else -1.5)
except:
scores.append(0)
continue
return scores
```
***
## Section 7 — Configure & Launch GRPO Training
### vLLM Integration
When `fast_inference=True`, GRPOTrainer routes all rollout generation through vLLM's `SamplingParams`. This gives a significant speedup on H100:
| Method | 4 rollouts time (approx) |
| ----------------------------- | ------------------------ |
| Standard HuggingFace generate | \~8 seconds |
| vLLM with PagedAttention | \~2 seconds |
We configure `SamplingParams` separately from `GRPOConfig` — vLLM uses its own sampling API.
### Sequence Length Calculation
We compute `max_completion_length` dynamically from the measured max prompt length, ensuring the total sequence always fits within `max_seq_length`. This prevents silent truncation of reasoning chains, which would produce noisy gradients.
### Training Duration
We run for **100 steps** here (`max_steps=100`) — enough to see rewards start climbing, and to verify the training loop works. For production quality, train for 1–3 full epochs (`num_train_epochs=1`, remove `max_steps`).
> ℹ️ Watch the `reward` and `rewards/language` columns in the training table. You expect `reward` to climb from \~0 to \~2+ after 100 steps, and the language reward to become increasingly positive as the model adopts Indonesian.
```python
max_prompt_length = maximum_length + 1 # + 1 just in case!
max_completion_length = max_seq_length - max_prompt_length
from vllm import SamplingParams
vllm_sampling_params = SamplingParams(
min_p = 0.1,
top_p = 1.0,
top_k = -1,
seed = 3407,
stop = [tokenizer.eos_token],
include_stop_str_in_output = True,
)
from trl import GRPOConfig, GRPOTrainer
training_args = GRPOConfig(
vllm_sampling_params = vllm_sampling_params,
temperature = 1.0,
learning_rate = 5e-6,
weight_decay = 0.001,
warmup_ratio = 0.1,
lr_scheduler_type = "linear",
optim = "adamw_8bit",
logging_steps = 1,
per_device_train_batch_size = 1,
gradient_accumulation_steps = 1, # Increase to 4 for smoother training
num_generations = 4, # Decrease if out of memory
max_prompt_length = max_prompt_length,
max_completion_length = max_completion_length,
# num_train_epochs = 1, # Set to 1 for a full training run
max_steps = 100,
save_steps = 100,
report_to = "none", # Can use Weights & Biases
output_dir = "outputs",
# For optional training + evaluation
# fp16_full_eval = True,
# per_device_eval_batch_size = 4,
# eval_accumulation_steps = 1,
# eval_strategy = "steps",
# eval_steps = 1,
)
```
```python
# For optional training + evaluation
# new_dataset = dataset.train_test_split(test_size = 0.01)
trainer = GRPOTrainer(
model = model,
processing_class = tokenizer,
reward_funcs = [
match_format_exactly,
match_format_approximately,
check_answer,
check_numbers,
format_and_language_reward_func,
],
args = training_args,
train_dataset = dataset,
# For optional training + evaluation
# train_dataset = new_dataset["train"],
# eval_dataset = new_dataset["test"],
)
trainer.train()
```
***
## Section 8 — Inference & Language Compliance Evaluation
We run three comparison experiments:
1. **Without LoRA** — baseline model behaviour (no system prompt)
2. **With LoRA, no system prompt** — does LoRA affect general reasoning?
3. **With LoRA + system prompt** — the intended deployment mode (Indonesian reasoning)
Then we run a **batch evaluation on 20 samples** to measure the language compliance rate quantitatively.
```python
text = "What is the sqrt of 101?"
from vllm import SamplingParams
sampling_params = SamplingParams(
temperature = 1.0,
top_k = 50,
max_tokens = 1024,
)
output = model.fast_generate(
[text],
sampling_params = sampling_params,
lora_request = None,
)[0].outputs[0].text
output
```
```python
model.save_lora("grpo_lora")
```
{% hint style="info" %}
`model.save_lora()` is used here instead of `model.save_pretrained()` because we enabled `fast_inference=True` (vLLM mode). The vLLM-backed model uses the Unsloth `save_lora` API.
{% endhint %}
```python
from safetensors import safe_open
tensors = {}
with safe_open("grpo_lora/adapter_model.safetensors", framework = "pt") as f:
# Verify both A and B are non zero
for key in f.keys():
tensor = f.get_tensor(key)
n_zeros = (tensor == 0).sum() / tensor.numel()
assert(n_zeros.item() != tensor.numel())
```
```python
messages = [
{"role": "user", "content": "Solve (x + 2)^2 = 0"},
]
text = tokenizer.apply_chat_template(
messages,
add_generation_prompt = True, # Must add for generation
tokenize = False,
)
from vllm import SamplingParams
sampling_params = SamplingParams(
temperature = 1.0,
top_k = 50,
max_tokens = 2048,
)
output = model.fast_generate(
text,
sampling_params = sampling_params,
lora_request = model.load_lora("grpo_lora"),
)[0].outputs[0].text
output
```
```python
messages = [
{"role": "system", "content": system_prompt},
{"role": "user", "content": "Solve (x + 2)^2 = 0"},
]
text = tokenizer.apply_chat_template(
messages,
add_generation_prompt = True, # Must add for generation
tokenize = False,
)
from vllm import SamplingParams
sampling_params = SamplingParams(
temperature = 1.0,
top_k = 50,
max_tokens = 2048,
)
output = model.fast_generate(
text,
sampling_params = sampling_params,
lora_request = model.load_lora("grpo_lora"),
)[0].outputs[0].text
output
```
```python
messages = [
{"role": "system", "content": system_prompt},
{"role": "user", "content": "Solve (x + 2)^2 = 0"},
]
text = tokenizer.apply_chat_template(
messages,
add_generation_prompt = True, # Must add for generation
tokenize = False,
)
from vllm import SamplingParams
sampling_params = SamplingParams(
temperature = 1.0,
top_k = 50,
max_tokens = 2048,
)
output = model.fast_generate(
text,
sampling_params = sampling_params,
lora_request = None,
)[0].outputs[0].text
output
```
### Batch Language Compliance Evaluation
A single example is anecdotal. We run over **20 randomly sampled problems** and measure the percentage that produce Indonesian reasoning chains — with and without the LoRA.
```python
sample_dataset = dataset.shuffle(seed = 3407).select(range(20))
sample_dataset
```
```python
with_lora_id_count = 0
without_lora_id_count = 0
print("Comparing language usage with and without LoRA on 20 samples:")
print("=" * 60)
for i, sample in enumerate(sample_dataset):
messages = [
{"role": "system", "content": system_prompt},
{"role": "user", "content": sample["prompt"][1]["content"]},
]
text = tokenizer.apply_chat_template(
messages,
add_generation_prompt = True,
tokenize = False,
)
output_with_lora = model.fast_generate(
text,
sampling_params = sampling_params,
lora_request = model.load_lora("grpo_lora"),
)[0].outputs[0].text
output_without_lora = model.fast_generate(
text,
sampling_params = sampling_params,
lora_request = None,
)[0].outputs[0].text
lang_with_lora = get_lang(output_with_lora)
lang_without_lora = get_lang(output_without_lora)
if lang_with_lora == 'id':
with_lora_id_count += 1
if lang_without_lora == 'id':
without_lora_id_count += 1
# Print progress every 5 samples
if (i + 1) % 5 == 0:
print(f"Processed {i + 1}/20 samples...")
print("\n" + "=" * 60)
print("RESULTS:")
print(f"With LoRA - Indonesian responses: {with_lora_id_count}/20 ({with_lora_id_count/20*100:.1f}%)")
print(f"Without LoRA - Indonesian responses: {without_lora_id_count}/20 ({without_lora_id_count/20*100:.1f}%)")
print(f"Improvement: +{with_lora_id_count - without_lora_id_count} Indonesian responses with LoRA")
```
***
## Section 9 — Save & Export
### Export Options
| Method | Size | Use Case |
| ----------------- | -------- | ----------------------------------------------------------- |
| **LoRA adapters** | \~200 MB | Share on HuggingFace, continue training, hot-swap with vLLM |
| **Merged 16-bit** | \~16 GB | Deploy with vLLM as a standalone model |
| **Merged 4-bit** | \~5 GB | Memory-constrained vLLM deployment |
| **GGUF q4\_k\_m** | \~5 GB | llama.cpp / Ollama local inference |
| **GGUF q8\_0** | \~9 GB | High-quality llama.cpp inference |
> **Note:** `model.save_lora()` is used here instead of `model.save_pretrained()` because we enabled `fast_inference=True` (vLLM mode). The vLLM-backed model uses the Unsloth `save_lora` API.
```python
# Merge to 16bit
if False: model.save_pretrained_merged("deepseek_r1_finetune_16bit", tokenizer, save_method = "merged_16bit",)
if False: model.push_to_hub_merged("HF_USERNAME/deepseek_r1_finetune_16bit", tokenizer, save_method = "merged_16bit", token = "YOUR_HF_TOKEN")
# Merge to 4bit
if False: model.save_pretrained_merged("deepseek_r1_finetune_4bit", tokenizer, save_method = "merged_4bit",)
if False: model.push_to_hub_merged("HF_USERNAME/deepseek_r1_finetune_4bit", tokenizer, save_method = "merged_4bit", token = "YOUR_HF_TOKEN")
# Just LoRA adapters
if False:
model.save_pretrained("deepseek_r1_lora")
tokenizer.save_pretrained("deepseek_r1_lora")
if False:
model.push_to_hub("HF_USERNAME/deepseek_r1_lora", token = "YOUR_HF_TOKEN")
tokenizer.push_to_hub("HF_USERNAME/deepseek_r1_lora", token = "YOUR_HF_TOKEN")
```
### GGUF / llama.cpp Conversion
To save to `GGUF` / `llama.cpp`, we support it natively now! We clone `llama.cpp` and we default save it to `q8_0`. We allow all methods like `q4_k_m`. Use `save_pretrained_gguf` for local saving and `push_to_hub_gguf` for uploading to HF.
Some supported quant methods (full list on our [docs page](https://unsloth.ai/docs/basics/inference-and-deployment/saving-to-gguf)):
* `q8_0` - Fast conversion. High resource use, but generally acceptable.
* `q4_k_m` - Recommended. Uses Q6\_K for half of the attention.wv and feed\_forward.w2 tensors, else Q4\_K.
* `q5_k_m` - Recommended. Uses Q6\_K for half of the attention.wv and feed\_forward.w2 tensors, else Q5\_K.
```python
# Save to 8bit Q8_0
if False: model.save_pretrained_gguf("deepseek_r1_finetune", tokenizer,)
# Remember to go to https://huggingface.co/settings/tokens for a token!
# And change hf to your username!
if False: model.push_to_hub_gguf("HF_USERNAME/deepseek_r1_finetune", tokenizer, token = "YOUR_HF_TOKEN")
# Save to 16bit GGUF
if False: model.save_pretrained_gguf("deepseek_r1_finetune", tokenizer, quantization_method = "f16")
if False: model.push_to_hub_gguf("HF_USERNAME/deepseek_r1_finetune", tokenizer, quantization_method = "f16", token = "YOUR_HF_TOKEN")
# Save to q4_k_m GGUF
if False: model.save_pretrained_gguf("deepseek_r1_finetune", tokenizer, quantization_method = "q4_k_m")
if False: model.push_to_hub_gguf("HF_USERNAME/deepseek_r1_finetune", tokenizer, quantization_method = "q4_k_m", token = "YOUR_HF_TOKEN")
# Save to multiple GGUF options - much faster if you want multiple!
if False:
model.push_to_hub_gguf(
"HF_USERNAME/deepseek_r1_finetune", # Change hf to your username!
tokenizer,
quantization_method = ["q4_k_m", "q8_0", "q5_k_m",],
token = "YOUR_HF_TOKEN",
)
```
Now, use the `deepseek_r1_finetune.Q8_0.gguf` file or `deepseek_r1_finetune.Q4_K_M.gguf` file in llama.cpp.
# SkyRL for LLM-as-a-Judge Training
### What is LLM-as-a-Judge About?
Imagine teaching a student mathematics. The traditional approach is to show them correct answers and have them memorize it. But a smarter method is: let them solve problems on their own, then have a "judge teacher" evaluate whether their answers are good or not. Reward good work and correct mistakes. **That's exactly what we're doing here!**
We're using the SkyRL framework to train a small language model `Qwen2.5-1.5B` to solve math problems (GSM8K dataset). `GPT-4o-mini` acts as the "judge teacher," evaluating the quality of the model's answers.
{% hint style="info" %}
***The GSM8K (Grade School Math 8K) dataset** is a collection of 8.5K high-quality, linguistically diverse grade school math word problems. This dataset was created to support the task of question answering on basic mathematical problems that require multi-step reasoning.*
*It looks like:*
```json
{
"question": "Natalia sold clips to 48 of her friends in April, and then she sold half as many clips in May. How many clips did Natalia sell altogether in April and May?",
"answer": "Natalia sold 48/2 = <<48/2=24>>24 clips in May.\nNatalia sold 48+24 = <<48+24=72>>72 clips altogether in April and May.\n#### 72"
}
```
{% endhint %}
***
### Step-by-Step Guide
{% stepper %}
{% step %}
#### Environment Check
```python
# Start a pod and connect to 8888 jupyterlab port.Start a new notebook.
# We need to confirm the SkyRL project code is downloaded
# Use git clone https://github.com/NovaSky-AI/SkyRL.git
import os
# Check current directory structure
print("Current working directory:", os.getcwd())
print("\nDirectory structure:")
!ls -la
# Check if SkyRL exists
if os.path.exists('SkyRL'):
print("\n✓ SkyRL directory exists")
!ls -la SkyRL/
else:
print("\n✗ SkyRL directory not found, need to clone first")
```
Checks if the `SkyRL` folder exists in the current directory
{% endstep %}
{% step %}
#### Locate Key Files
```python
# Navigate to SkyRL's training code directory
# Check if the three important files we need are present
import os
# Change to skyrl-train directory
os.chdir('/workspace/SkyRL/skyrl-train')
print("Current directory:", os.getcwd())
# Check key files
print("\nChecking key files:")
files_to_check = [
'examples/llm_as_a_judge/gsm8k_dataset_judge.py',
'examples/llm_as_a_judge/main_llm_judge.py',
'examples/llm_as_a_judge/run_llm_judge.sh',
]
for file in files_to_check:
if os.path.exists(file):
print(f"✓ {file}")
else:
print(f"✗ {file}")
```
**Files to check**:
* `gsm8k_dataset_judge.py` - Data preparation script, organizing math problems into training format
* `main_llm_judge.py` - Main training program
* `run_llm_judge.sh` - Quick launch script
{% endstep %}
{% step %}
#### Prepare Training Data
```python
# Organize raw math problem data into a format the model can "digest"
# Generate training and validation sets
import os
# Set data output directory
DATA_DIR = os.path.expanduser("~/data/gsm8k_llm_judge")
print(f"Data will be saved to: {DATA_DIR}")
# Run dataset preparation script
command = f"uv run examples/llm_as_a_judge/gsm8k_dataset_judge.py --output_dir {DATA_DIR}"
print(f"\nExecuting command:\n{command}\n")
!{command}
# Verify dataset
print("\nVerifying dataset:")
!ls -lh {DATA_DIR}
```
**Output files**:
* `train.parquet` - Training data (for model practice)
* `validation.parquet` - Validation data (to check how well the model learned)
**Data saved to**: `~/data/gsm8k_llm_judge/` directory
{% endstep %}
{% step %}
#### Install System Dependencies
```bash
# Install libnuma-dev
# This is a low-level library that helps programs better utilize multi-core CPUs
!sudo apt-get update
!sudo apt-get install -y libnuma-dev
```
NUMA (Non-Uniform Memory Access) library optimizes memory access performance
{% endstep %}
{% step %}
#### Configure API Keys
```python
# Create .env.llm_judge configuration file
# Contains:
# - OpenAI API Key (for calling GPT-4o-mini as the judge)
# - Wandb config (experiment tracking tool, disabled here)
# Create .env.llm_judge file
env_content = """OPENAI_API_KEY=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
WANDB_API_KEY=dummy_key_not_used
WANDB_MODE=disabled
"""
with open('.env.llm_judge', 'w') as f:
f.write(env_content)
print("✓ .env.llm_judge created")
# Verify file content
print("\nFile content:")
!cat .env.llm_judge
```
:exclamation:Replace with your own real OpenAI API Key!
{% endstep %}
{% step %}
#### Start Training!
Here comes the coolest part.
```python
import os
# ==================== Configuration Section ====================
# Set the directory where GSM8K dataset will be stored
DATA_DIR = os.path.expanduser("~/data/gsm8k_llm_judge")
# Number of GPUs to use for training
NUM_GPUS = 1
#Adjust this according to the actual number of GPUs you use!!
#If you check on the original doc skyrl team provided, you'll find the default is 4.
# ==================== Change Directory ====================
# Navigate to the skyrl-train module directory
os.chdir('/workspace/SkyRL/skyrl-train')
print(f"✓ Current directory: {os.getcwd()}\n")
print("=" * 80)
print("Starting Training (1 GPU Config - CPU Offload Disabled)")
print("=" * 80)
# CRITICAL: Disable CPU offload for single GPU to avoid CPU-GPU transfer bottlenecks
command = f"""
uv run --isolated --extra vllm --env-file .env.llm_judge -m examples.llm_as_a_judge.main_llm_judge \
data.train_data="['{DATA_DIR}/train.parquet']" \ # Training dataset path
data.val_data="['{DATA_DIR}/validation.parquet']" \ # Validation dataset path
trainer.algorithm.advantage_estimator="grpo" \ # Use GRPO (Group Relative Policy Optimization)
trainer.policy.model.path="Qwen/Qwen2.5-1.5B-Instruct" \ # Base model: Qwen 1.5B Instruct
trainer.epochs=20 \ # Train for 20 epochs
trainer.train_batch_size=8 \ # Process 8 samples per batch
trainer.policy_mini_batch_size=8 \ # Mini-batch size for policy updates
trainer.placement.colocate_all=true \ # Place all models on the same GPU
trainer.strategy=fsdp2 \ # Use FSDP2 (Fully Sharded Data Parallel v2)
trainer.placement.policy_num_gpus_per_node={NUM_GPUS} \ # Policy model GPU allocation
trainer.placement.ref_num_gpus_per_node={NUM_GPUS} \ # Reference model GPU allocation
trainer.placement.critic_num_gpus_per_node={NUM_GPUS} \ # Critic model GPU allocation
trainer.policy.fsdp_config.cpu_offload=false \ # Disable CPU offload for policy model
trainer.ref.fsdp_config.cpu_offload=false \ # Disable CPU offload for reference model
trainer.critic.fsdp_config.cpu_offload=false \ # Disable CPU offload for critic model
generator.num_inference_engines=1 \ # Use 1 inference engine
generator.inference_engine_tensor_parallel_size=1 \ # No tensor parallelism
generator.backend=vllm \ # Use vLLM as inference backend
generator.n_samples_per_prompt=5 \ # Generate 5 candidate answers per question
environment.env_class=llm_as_a_judge \ # Use LLM-as-a-Judge environment
environment.skyrl_gym.llm_as_a_judge.model="gpt-4o-mini" # GPT-4o-mini as the judge model
"""
!{command}
```
{% endstep %}
{% endstepper %}
***
### How Does the Training Process Work?
#### 1️⃣ **Generation Phase**
The student model (Qwen2.5-1.5B) sees a math problem and attempts to generate 5 different answers
#### 2️⃣ **Evaluation Phase**
The judge model (GPT-4o-mini) reviews these 5 answers and scores each one:
* ✅ Correct answer, clear reasoning → High reward
* ⚠️ Correct answer, but messy process → Medium reward
* ❌ Wrong answer → Low score or penalty
#### 3️⃣ **Learning Phase**
Based on the judge's scores, the student model adjusts its "problem-solving strategy":
* High-scoring approaches → Use more often
* Low-scoring approaches → Use less often
#### 4️⃣ **Repeat Cycle**
Repeat for 20 rounds (20 epochs), the student model gradually learns problem-solving skills
{% hint style="info" %}
Need more information? Check these:
* [SkyRL GitHub Repository](https://github.com/skyworkai/skyrl)
* [GSM8K Dataset Paper](https://arxiv.org/abs/2110.14168)
{% endhint %}
Have fun building!
# Reinforced Learning with Miles
### Prerequisites
Access to a YottaLabs RTX 5090 GPU, ideally.
Start a pod with our official template and enter Jupyter lab.
***
Run the cell below to see what we're working with:
```python
# Let's see what awesome hardware we have! 🖥
!nvidia-smi
# Check Python version
import sys
print(f"\n🐍 Python version: {sys.version}")
# Check current working directory
import os
print(f"\n📁 Current directory: {os.getcwd()}")
```
***
{% stepper %}
{% step %}
#### Step 1: Environment Setup
```python
# Set up our working directory
# YottaLabs users: we're using /workspace/ as the base directory
WORK_DIR = "/workspace/miles_workspace"
os.makedirs(WORK_DIR, exist_ok=True)
os.chdir(WORK_DIR)
print(f"✅ Working directory set to: {WORK_DIR}")
```
{% hint style="info" %}
The original miles repository quickstart provides a `build_conda.sh` script, but we'll adapt it for our JupyterLab environment.
{% endhint %}
Let's grab the miles framework from GitHub. This is where all the magic happens.
```python
# Clone miles repository if it doesn't exist
if not os.path.exists(f"{WORK_DIR}/miles"):
!git clone https://github.com/radixark/miles.git
print("✅ Miles repository cloned successfully!")
else:
print("✅ Miles repository already exists!")
# Let's make sure we have the latest version
%cd {WORK_DIR}/miles
!git pull
%cd {WORK_DIR}
```
Now let's install miles and its dependencies. This might take a few minutes.
```python
%cd {WORK_DIR}/miles
# Install miles in editable mode
%pip install -e . --no-deps
print("\n✅ Miles installation complete!")
```
Miles uses Megatron-LM as one of its training backends.
```python
%cd {WORK_DIR}
if not os.path.exists(f"{WORK_DIR}/Megatron-LM"):
%git clone https://github.com/NVIDIA/Megatron-LM.git
print("✅ Megatron-LM cloned successfully!")
else:
print("✅ Megatron-LM already exists!")
# Add Megatron to Python path
import sys
megatron_path = f"{WORK_DIR}/Megatron-LM"
if megatron_path not in sys.path:
sys.path.append(megatron_path)
# Also set it as an environment variable for subprocess calls
os.environ['PYTHONPATH'] = f"{megatron_path}:{os.environ.get('PYTHONPATH', '')}"
print(f"✅ Megatron-LM added to Python path")
```
{% endstep %}
{% step %}
#### Prepare Models and Datasets
We'll be working with:
* **Model:** GLM-Z1-9B (a 9 billion parameter language model)
* **Training Data:** dapo-math-17k (17,000 math problems)
* **Evaluation Data:** aime-2024 (American Invitational Mathematics Examination)
These downloads can take a while depending on your connection.
Let's organize our downloads neatly.
```python
# Create directories for models and data
MODEL_DIR = f"{WORK_DIR}/models"
DATA_DIR = f"{WORK_DIR}/datasets"
os.makedirs(MODEL_DIR, exist_ok=True)
os.makedirs(DATA_DIR, exist_ok=True)
print(f"✅ Models will be saved to: {MODEL_DIR}")
print(f"✅ Datasets will be saved to: {DATA_DIR}")
```
We're using `huggingface-cli` to download the GLM-Z1-9B model. This is a fantastic 9B parameter model perfect for learning.
```python
import sys
import subprocess
subprocess.check_call([sys.executable, "-m", "pip", "install", "-U", "huggingface_hub"])
from huggingface_hub import snapshot_download
MODEL_NAME = "GLM-Z1-9B-0414"
MODEL_PATH = f"{MODEL_DIR}/{MODEL_NAME}"
if not os.path.exists(MODEL_PATH):
print(f"🚀 Downloading {MODEL_NAME}... This might take 10-20 minutes.")
snapshot_download(
repo_id="zai-org/GLM-Z1-9B-0414",
local_dir=MODEL_PATH,
local_dir_use_symlinks=False
)
print(f"\n✅ Model downloaded to: {MODEL_PATH}")
else:
print(f"✅ Model already exists at: {MODEL_PATH}")
```
The dapo-math-17k dataset contains 17,000 math problems. Great for training our model to think mathematically.
```python
TRAIN_DATA_PATH = f"{DATA_DIR}/dapo-math-17k"
if not os.path.exists(TRAIN_DATA_PATH):
print("📚 Downloading training dataset...")
!huggingface-cli download --repo-type dataset zhuzilin/dapo-math-17k --local-dir {TRAIN_DATA_PATH}
print(f"\n✅ Training data downloaded to: {TRAIN_DATA_PATH}")
else:
print(f"✅ Training data already exists at: {TRAIN_DATA_PATH}")
```
The AIME-2024 dataset will help us evaluate how well our model is learning. Think of it as the final exam.
```python
EVAL_DATA_PATH = f"{DATA_DIR}/aime-2024"
if not os.path.exists(EVAL_DATA_PATH):
print("📊 Downloading evaluation dataset...")
!huggingface-cli download --repo-type dataset zhuzilin/aime-2024 --local-dir {EVAL_DATA_PATH}
print(f"\n✅ Evaluation data downloaded to: {EVAL_DATA_PATH}")
else:
print(f"✅ Evaluation data already exists at: {EVAL_DATA_PATH}")
```
{% endstep %}
{% step %}
#### Model Weight Conversion
Miles uses Megatron for training, which requires a specific weight format. We need to convert our Hugging Face model to Megatron's `torch_dist` format.
Think of this as translating a book from one language to another - same content, different format.
First, we need to load the model's configuration. Miles provides ready-made configs for popular models.
```python
# Let's peek at what the GLM4-9B config looks like
config_file = f"{WORK_DIR}/miles/scripts/models/glm4-9B.sh"
print("📋 Model configuration parameters:")
print("=" * 50)
with open(config_file, 'r') as f:
content = f.read()
print(content)
print("=" * 50)
```
Now let's do the actual conversion! This process reads the Hugging Face weights and reorganizes them into Megatron's format.
```python
%cd {WORK_DIR}/miles
# Output path for converted weights
CONVERTED_MODEL_PATH = f"{MODEL_PATH}_torch_dist"
if not os.path.exists(CONVERTED_MODEL_PATH):
print("🔄 Converting model weights to Megatron format...")
print("This will take a while - perfect time to learn about what's happening!\n")
print("📖 During conversion, we're:")
print(" 1. Reading the Hugging Face model structure")
print(" 2. Redistributing weights for tensor parallelism")
print(" 3. Saving in Megatron's checkpoint format\n")
# Source the model config and run conversion
!bash -c "source scripts/models/glm4-9B.sh && \
PYTHONPATH={WORK_DIR}/Megatron-LM python tools/convert_hf_to_torch_dist.py \
--hf-checkpoint {MODEL_PATH} \
--save {CONVERTED_MODEL_PATH} \
--num-layers 40 \
--hidden-size 4096 \
--num-attention-heads 32 \
--group-query-attention \
--num-query-groups 2 \
--ffn-hidden-size 13696 \
--seq-length 131072 \
--max-position-embeddings 131072 \
--rotary-base 5000000 \
--rotary-percent 0.5 \
--swiglu \
--tokenizer-type PretrainedFromHF \
--no-bias-swiglu-fusion \
--layernorm-type RMSNorm \
--untie-embeddings-and-output-weights \
--disable-bias-linear \
--normalization RMSNorm"
print(f"\n✅ Conversion complete! Saved to: {CONVERTED_MODEL_PATH}")
else:
print(f"✅ Converted model already exists at: {CONVERTED_MODEL_PATH}")
```
{% endstep %}
{% step %}
#### Understanding Training Parameters
Before we start training, let's take a moment to understand what's going on under the hood. Trust me, this will make everything click.
Miles training follows a reinforcement learning loop:
```
📊 Data Sampling (Rollout) → 🎓 Weight Update (Training) → 🔄 Repeat
```
Let me break down the key parameters that control this loop:
**Phase 1: Data Sampling (Rollout)**
* **`rollout-batch-size`**: How many prompts we sample each round
* Example: 16 prompts
* **`n-samples-per-prompt`**: How many responses we generate per prompt
* Example: 8 responses per prompt
* **Total samples generated** = 16 × 8 = 128 samples
**Phase 2: Model Training**
* **`global-batch-size`**: Samples needed for one parameter update
* Example: 128 samples
* **`num-steps-per-rollout`**: How many updates to make with current data
* Example: 1 update (on-policy learning)
* **Total samples consumed** = 128 × 1 = 128 samples
{% hint style="info" %}
**Golden Rule 🌟**
Samples Generated = Samples Consumed
(rollout-batch-size × n-samples-per-prompt) = (global-batch-size × num-steps-per-rollout)
{% endhint %}
This ensures we use exactly the data we generate - no waste, no shortfall.
```python
# Let's visualize this with a quick calculation helper
def validate_training_params(rollout_batch, n_samples, global_batch, num_steps):
generated = rollout_batch * n_samples
consumed = global_batch * num_steps
print("📊 Training Loop Balance Check")
print("=" * 50)
print(f"🎲 Samples Generated: {rollout_batch} × {n_samples} = {generated}")
print(f"🎓 Samples Consumed: {global_batch} × {num_steps} = {consumed}")
print("=" * 50)
if generated == consumed:
print("✅ Perfect balance! Your parameters are correct!")
return True
else:
print(f"❌ Imbalance detected! Difference: {abs(generated - consumed)}")
print("💡 Tip: Adjust your parameters to match the golden rule.")
return False
# Example configuration
validate_training_params(
rollout_batch=16,
n_samples=8,
global_batch=128,
num_steps=1
)
```
{% endstep %}
{% step %}
#### Prepare Your Training Script
Alright, time to put it all together.
```python
# Let's create our training configuration
import json
# Base paths
TRAINING_CONFIG = {
# Model paths
"hf_checkpoint": MODEL_PATH,
"ref_load": CONVERTED_MODEL_PATH,
"load": f"{MODEL_PATH}_miles_checkpoint",
"save": f"{MODEL_PATH}_miles_checkpoint",
"save_interval": 20,
# Data paths
"prompt_data": f"{TRAIN_DATA_PATH}/dapo-math-17k.jsonl",
"eval_prompt_data": f"{EVAL_DATA_PATH}/aime-2024.jsonl",
# Training loop parameters
"num_rollout": 100, # Reduced for quick testing
"rollout_batch_size": 16,
"n_samples_per_prompt": 8,
"num_steps_per_rollout": 1,
"global_batch_size": 128,
# Model configuration (GLM4-9B)
"num_layers": 40,
"hidden_size": 4096,
"num_attention_heads": 32,
"num_query_groups": 2,
"ffn_hidden_size": 13696,
"seq_length": 131072,
# Parallelism (adjust based on your GPU count)
"tensor_model_parallel_size": 2,
"pipeline_model_parallel_size": 1,
"context_parallel_size": 2,
# Performance
"max_tokens_per_gpu": 4608,
"use_dynamic_batch_size": True,
# GRPO algorithm
"advantage_estimator": "grpo",
"kl_loss_coef": 0.0,
# Optimizer
"optimizer": "adam",
"lr": 1e-6,
"weight_decay": 0.1,
}
# Save config for reference
config_path = f"{WORK_DIR}/training_config.json"
with open(config_path, 'w') as f:
json.dump(TRAINING_CONFIG, f, indent=2)
print("✅ Training configuration created!")
print(f"📄 Saved to: {config_path}")
print("\n📋 Quick Summary:")
print(f" • Training for {TRAINING_CONFIG['num_rollout']} rollouts")
print(f" • {TRAINING_CONFIG['rollout_batch_size']} prompts per rollout")
print(f" • {TRAINING_CONFIG['n_samples_per_prompt']} samples per prompt")
print(f" • Total samples per rollout: {TRAINING_CONFIG['rollout_batch_size'] * TRAINING_CONFIG['n_samples_per_prompt']}")
```
{% endstep %}
{% step %}
#### Start Ray and Launch Training
Now for the exciting part - let's actually start training.
Miles uses Ray for distributed computing. We'll need to:
1. Start a Ray cluster
2. Submit our training job
3. Monitor progress
Ray is pretty awesome - it handles all the distributed computing magic for us✨Let's start ray.
```python
# Check if Ray is already running
!ray status || ray start --head --num-gpus=8 --disable-usage-stats
print("\n✅ Ray cluster is ready!")
print("\n💡 Tip: You can view the Ray dashboard in your browser")
print(" Default URL: http://localhost:8265")
```
Let's build our training command. I'll show you each part so you understand what's happening!
```python
%cd {WORK_DIR}/miles
# Build the training command
# We're using a background process so you can monitor it in real-time
training_script = f"""
export PYTHONPATH={WORK_DIR}/Megatron-LM:$PYTHONPATH
python3 train.py \\
--actor-num-nodes 1 \\
--actor-num-gpus-per-node 8 \\
--rollout-num-gpus 8 \\
--rollout-num-gpus-per-engine 2 \\
\\
--hf-checkpoint {TRAINING_CONFIG['hf_checkpoint']} \\
--ref-load {TRAINING_CONFIG['ref_load']} \\
--load {TRAINING_CONFIG['load']} \\
--save {TRAINING_CONFIG['save']} \\
--save-interval {TRAINING_CONFIG['save_interval']} \\
\\
--prompt-data {TRAINING_CONFIG['prompt_data']} \\
--input-key prompt \\
--label-key label \\
--apply-chat-template \\
--rollout-shuffle \\
\\
--rm-type deepscaler \\
\\
--num-rollout {TRAINING_CONFIG['num_rollout']} \\
--rollout-batch-size {TRAINING_CONFIG['rollout_batch_size']} \\
--n-samples-per-prompt {TRAINING_CONFIG['n_samples_per_prompt']} \\
--num-steps-per-rollout {TRAINING_CONFIG['num_steps_per_rollout']} \\
--global-batch-size {TRAINING_CONFIG['global_batch_size']} \\
\\
--rollout-max-response-len 8192 \\
--rollout-temperature 1 \\
--balance-data \\
\\
--eval-interval 5 \\
--eval-prompt-data aime {TRAINING_CONFIG['eval_prompt_data']} \\
--n-samples-per-eval-prompt 16 \\
--eval-max-response-len 16384 \\
--eval-top-p 1 \\
\\
--tensor-model-parallel-size {TRAINING_CONFIG['tensor_model_parallel_size']} \\
--sequence-parallel \\
--pipeline-model-parallel-size {TRAINING_CONFIG['pipeline_model_parallel_size']} \\
--context-parallel-size {TRAINING_CONFIG['context_parallel_size']} \\
--recompute-granularity full \\
--recompute-method uniform \\
--recompute-num-layers 1 \\
--use-dynamic-batch-size \\
--max-tokens-per-gpu {TRAINING_CONFIG['max_tokens_per_gpu']} \\
\\
--advantage-estimator {TRAINING_CONFIG['advantage_estimator']} \\
--use-kl-loss \\
--kl-loss-coef {TRAINING_CONFIG['kl_loss_coef']} \\
--kl-loss-type low_var_kl \\
--entropy-coef 0.0 \\
--eps-clip 0.2 \\
--eps-clip-high 0.28 \\
\\
--optimizer {TRAINING_CONFIG['optimizer']} \\
--lr {TRAINING_CONFIG['lr']} \\
--lr-decay-style constant \\
--weight-decay {TRAINING_CONFIG['weight_decay']} \\
--adam-beta1 0.9 \\
--adam-beta2 0.98 \\
\\
--num-layers {TRAINING_CONFIG['num_layers']} \\
--hidden-size {TRAINING_CONFIG['hidden_size']} \\
--num-attention-heads {TRAINING_CONFIG['num_attention_heads']} \\
--group-query-attention \\
--num-query-groups {TRAINING_CONFIG['num_query_groups']} \\
--ffn-hidden-size {TRAINING_CONFIG['ffn_hidden_size']} \\
--seq-length {TRAINING_CONFIG['seq_length']} \\
--max-position-embeddings {TRAINING_CONFIG['seq_length']} \\
--rotary-base 5000000 \\
--rotary-percent 0.5 \\
--swiglu \\
--tokenizer-type PretrainedFromHF \\
--no-bias-swiglu-fusion \\
--layernorm-type RMSNorm \\
--untie-embeddings-and-output-weights \\
--disable-bias-linear \\
--normalization RMSNorm
"""
# Save the script
script_path = f"{WORK_DIR}/run_training.sh"
with open(script_path, 'w') as f:
f.write(training_script)
!chmod +x {script_path}
print("✅ Training script created!")
print(f"📄 Saved to: {script_path}")
print("\n🎯 Ready to launch training!")
```
This is it - the moment we've been building up to.
Training will run in the background. You can monitor progress in the next cell.
```python
# Launch training
print("🚀 Launching training job...")
print("This will take several hours depending on your hardware.\n")
!bash {script_path} > {WORK_DIR}/training.log 2>&1 &
print("✅ Training started!")
print(f" Log file: {WORK_DIR}/training.log")
print("\n Tips for monitoring:")
print(" • Check the log file for detailed progress")
print(" • Use Ray dashboard: http://localhost:8265")
print(" • Run the monitoring cell below for real-time updates")
```
Let's keep an eye on how things are going! This cell will show you the latest updates from the training log.
```python
# Display the last 50 lines of the training log
import time
log_file = f"{WORK_DIR}/training.log"
if os.path.exists(log_file):
print("📊 Latest Training Updates")
print("=" * 70)
!tail -50 {log_file}
print("=" * 70)
print(f"\n⏰ Last checked: {time.strftime('%Y-%m-%d %H:%M:%S')}")
print("\n💡 Tip: Re-run this cell anytime to see fresh updates!")
else:
print("⏳ Log file not created yet. Training is starting up...")
print("Wait a minute and try again!")
```
{% endstep %}
{% step %}
#### Understanding What's Happening
While training runs, let me explain what's happening behind the scenes.
**The GRPO Algorithm**
Miles uses GRPO (Group Relative Policy Optimization) by default. Here's what's happening in each iteration:
✅**Sampling Phase**
* Model generates multiple responses for each prompt
* Each response gets a reward score from the reward model
* We collect both good and bad responses
✅**Advantage Calculation**
* Compare each response's reward within its group
* Responses better than the group average get positive advantages
* Poor responses get negative advantages
✅**Policy Update**
* Update the model to increase probability of high-advantage responses
* Decrease probability of low-advantage responses
* Use PPO-style clipping to prevent drastic changes
✅**Evaluation**
* Every few rollouts, test on the AIME dataset
* Track progress and save checkpoints
In the logs, you'll see these key metrics:
* **`loss`**: Training loss (should decrease over time)
* **`reward_mean`**: Average reward score (should increase)
* **`kl_divergence`**: How much model changes (want controlled change)
* **`eval_accuracy`**: Performance on test set (the ultimate goal!)
{% endstep %}
{% endstepper %}
# Inference & Serving
# Guide to Serverless
### **Introduction**
This comprehensive guide explains how to use YottaLabs’ **Serverless** feature to quickly and reliably deploy **Qwen3-0.6B** model as containerized services in a production environment.
***
### **1. Background**
Yotta Labs is a one-stop platform for AI application development. This Serverless feature is specifically designed for low-latency, high-concurrency inference services, supporting:
* **Auto-scaling**
* **Self-healing (Fault tolerance)**
* **Multi-GPU scheduling**
Unlike traditional static deployments, Serverless abstracts computing units (**Workers**) into stateless service instances that can be dynamically scaled.
***
### **2. Core Deployment Steps**
#### **Step 1: Preparation – API Key & Console Access**

Before deploying, you must obtain your identity credentials:
1. Log in to the **YottaLabs Console**.
2. Navigate to **Settings → Access Keys**.
3. Generate and copy your **API Key**. This key is required for all automated operations and management interfaces.
4. Return to the main menu and click on **Serverless** to begin.
#### **Step 2: Image Configuration – Public vs. Private Registries**

The image source is the foundation of your deployment. Yotta Labs supports two categories:
* **Docker Hub (Public):** Simply provide the full image name, e.g., `myorg/qwen-vllm:2.3.1-cu121`.
* **Other (Private):** For private registries , you must provide the registry URL and valid **Credentials**.
#### **Step 3: Service Modes & GPU Allocation**
Choose modes that matches your business logic:
SERVICE MODE
BEST USE CASE
LOGIC
ALB
Web APIs / Chatbots
Automatically distributes traffic.
Queue
Batch Processing
Workers pull tasks from a queue; ideal for non-real-time tasks.
Custom
Advanced Integration
Opens raw ports for users with their own load balancers.
**For more information here, see our** [**official docs of service mode**](/products/serverless/service-mode)
**GPU Selection:**
You can specify the **GPU Type** (e.g. RTX 4090), **GPU Count** per worker (1–3), and **VRAM** requirements.
#### **Step 4: Elastic Mechanism – Worker Lifecycle**
* **Declarative Scaling:** If you set the target to 2 Workers, YottaLabs ensures 2 Workers are always running.
* **Automatic Recovery:** If a Worker crashes/is terminated accidentally, the system will automatically spins up a new instance within seconds.
***
### **3. Deployment and validation**
Once the status changes to **Running**, YottaLabs generates a unique HTTPS URL. Copy the url provided in the box above.
Use a `curl` command to test the service, for example:
```
curl -X POST "https://32tkdcwyscmx.yottadeos.com/v1/chat/completions" \
-H "Content-Type: application/json" \
-H "Authorization: Bearer " \
-d '{
"model": "Qwen/Qwen3-0.6B",
"messages": [
{"role": "system", "content": "You are a helpful AI assistant."},
{"role": "user", "content": "Explain AI in simple terms."}
],
"temperature": 0.7,
"max_tokens": 512
}'
```
A successful response confirms that the VLLM inference engine, Tokenizer, and CUDA acceleration path are all functioning correctly.
# Queue-based Serverless Quickstart
**Welcome!** This guide will walk you through setting up and testing YottaLabs' queue-based serverless from start to finish.
***
### What You'll Accomplish
By the end of this guide, you'll have:
* ✅ Built a queue-compatible worker image
* ✅ Deployed it as a **QUEUE** serverless
* ✅ Submitted tasks through the Queue API
* ✅ Monitored task status in real-time
* ✅ Retrieved and verified task results
* ✅ Confirmed a complete end-to-end workflow
***
### Understanding the Queue Model
#### How It Works
In **QUEUE** mode, YottaLabs operates with the following flow:
```
Your Client (curl or Python)
↓
Sends: POST /skywalker/tasks/create
↓
Yotta Queue System
↓
Sends: HTTP POST with taskData
↓
Your Worker Container (Docker)
↓
Receives: FastAPI endpoint (/run)
↓
Your handler(job) function
↓
Returns: result
↓
Yotta Queue System
↓
Stores: taskResult for retrieval
```
***
### Step 1: Build Your Worker
#### 1.1 Create Your Business Logic
First, let's create `handler.py` — this is where your core logic lives. This is a super easy example of "echoing" what you prompted back to you.
**File: `handler.py`**
```python
def handler(job):
"""
job format:
{
"input": {
"prompt": "hello"
}
}
"""
job_input = job.get("input", {})
prompt = job_input.get("prompt", "no prompt provided")
return f"You said: {prompt}"
```
#### 1.2 Create the HTTP Server
Now let's wrap your handler with FastAPI so YottaLabs can communicate with it.
**File: `server.py`**
```python
from fastapi import FastAPI, Request
from handler import handler
app = FastAPI()
@app.post("/run")
async def run(request: Request):
job = await request.json()
result = handler(job)
return {
"result": result
}
```
> **What's happening here?** YottaLabs sends your task data to the `/run` endpoint, and your server passes it to your handler function.
***
### Step 2: Package Everything in Docker
#### 2.1 Define Dependencies
**File: `requirements.txt`**
```txt
fastapi
uvicorn
```
#### 2.2 Create Your Dockerfile
**File: `Dockerfile`**
```dockerfile
FROM python:3.10-slim
WORKDIR /app
COPY requirements.txt .
RUN pip install --no-cache-dir fastapi uvicorn
COPY handler.py server.py ./
EXPOSE 8000
CMD ["uvicorn", "server:app", "--host", "0.0.0.0", "--port", "8000"]
```
#### 2.3 Build and Test Locally
**Build your image:**
```bash
docker build -t yotta-queue-test .
```
**Run it locally:**
```bash
docker run -p 8000:8000 yotta-queue-test
```
**Test that it works:**
```bash
curl -X POST http://localhost:8000/run \
-H "Content-Type: application/json" \
-d '{"input":{"prompt":"Hello Queue"}}'
```
**You should see:**
```json
{"result":"You said: Hello Queue"}
```
✅ **Great!** Your worker is ready for deployment.
Push the image to Dockerhub for future use. Create,for example, `yotta-queue-test:latest` as my image name and tag.
***
### Step 3: Deploy to YottaLabs
#### Create Your Serverless
Head to the **YottaLabs Console** and configure:
| Setting | Value |
| ---------------- | --------------------------------------- |
| **Service Mode** | `QUEUE` |
| **Image** | `yotta-queue-test` (or your image name) |
| **Worker Port** | `8000` |
| | |
**Wait for deployment to complete** — you'll see **Status = RUNNING** when ready.
#### Save Your Endpoint ID
You'll receive an `Endpoint ID` that looks like this:
```
Endpoint ID: 407712238196040165
```
> ⚠️ **Important**: `Endpoint ID` is NOT `worker ID` shown at the bottom of detail page. Use the code below to get your Endpoint ID list
```bash
curl --request GET \
--url 'https://api.yottalabs.ai/openapi/v1/elastic/deploy/list?statusList=INITIALIZING&statusList=RUNNING&statusList=STOPPED' \
--header 'Content-Type: application/json' \
--header 'X-API-Key: '
```
***
### Step 5: Full Python Integration Test
For a more robust testing workflow, let's use Python.
#### Complete Test Script
**File: `test_remote.py`**
```python
import time
import uuid
import requests
import json
YOTTA_API_BASE = "https://api.yottalabs.ai"
API_KEY = ""
ENDPOINT_ID = ""
WORKER_PORT = 8000
PROCESS_URI = "/run"
TIMEOUT_S = 300
POLL_S = 2
def pretty(x):
return json.dumps(x, ensure_ascii=False, indent=2)
def create_task(prompt):
url = f"{YOTTA_API_BASE}/openapi/v1/skywalker/tasks/create"
headers = {
"X-API-Key": API_KEY,
"X-Endpoint-ID": ENDPOINT_ID,
"Content-Type": "application/json",
}
user_task_id = f"task_{time.strftime('%Y%m%d_%H%M%S')}_{uuid.uuid4().hex[:8]}"
payload = {
"userTaskId": user_task_id,
"workerPort": WORKER_PORT,
"processUri": PROCESS_URI,
"taskData": {"input": {"prompt": prompt}},
}
r = requests.post(url, headers=headers, json=payload, timeout=30)
r.raise_for_status()
data = r.json()
if data.get("code") != 10000:
raise RuntimeError(pretty(data))
return user_task_id
def get_task(task_id):
url = f"{YOTTA_API_BASE}/openapi/v1/skywalker/tasks/{task_id}"
headers = {
"X-API-Key": API_KEY,
"X-Endpoint-ID": ENDPOINT_ID,
}
r = requests.get(url, headers=headers, timeout=30)
r.raise_for_status()
return r.json()["data"]
def wait_done(task_id):
start = time.time()
while True:
detail = get_task(task_id)
status = detail["status"]
if status in ("SUCCESS", "FAILED", 2, 3):
return detail
if time.time() - start > TIMEOUT_S:
raise TimeoutError(pretty(detail))
time.sleep(POLL_S)
def main():
prompt = "Hello from Queue!"
task_id = create_task(prompt)
print("[create]", task_id)
detail = wait_done(task_id)
print(pretty(detail))
assert detail["status"] == "SUCCESS"
assert detail["taskResult"]["result"] == f"You said: {prompt}"
print("\n✅ Queue end-to-end test passed!")
if __name__ == "__main__":
main()
```
#### Run Your Test
```bash
python3 test_remote.py
```
#### Expected Output
```json
{
"userTaskId": "task_20260129_125952_a4337d96",
"status": "SUCCESS",
"workerUrl": "http://localhost:8000/run",
"taskData": {
"input": {
"prompt": "Hello from Queue!"
}
},
"taskResult": {
"result": "You said: Hello from Queue!"
},
"resultSendStatus": "SUCCESS"
}
```
***
### Next Steps
Ready to take things further? Consider exploring:
* **Batch Processing** — Submit multiple tasks at once
* **Monitoring** — Add observability and metrics tracking
***
Need more help? Check out:
* [YottaLabs API Documentation](https://docs.yottalabs.ai/api-and-sdk/api-spec/serverless)
# LLM Serving on Yotta Labs with AWS Trainium
> This tutorial walks you through deploying an LLM inference service on the Yotta Labs platform using an **AWS Trainium** Pod.\
> Reference: [AWS Neuron Docs — vLLM on Neuron](https://awsdocs-neuron.readthedocs-hosted.com/en/latest/libraries/nxd-inference/vllm/index.html) (Neuron SDK 2.29.0)
## 1. Platform Overview & Hardware Selection
Log in to [https://yottalabs.ai](https://yottalabs.ai/), go to the **Pods** page, and click **Deploy**.
In the hardware selector, switch to the **AWS** tab (NVIDIA is the default):
```
NVIDIA | [AWS] ← click to switch
```
Select **Trainium1**:
| Spec | Value |
| ----- | ---------- |
| VRAM | 32 GB |
| RAM | 32 GB |
| vCPU | 8 |
| Price | $1.40 / Hr |
## 2. AWS Trainium vs NVIDIA GPU — Key Differences
| Aspect | NVIDIA GPU | AWS Trainium1 |
| ------------------------ | --------------------------------- | ----------------------------------------------------------------------- |
| **Compute backend** | CUDA / cuDNN | AWS Neuron SDK (`neuronx-distributed-inference`) |
| **Compilation** | JIT / eager | **AOT compilation** — model is compiled to `.neff` format on first run |
| **First startup time** | 1–3 min (download weights only) | **\~20 min** (includes Neuron AOT compilation) |
| **Subsequent startup** | Same as above | Seconds–1 min (compiled artifacts cached) |
| **vLLM integration** | Native (`pip install vllm`) | `vllm-neuron` plugin — **pre-installed** in the Yotta Neuron image |
| **Backend flag** | None (cuda by default) | `VLLM_NEURON_FRAMEWORK=neuronx-distributed-inference` |
| **Parallelism** | `--tensor-parallel-size` = # GPUs | `--tensor-parallel-size` = # NeuronCores |
| **Memory mgmt** | `torch.cuda.*` | `torch_xla` + Neuron Runtime |
| **Monitoring** | `nvidia-smi`, `nvtop` | `neuron-top`, `neuron-ls`, `neuron-monitor` |
| **Compiled model cache** | Not needed | Set `NEURON_COMPILED_ARTIFACTS` to persist across restarts |
| **Weight sharding** | Re-sharded every run | Can be persisted with `save_sharded_checkpoint: true` |
| **CUDA libs** | Required | Not present — `libcuda.so` warnings on import are expected and harmless |
### Key Takeaways
* The `vllm-neuron` plugin exposes the **same OpenAI-compatible `/v1` API** as standard vLLM — no client-side changes needed.
* The Neuron plugin is **pre-installed** in the `yottalabsai/pytorch-inference-vlm-neuronx` image. No manual installation required.
* The Triton warning (`0 active driver(s) found`) and `libcuda.so` import warning are **expected** on Trainium and do not affect inference.
## 3. Launching a Trainium Pod
### 3.1 Select the Image
| Field | Value |
| ---------------- | -------------------------------------------------------------------------------------- |
| **Image Source** | Docker Hub |
| **Image Type** | Public Image |
| **Image** | `yottalabsai/pytorch-inference-vlm-neuronx:0.13.0-neuronx-py312-sdk2.27.1-ubuntu24.04` |
This image includes:
* `torch-neuronx 2.9.0` + `neuronxcc` (Neuron compiler)
* `neuronx-distributed` (NxD Inference library)
* `vllm 0.13.0` with the `vllm-neuron` plugin pre-installed and auto-activated
* `transformers 4.56.2`, `torch_xla 2.9.0`
### 3.2 Ports
Expose these ports in addition to the defaults (22, 8080):
| Port | Service |
| ---- | -------------------------- |
| 8000 | vLLM OpenAI-compatible API |
| 8888 | JupyterLab |
### 3.3 Deploy
Review the pricing summary (\~$1.40/Hr + storage) and click **Deploy**. The Pod reaches **Running** state in 1–2 minutes (image pull).
## 4. Connecting & Verifying the Environment
### 4.1 SSH into the Pod
```bash
ssh root@ -p 22
```
### 4.2 Activate the Conda Environment
{% hint style="warning" %}
**Critical**: All Neuron packages live in the conda base environment at `/opt/conda`. The system Python at `/usr/bin/python3` has no packages installed. You must activate conda first.
{% endhint %}
```bash
source /opt/conda/bin/activate
# Verify the Python path has switched
which python3
# Expected: /opt/conda/bin/python3
```
To make this permanent across SSH sessions:
```bash
echo 'source /opt/conda/bin/activate' >> ~/.bashrc
source ~/.bashrc
```
### 4.3 Verify Neuron Devices
```bash
# List Neuron devices (equivalent to nvidia-smi -L)
neuron-ls
# Live NeuronCore utilization monitor (equivalent to nvidia-smi)
neuron-top
```
Expected `neuron-ls` output:
```
+--------+------------+---------+--------+
| Name | NeuronCore | Memory | Status |
+--------+------------+---------+--------+
| NC0 | 0,1,2,3 | 32 GB | OK |
+--------+------------+---------+--------+
```
### 4.4 Verify All Required Packages
Run the following one-shot check:
```bash
python3 - <<'EOF'
packages = [
"torch", "torch_neuronx", "torch_xla",
"neuronx_distributed", "transformers", "accelerate", "vllm"
]
for pkg in packages:
try:
m = __import__(pkg)
ver = getattr(m, "__version__", "installed, no version attr")
print(f" [OK] {pkg}: {ver}")
except ImportError as e:
print(f" [MISSING] {pkg}: {e}")
EOF
```
**Expected output** (DeprecationWarnings on `neuronx_distributed` are normal and can be ignored):
```
[OK] torch: 2.9.0+cu128
[OK] torch_neuronx: 2.9.0.2.11.19912+e48cd891
[OK] torch_xla: 2.9.0
[OK] neuronx_distributed: installed, no version attr
[OK] transformers: 4.56.2
[OK] accelerate: 1.13.0
[OK] vllm: 0.13.0
```
{% hint style="warning" %}
**Do not** `pip install vllm` or `git clone vllm-neuron`. The correct version is already pre-installed in the image. Reinstalling may break the Neuron plugin.
{% endhint %}
## 5. Using the Prestarted vLLM Service
> Reference: [Quickstart: Serve models online with vLLM on Neuron](https://awsdocs-neuron.readthedocs-hosted.com/en/latest/libraries/nxd-inference/vllm/quickstart-vllm-online-serving.html)
{% hint style="warning" %}
On Yotta Trainium pods, a vLLM server is already started automatically.\
Do NOT run `vllm serve` again unless you are sure no service is running.
{% endhint %}
### 5.1 Check if vLLM is already running
Run:
```bash
curl http://127.0.0.1:8080/v1/models
```
If you see a response like:
```bash
{
"object": "list",
"data": [
{
"id": "TinyLlama/TinyLlama-1.1B-Chat-v1.0"
}
]
}
```
Then the service is already running.
### 5.2 Confirm the active model
The active model is:
```
TinyLlama/TinyLlama-1.1B-Chat-v1.0
```
### 5.3 Run inference (curl)
```bash
curl http://127.0.0.1:8080/v1/chat/completions \
-H "Content-Type: application/json" \
-d '{
"model": "TinyLlama/TinyLlama-1.1B-Chat-v1.0",
"messages": [
{"role": "user", "content": "Hello, who are you?"}
],
"max_tokens": 64
}'
```
## Quick Reference
```bash
# Activate conda (required after every new SSH session)
source /opt/conda/bin/activate
# Check Neuron devices
neuron-ls
# Live NeuronCore monitor
neuron-top
# Set required env vars
export VLLM_NEURON_FRAMEWORK="neuronx-distributed-inference"
export NEURON_COMPILED_ARTIFACTS=~/neuron_compiled_models/tinyllama # use ~ not /workspace
export HF_TOKEN=hf_xxxxxxxxxxxxxxxxxxxx # only needed for gated models (e.g. Llama-3.1)
# Health check
curl http://localhost:8000/health
# View server logs
tail -f /workspace/vllm.log
# List loaded models
curl http://localhost:8000/v1/models | python3 -m json.tool
# Clear compiled artifacts (free disk space)
rm -rf ~/neuron_compiled_models
# View server logs (background mode)
tail -f ~/vllm.log
```
## Verified Package Versions
| Package | Version |
| --------------------- | ---------------------------------- |
| `torch` | 2.9.0+cu128 |
| `torch_neuronx` | 2.9.0.2.11.19912 |
| `torch_xla` | 2.9.0 |
| `neuronx_distributed` | (installed, no `__version__`) |
| `transformers` | 4.56.2 |
| `accelerate` | 1.13.0 |
| `vllm` | 0.13.0 (with `vllm-neuron` plugin) |
> Reference: [AWS Neuron Docs — vLLM on Neuron](https://awsdocs-neuron.readthedocs-hosted.com/en/latest/libraries/nxd-inference/vllm/index.html)
# Running DFlash with Qwen3.6-35B-A3B on RTX PRO 6000
**DFlash** is a speculative decoding framework from [Z Lab](https://z-lab.ai/projects/dflash/) that uses a lightweight block diffusion model to draft multiple tokens in parallel, delivering **up to 6× lossless inference acceleration** over standard autoregressive decoding — and up to 2.5× faster than EAGLE-3. This guide walks you through deploying `Qwen3.6-35B-A3B` with DFlash on a Yotta Labs GPU Pod, using the `pod-templates-jupyterlab` template.
> **Note:** Yotta Labs provided compute resources for training the `Qwen3.6-35B-A3B-DFlash` draft model. The draft model is still under active training (2000 steps); early benchmark numbers are included at the end of this guide.
***
### Prerequisites
* A [Yotta Labs](https://www.yottalabs.ai/) account with sufficient credits
* A [Hugging Face](https://huggingface.co/) account — you must accept the model access conditions for [`z-lab/Qwen3.6-35B-A3B-DFlash`](https://huggingface.co/z-lab/Qwen3.6-35B-A3B-DFlash) and [`Qwen/Qwen3.6-35B-A3B`](https://huggingface.co/Qwen/Qwen3.6-35B-A3B) before downloading
* A Hugging Face access token (`HF_TOKEN`) with read permissions
#### GPU Requirements
`Qwen3.6-35B-A3B` is a Mixture-of-Experts model with 35B total parameters and \~3B active parameters per token. The BF16 weights alone are **71 GB**, so you need a GPU with sufficient VRAM to hold the full model plus the DFlash drafter and KV cache.
| GPU | VRAM | Strategy | Notes |
| ---------------- | ----------- | -------------------------- | ---------------------------------------------------------------------------------- |
| **RTX PRO 6000** | **96 GB** | single GPU | ✅ **Recommended on Yotta Labs** — fits BF16 comfortably with headroom for KV cache |
| 2× RTX 5090 | 64 GB total | `--tensor-parallel-size 2` | Good consumer-GPU alternative |
| H100 80GB | 80 GB | single GPU | Best for high-concurrency serving |
| A100 80GB | 80 GB | single GPU | Solid alternative; no native FP8 Tensor Cores |
> **Why RTX PRO 6000?** With 96 GB VRAM, the full BF16 model (71 GB) + DFlash drafter (\~2 GB) + KV cache and runtime overhead all fit on a single card with comfortable headroom. No tensor parallelism needed, which simplifies deployment and avoids inter-GPU communication overhead.
***
### Step 1 — Deploy a Dflash Pod
* Log in to the [Yotta Labs Console](https://console.yottalabs.ai/).
* Navigate to **Compute → Pods** and click **Deploy** in the top right.
* On the **GPU Selection** page, choose **RTX PRO 6000/H200/2\*RTX5090**.
* Under **Pod Template**, select Dflash.
* Configure the following settings:
| Setting | Recommended Value |
| ------------- | -------------------------------------------------------------------------------- |
| System Volume | **200 GB** (BF16 weights ≈ 73 GB total for target + drafter, plus working space) |
| GPU Count | **1** |
* Add the following **Environment Variable** so your Hugging Face token is available inside the Pod:
```
HF_TOKEN=
```
* Click **Deploy**. The Pod will enter `Initializing` state while resources are allocated.
> **Tip:** The System Volume must be at least 3× the image size. With BF16 weights for both models (\~73 GB) plus the JupyterLab base image, 200 GB gives you comfortable headroom for checkpoints and logs.
***
### Step 2 — Open JupyterLab
Once the Pod status shows **Running**:
1. Click **Connect** on the Pod card.
2. Under HTTP services, click the link for **port 8888** to open JupyterLab in your browser.
3. Create a new notebook: **File → New → Notebook**, select the Python 3 kernel.
All steps below run inside notebook cells. Commands prefixed with `%pip` or `!` run as shell commands inside the notebook.
***
### Step 3 — Install Dependencies
Run each of the following in separate notebook cells. Use `%pip` (not `pip`) so packages are installed into the active kernel.
vLLM has stable DFlash support built in. Use the nightly build until DFlash lands in a stable release.
```python
# Cell 1a — install vLLM nightly
%pip install -q -U vllm --torch-backend=auto --extra-index-url https://wheels.vllm.ai/nightly
%pip install -q huggingface_hub openai
```
> **After installing either option:** go to **Kernel → Restart Kernel** so the newly installed packages are picked up before running the next cells.
***
### Step 4 — Download Model Weights
Run this cell after restarting the kernel. Downloads go to `/root/models/`, which is persisted across Pod restarts.
```python
# Cell 2 — download models
import os
import subprocess
hf_token = os.environ.get("HF_TOKEN", "")
if not hf_token:
raise ValueError(
"HF_TOKEN is not set. Add it as a Pod environment variable in the "
"Yotta Labs Console and redeploy, or set it manually below."
)
# Download the target model (~71 GB, may take 15-25 min)
print("Downloading Qwen3.6-35B-A3B target model...")
subprocess.run([
"huggingface-cli", "download", "Qwen/Qwen3.6-35B-A3B",
"--local-dir", "/root/models/Qwen3.6-35B-A3B",
"--token", hf_token
], check=True)
# Download the DFlash draft model (~2 GB)
# Requires accepting access conditions at:
# https://huggingface.co/z-lab/Qwen3.6-35B-A3B-DFlash
print("Downloading DFlash draft model...")
subprocess.run([
"huggingface-cli", "download", "z-lab/Qwen3.6-35B-A3B-DFlash",
"--local-dir", "/root/models/Qwen3.6-35B-A3B-DFlash",
"--token", hf_token
], check=True)
print("✅ All downloads complete.")
```
> **Note:** Total download is approximately 73 GB. This may take 15–30 minutes. Because `/root` is persisted on Yotta Labs Pods, the weights survive Pod restarts and kernel restarts — you only need to download once.
***
### Step 5 — Send Your First Request
Run this in a new cell after the server shows ✅ ready:
```python
# Cell 4 — test inference
from openai import OpenAI
client = OpenAI(
base_url="http://localhost:30000/v1",
api_key="EMPTY"
)
response = client.chat.completions.create(
model="Qwen/Qwen3.6-35B-A3B",
messages=[{"role": "user", "content": "Give a brief introduction on Hermes Trismegistus"}],
max_tokens=4096,
temperature=0.0
)
print(response.choices[0].message.content)
```
Optionally run a health check before your first request:
```python
# Cell 4a — optional health check
import urllib.request
try:
with urllib.request.urlopen("http://localhost:30000/health") as r:
print("Server status:", r.status, r.read().decode())
except Exception as e:
print("Server not ready yet:", e)
```
***
### Performance Reference
The following acceptance lengths are measured with the `Qwen3.6-35B-A3B-DFlash` draft model (thinking enabled, block size 16, SGLang backend). Higher acceptance length = more tokens accepted per draft step = faster effective throughput.
| Dataset | Accept Length |
| --------- | ------------- |
| GSM8K | 5.8 |
| Math500 | 6.3 |
| HumanEval | 5.2 |
| MBPP | 4.8 |
| MT-Bench | 4.4 |
> These are early results — the draft model is still under training. Numbers will improve as training progresses.
***
### Tips & Troubleshooting
**Model download fails / access denied** Accept the model access conditions at [huggingface.co/z-lab/Qwen3.6-35B-A3B-DFlash](https://huggingface.co/z-lab/Qwen3.6-35B-A3B-DFlash) while logged into Hugging Face, then re-run Cell 2.
**`HF_TOKEN` is empty inside the notebook** The token must be set as a Pod environment variable before deployment. If you forgot, terminate and redeploy with `HF_TOKEN` added. As a temporary workaround you can set it directly in a cell:
```python
import os
os.environ["HF_TOKEN"] = "hf_your_token_here"
```
**Packages not found after install** Always run **Kernel → Restart Kernel** after running Cell 1. `%pip install` takes effect only after the kernel is restarted.
**Server process exits immediately** Check the log for errors:
```python
!tail -80 /root/vllm_server.log
# or for SGLang:
!tail -80 /root/sglang_server.log
```
**Out of GPU memory (OOM)** Change `"0.92"` to `"0.88"` in the `--gpu-memory-utilization` argument in Cell 3, then re-run. If the problem persists, add `"--max-model-len", "65536"` to cap the context window and free KV cache budget.
**Server not reachable on port 30000** Make sure port 30000 was configured as an HTTP port when deploying the Pod. Click **Connect** on the Pod card — port 30000 should appear in the HTTP services list. If not, you need to redeploy with the port added.
**Kernel restarted and server is gone** The server subprocess is tied to the kernel session. If the kernel restarts, re-run Cell 3. Model weights in `/root/models/` are still on disk — no re-download needed.
**Slow generation / DFlash not kicking in** DFlash is most effective at low-to-medium batch sizes (1–32 concurrent requests). For high concurrency, add `"--speculative-disable-by-batch-size", "32"` to the argument list in Cell 3a.
***
### Additional Resources
* [DFlash Paper (arXiv)](https://arxiv.org/abs/2602.06036)
* [DFlash GitHub](https://github.com/z-lab/dflash)
* [z-lab/Qwen3.6-35B-A3B-DFlash on Hugging Face](https://huggingface.co/z-lab/Qwen3.6-35B-A3B-DFlash)
* [Yotta Labs GPU Pods Documentation](https://docs.yottalabs.ai/products/gpu-pods)
* [Yotta Labs Quickstart](https://docs.yottalabs.ai/products/quickstart)
* [DFlash Feedback Form](https://forms.gle/4YNwfqb4nJdqn6hq9)
# Run DeepSeek V4 Flash/Pro on B300
Target hardware: **8\* B300 (native)** or **8× H200 (192GB each, 1.5TB total VRAM)**\
Covers **V4-Flash** (284B / 13B active, \~146GB) and **V4-Pro** (1.6T / 49B active, \~960GB)\
Both models are MIT licensed.
Created based on:
***
## 1. Spin Up the Virtual Machine
Log in to [yottalabs.ai](https://www.yottalabs.ai/) → **Compute → VMs→ Launch**.
For those who intend to run V4-Flash, two H200 SXM in a single pod is enough. If you need full 1M context or high QPS, choose 8× H200, which can cost significantly more.
For V4-Pro, 8× HGX B300 is the its native FP4 execution, full 1M context, no model-len cap. H200 cluster nodes is also a good choice, if there are not as many B300 as we want.
### Pod Settings
| Field | Value |
| ----------------- | ------------------------------------ |
| **GPU Type** | H200 |
| **GPU Count** | 8 |
| **Image** | `lmsysorg/sglang:deepseek-v4-hopper` |
| **System Volume** | ≥ 300 GB (Flash) / ≥ 1.2 TB (Pro) |
{% hint style="warning" %}
**System volume sizing rule:** The SGLang Blackwell image is \~15GB. Yotta Labs requires volume ≥ image size × 3, plus model weights plus buffer:
* Flash: 45GB + 200GB + 55GB buffer = **≥ 300GB**
* Pro: 45GB + 1000GB + 155GB buffer = **≥ 1.2TB**
{% endhint %}
Once deployed, click **Connect → SSH** to open a terminal.
***
## 2. Environment Setup
### Set HuggingFace token
```bash
export HF_TOKEN="hf_your_token_here"
echo 'export HF_TOKEN="hf_your_token_here"' >> ~/.bashrc
```
> Get a token at [huggingface.co/settings/tokens](https://huggingface.co/settings/tokens).
### Install the `hf` CLI
Ubuntu 24.04 has an externally managed Python. Install to user directory:
```bash
pip install -U "huggingface_hub[cli]" hf_transfer --user --quiet
# Add to PATH
export PATH="$HOME/.local/bin:$PATH"
echo 'export PATH="$HOME/.local/bin:$PATH"' >> ~/.bashrc
# Enable fast parallel downloads
export HF_HUB_ENABLE_HF_TRANSFER=1
echo 'export HF_HUB_ENABLE_HF_TRANSFER=1' >> ~/.bashrc
# Verify
hf version
```
> ⚠️ Do NOT use `huggingface-cli` — it may not be on PATH. Use `hf` instead.
### Accept model licenses on HuggingFace
Visit each link and click **"Access repository"**:
* ← for Flash
* ← for Pro
### Verify GPUs
```bash
nvidia-smi
# Expected: 8*B300 / 8*H200, driver ≥ 570, CUDA ≥ 12.8
```
***
## 3. Download Model Weights
This could take 40\~60 minutes depends on which version you choose.
{% hint style="warning" %}
Always download to `/home/ubuntu/models/` — the pod runs as the `ubuntu` user and **cannot write to `/root/`**.
{% endhint %}
```bash
mkdir -p /home/ubuntu/models
```
> **Run downloads inside tmux** — SSH disconnects will kill the process otherwise.\
> `hf download` supports resume: if interrupted, just re-run the same command and it will skip already-completed files. If you see `Still waiting to acquire lock`, a previous process is still running — find and kill it first with `pkill -f "hf download"`, then delete lock files with `find /home/ubuntu/models -name "*.lock" -delete`.
{% tabs %}
{% tab title="V4-Flash" %}
#### Option A — V4-Flash (\~146GB, FP4+FP8)
```bash
tmux new-session -d -s download \
"hf download deepseek-ai/DeepSeek-V4-Flash \
--local-dir /home/ubuntu/models/deepseek-v4-flash \
--token $HF_TOKEN"
tmux attach -t download
# ~10–20 min on datacenter uplink
```
{% endtab %}
{% tab title="V4-Pro" %}
#### Option B — V4-Pro (\~960GB, FP4+FP8)
```bash
tmux new-session -d -s download \
"hf download deepseek-ai/DeepSeek-V4-Pro \
--local-dir /home/ubuntu/models/deepseek-v4-pro \
--token $HF_TOKEN"
tmux attach -t download
# 2–4 hours — do not close the terminal
```
Monitor progress in a second window:
```bash
# Open a new SSH session or tmux pane, then:
watch -n 10 "du -sh /home/ubuntu/models/deepseek-v4-pro"
```
Verify completion:
```bash
ls /home/ubuntu/models/deepseek-v4-pro | wc -l # expect: 92 files
ls /home/ubuntu/models/deepseek-v4-pro/config.json # must exist
```
{% endtab %}
{% endtabs %}
***
## 4. Launch SGLang
Decide which image to use based on what GPUs you chose:
> Chart from
**Key points for H200 :**
* Use image `lmsysorg/sglang:deepseek-v4-hopper`
* Use official `deepseek-ai/` checkpoints (native FP4+FP8)
* Enable `--moe-runner-backend flashinfer_mxfp4` for FP4 expert kernel
* Mount model as `-v /home/ubuntu/models/:/workspace/model` and pass `--model-path /workspace/model`
* Always use `sudo docker` in our virtual machine
{% tabs %}
{% tab title="V4-Flash" %}
#### 4a. V4-Flash on 8× H200
```bash
sudo docker run -d --gpus all \
--shm-size 32g \
--ipc=host \
-p 8000:8000 \
-e HF_TOKEN=$HF_TOKEN \
-e SGLANG_DSV4_FP4_EXPERTS=0 \
-e PYTORCH_ALLOC_CONF=expandable_segments:True \
-v /home/ubuntu/models/deepseek-v4-flash-fp8:/workspace/model \
lmsysorg/sglang:deepseek-v4-hopper \
python3 -m sglang.launch_server \
--model-path /workspace/model \
--served-model-name deepseek-v4-flash \
--tp 8 \
--host 0.0.0.0 \
--port 8000 \
--trust-remote-code \
--mem-fraction-static 0.85 \
--context-length 131072 \
--speculative-algo EAGLE \
--speculative-num-steps 3 \
--speculative-eagle-topk 1 \
--speculative-num-draft-tokens 4 \
--chunked-prefill-size 4096 \
--disable-flashinfer-autotune
```
{% endtab %}
{% tab title="V4-Pro" %}
#### 4b. V4-Pro on 8× H200
```bash
sudo docker run -d --gpus all \
--shm-size 64g \
--ipc=host \
-p 8000:8000 \
-e HF_TOKEN=$HF_TOKEN \
-e SGLANG_DSV4_FP4_EXPERTS=0 \
-e PYTORCH_ALLOC_CONF=expandable_segments:True \
-v /home/ubuntu/models/deepseek-v4-pro-fp8:/workspace/model \
lmsysorg/sglang:deepseek-v4-hopper \
python3 -m sglang.launch_server \
--model-path /workspace/model \
--served-model-name deepseek-v4-pro \
--tp 8 \
--host 0.0.0.0 \
--port 8000 \
--trust-remote-code \
--mem-fraction-static 0.75 \
--context-length 32768 \
--speculative-algo EAGLE \
--speculative-num-steps 3 \
--speculative-eagle-topk 1 \
--speculative-num-draft-tokens 4 \
--chunked-prefill-size 4096 \
--disable-flashinfer-autotune
```
> Start with `--context-length` 131072 (128K). Once confirmed working, increase to `262144` or higher if `nvidia-smi` shows headroom.
> {% endtab %}
> {% endtabs %}
### Watch startup logs
```bash
sudo docker logs -f $(sudo docker ps -q)
# Startup takes 5–10 min (model loading + JIT kernel compilation)
# Ready when you see: "The server is fired up and ready to roll!"
```
### Health check
```bash
curl http://:8000/v1/models
# {"object":"list","data":[{"id":"deepseek-v4-pro",...}]}
```
### Basic inference
```bash
curl http://:8000/v1/chat/completions \
-H "Content-Type: application/json" \
-d '{
"model": "deepseek-v4-pro",
"messages": [{"role": "user", "content": "Hello, what model are you?"}],
"max_tokens": 256,
"temperature": 1.0,
"top_p": 1.0
}'
```
> **Always use `temperature=1.0, top_p=1.0`** — DeepSeek officially recommends these for V4. Lowering temperature degrades reasoning quality on MoE architectures.
### Python client
```python
from openai import OpenAI
client = OpenAI(
base_url="http://localhost:8000/v1",
api_key="EMPTY"
)
response = client.chat.completions.create(
model="deepseek-v4-pro",
messages=[{"role": "user", "content": "Write a Python function to merge two sorted lists."}],
max_tokens=1024,
temperature=1.0,
top_p=1.0
)
print(response.choices[0].message.content)
```
***
## 6. Enabling Thinking Mode
V4 has three reasoning levels: **Non-think**, **Think High**, **Think Max**.
```python
from openai import OpenAI
client = OpenAI(base_url="http://localhost:8000/v1", api_key="EMPTY")
# Think High (recommended for most tasks)
response = client.chat.completions.create(
model="deepseek-v4-pro",
messages=[{"role": "user", "content": "Prove that sqrt(2) is irrational."}],
max_tokens=8192,
temperature=1.0,
top_p=1.0,
extra_body={"chat_template_kwargs": {"thinking": True}}
)
if hasattr(response.choices[0].message, "reasoning_content"):
print("=== Thinking ===")
print(response.choices[0].message.reasoning_content)
print("=== Answer ===")
print(response.choices[0].message.content)
```
> **Think Max** requires `--context-length` ≥ 384K. Achievable on 8× B200 with Flash; for Pro use Think High (128K) until you've confirmed stable operation.
### Streaming with thinking
```python
response = client.chat.completions.create(
model="deepseek-v4-pro",
messages=[{"role": "user", "content": "What is 15% of 240?"}],
max_tokens=2048,
extra_body={"chat_template_kwargs": {"thinking": True}},
stream=True,
)
thinking_started = False
for chunk in response:
if not chunk.choices:
continue
delta = chunk.choices[0].delta
if getattr(delta, "reasoning_content", None):
if not thinking_started:
print("=== Thinking ===", flush=True)
thinking_started = True
print(delta.reasoning_content, end="", flush=True)
if delta.content:
if thinking_started:
print("\n=== Answer ===", flush=True)
thinking_started = False
print(delta.content, end="", flush=True)
```
***
## Summary Cheat Sheet
```
Hardware: 8*B300(native) /8*H200
Image: lmsysorg/sglang:deepseek-v4-blackwell
Docker: always sudo docker (not docker)
Models: /home/ubuntu/models/ (not /root/)
Mount: -v /home/ubuntu/models/:/workspace/model
Path flag: --model-path /workspace/model
Flash: deepseek-ai/DeepSeek-V4-Flash ~146GB --tp 8 512K+ context
Pro: deepseek-ai/DeepSeek-V4-Pro ~960GB --tp 8 128K→1M context
MoE flag: --moe-runner-backend flashinfer_mxfp4 ← required on B300
Sampling: temperature=1.0 top_p=1.0
Download: hf download deepseek-ai/ --local-dir /home/ubuntu/models/ --token $HF_TOKEN
Resume: pkill -f "hf download" && find /home/ubuntu/models -name "*.lock" -delete && re-run
```
***
*References:* [*SGLang DeepSeek-V4 Docs*](https://docs.sglang.io/cookbook/autoregressive/DeepSeek/DeepSeek-V4) *·* [*LMSYS Day-0 Blog*](https://www.lmsys.org/blog/2026-04-25-deepseek-v4/) *·* [*Yotta Labs Pod Docs*](https://docs.yottalabs.ai/products/gpu-pods)
# Image & Video Generation
# Generating Images with Z-Image Model Quickstart
### Prerequisite:
Create a pod with our Pytorch 2.9.0 template.
{% stepper %}
{% step %}
#### Install Dependencies
Make sure your jupyter notebook is located in `/workspace`
```bash
!git clone https://github.com/Tongyi-MAI/Z-Image.git
%pip install -e ./Z-Image
!pwd #This should give an outcome like: /workspace
```
{% endstep %}
{% step %}
#### See an example of inference code
You will find an example file at `workspace/Z-Image/inference.py`
Let's break it down and find out what it's doing!:face\_with\_monocle:
```python
import torch
from diffusers import ZImagePipeline
```
These bring in tools that helps computers work with AI models, especially for AI image generation.
```python
print("Loading Z-Image-Turbo model...")
pipe = ZImagePipeline.from_pretrained(
"Tongyi-MAI/Z-Image-Turbo",
torch_dtype=torch.bfloat16,
low_cpu_mem_usage=False,
)
pipe.to("cuda")
print("Model loaded successfully!")
```
* `ZImagePipeline.from_pretrained()` - Loads the pre-trained model weights from the Hugging Face repository
* `"Tongyi-MAI/Z-Image-Turbo"` - The model identifier/checkpoint location
* `torch_dtype=torch.bfloat16` - Uses bfloat16 precision for reduced memory footprint while maintaining numerical stability
* `low_cpu_mem_usage=False` - Disables CPU memory optimization, prioritizing loading speed
* `pipe.to("cuda")` - Transfers the model to GPU memory for hardware-accelerated inference
Basically, this part loads the model architecture and weights, then deploying it to the GPU for efficient processing
***
```python
prompt = "Young Chinese woman in red Hanfu, intricate embroidery..."
```
This prompt tells the model what kind of image we want to generate.
```python
print("Generating image...")
image = pipe(
prompt=prompt,
height=1024,
width=1024,
num_inference_steps=9,
guidance_scale=0.0,
generator=torch.Generator("cuda").manual_seed(42),
).images[0]
```
* `pipe()` - Executes the diffusion process with specified parameters
* `prompt=prompt` - Text conditioning input
* `height=1024, width=1024` - Output resolution (how big the generate image will be )
* `num_inference_steps=9` - Number of denoising iterations
* `guidance_scale=0.0` - Classifier-free guidance weight; set to 0 for distilled Turbo models
* `generator=torch.Generator("cuda").manual_seed(42)` - Ensures reproducibility by controlling the random number generation with a fixed seed of 42
* `.images[0]` - Extracts the first (and only) generated image from the batch
{% hint style="info" %}
Z-image Turbo models are optimized for denoising steps as few as 8 :tada:
{% endhint %}
This part runs the generative model through its diffusion process to synthesize an image matching your prompt.
***
```python
image.save("example.png")
print("Image saved as 'example.png'!")
```
Writes the generated image tensor to disk as a PNG file.
{% endstep %}
{% step %}
#### Run Inference
In our notebook, run:
```bash
!python Z-Image/inference.py
```
Now we successfully get an image named `example.png` generated by Z-image!
{% endstep %}
{% step %}
#### More to see: batch inference generation
If you look closer, you may find another file named `batch_inference.py` in Z-image repository.
Let's break down this batch inference script that generates multiple images from **a list of prompts**! 🎨
```python
import os
from pathlib import Path
import time
import torch
from inference import ensure_weights
from utils import AttentionBackend, load_from_local_dir, set_attention_backend
from zimage import generate
```
* `os` and `Path` - For file and directory operations
* `time` - To measure how long each image takes to generate
* `torch` - PyTorch for tensor operations and device management
* Custom imports from the Z-Image project:
* `ensure_weights` - Downloads model weights if needed
* `AttentionBackend` and related - Manages different attention computation methods
* `generate` - The core image generation function
```python
def read_prompts(path: str) -> list[str]:
"""Read prompts from a text file (one per line, empty lines skipped)."""
prompt_path = Path(path)
if not prompt_path.exists():
raise FileNotFoundError(f"Prompt file not found: {prompt_path}")
with prompt_path.open("r", encoding="utf-8") as f:
prompts = [line.strip() for line in f if line.strip()]
if not prompts:
raise ValueError(f"No prompts found in {prompt_path}")
return prompts
PROMPTS = read_prompts(os.environ.get("PROMPTS_FILE", "prompts/prompt1.txt"))
```
* `read_prompts()` - Reads a text file where each line is a prompt
* Skips empty lines
* Strips whitespace from each line
* Validates that the file exists and contains prompts
* `PROMPTS` - Loads prompts from a file specified by the `PROMPTS_FILE` environment variable, defaulting to `"prompts/prompt1.txt"`
**Example prompts.txt:**
```
A serene mountain landscape at sunset
Futuristic city with flying cars
Portrait of a wise old wizard
```
***
```python
def slugify(text: str, max_len: int = 60) -> str:
"""Create a filesystem-safe slug from the prompt."""
slug = "".join(ch.lower() if ch.isalnum() else "-" for ch in text)
slug = "-".join(part for part in slug.split("-") if part)
return slug[:max_len].rstrip("-") or "prompt"
```
* Converts prompts into safe filenames by:
* Converting to lowercase
* Replacing non-alphanumeric characters with hyphens
* Removing consecutive hyphens
* Limiting to 60 characters
**Example:**
* Input: `"A serene mountain landscape at sunset!"`
* Output: `"a-serene-mountain-landscape-at-sunset"`
***
```python
def select_device() -> str:
"""Choose the best available device without repeating detection logic."""
if torch.cuda.is_available():
print("Chosen device: cuda")
return "cuda"
try:
import torch_xla.core.xla_model as xm
device = xm.xla_device()
print("Chosen device: tpu")
return device
except (ImportError, RuntimeError):
if torch.backends.mps.is_available():
print("Chosen device: mps")
return "mps"
print("Chosen device: cpu")
return "cpu"
```
* Automatically detects and selects the best available hardware in priority order:
1. **CUDA** (NVIDIA GPU) - Fastest option
2. **TPU** (Google Tensor Processing Unit) - For cloud environments
3. **MPS** (Apple Metal Performance Shaders) - For Mac M1/M2/M3
4. **CPU** - Fallback option (slowest)
***
```python
def main():
model_path = ensure_weights("ckpts/Z-Image-Turbo")
dtype = torch.bfloat16
compile = False
height = 1024
width = 1024
num_inference_steps = 8
guidance_scale = 0.0
attn_backend = os.environ.get("ZIMAGE_ATTENTION", "_native_flash")
output_dir = Path("outputs")
output_dir.mkdir(exist_ok=True)
```
* **Model setup:**
* `ensure_weights()` - Downloads model if not present, returns path
* `dtype = torch.bfloat16` - Memory-efficient precision
* `compile = False` - Disables PyTorch 2.0 compilation (can enable for speed)
* **Generation parameters:**
* `height/width = 1024` - Square 1K resolution
* `num_inference_steps = 8` - Optimized for Turbo model
* `guidance_scale = 0.0` - Required for Turbo (guidance pre-baked)
* **Backend configuration:**
* `attn_backend` - Attention mechanism (Flash Attention by default)
* `output_dir` - Creates "outputs" folder for saving images
***
```python
device = select_device()
components = load_from_local_dir(model_path, device=device, dtype=dtype, compile=compile)
AttentionBackend.print_available_backends()
set_attention_backend(attn_backend)
print(f"Chosen attention backend: {attn_backend}")
```
* Selects the optimal device (GPU/TPU/CPU)
* Loads all model components (transformer, VAE, text encoder, etc.)
* Configures attention backend for performance optimization
* Flash Attention is faster and more memory-efficient than standard attention
***
```python
for idx, prompt in enumerate(PROMPTS, start=1):
output_path = output_dir / f"prompt-{idx:02d}-{slugify(prompt)}.png"
seed = 42 + idx - 1
generator = torch.Generator(device).manual_seed(seed)
start_time = time.time()
images = generate(
prompt=prompt,
**components,
height=height,
width=width,
num_inference_steps=num_inference_steps,
guidance_scale=guidance_scale,
generator=generator,
)
elapsed = time.time() - start_time
images[0].save(output_path)
print(f"[{idx}/{len(PROMPTS)}] Saved {output_path} in {elapsed:.2f} seconds")
print("Done.")
```
{% endstep %}
{% step %}
#### **Run the batch inference script**
```bash
!python Z-Image/batch_inference.py
```
{% endstep %}
{% endstepper %}
***
### 🎨 Customizing Your Generation
#### Change Image Size
```python
image = pipe(
prompt=prompt,
height=768, # Adjust height
width=768, # Adjust width
...
).images[0]
```
#### Adjust Quality vs Speed
```python
# Faster generation (lower quality)
num_inference_steps=5
# Higher quality (slower generation)
num_inference_steps=15
```
#### Use Different Seeds
```python
# For reproducible results
generator=torch.Generator("cuda").manual_seed(42)
# For random results
generator=torch.Generator("cuda").manual_seed(torch.randint(0, 1000000, (1,)).item())
```
# Generate Product Images with Wan2.1/2.2
### :clapper:About Wan 2.2 & 2.1
**Wan** is a family of AI models designed for visual content generation and manipulation.
**Wan 2.1 is...**
* First-generation image-to-video (I2V) model
* Foundational capabilities for static-to-animated content
* Suitable for basic video generation tasks
Enter **Wan 2.2 Animate** — and this is where things get really exciting. With a **14 billion parameters** under the hood, this model is significantly more powerful and nuanced than its predecessor.
**What makes it special?**
It offers dual noise modes that give you creative control: high noise when you want imaginative, artistic variations, and low noise when you need faithful, precise reproduction of your source material.
The model has been optimized with FP8 precision, keeping it efficient at around 28GB while maintaining exceptional quality. And if you're in a hurry, the LightX2V LoRA acceleration can deliver results in just 4 steps — that's roughly 10 times faster than traditional approaches.
***
### Quick Guide
{% stepper %}
{% step %}
#### Select Template
Choose the **"Swap Product in Character's Hand"** template from the available options.
This template is pre-configured with optimized prompts for product replacement tasks.
{% endstep %}
{% step %}
#### Upload Images
Click **"Choose file to upload"** and add two images:
**First image**: Model/scene photo showing a person holding an object
**Second image**: Product photo you want to swap in
{% hint style="info" %}
Use clear, well-lit images
Product images work best with clean backgrounds
Match angles between images for natural results
{% endhint %}
{% endstep %}
{% step %}
#### Configure Node Settings
Review the node configuration on the right side:
**Inputs:**
* `images` — Your two uploaded images
* `files` — Optional file paths (leave blank for basic use)
**Prompt:**
```
Swap the product the subject is holding in image 1 with the product in image 2.
```
**Key Settings:**
* **model**: `gemini-3-pro-image-preview` — Latest Gemini vision model
* **seed**: `100368110105407` — For reproducible results
* **control after generate**: `randomize` — New variation each run
* **aspect\_ratio**: `auto` — Match input image proportions
* **resolution**: `2K` — High quality output
* **response\_modalities**: `IMAGE+TEXT` — Get both image and description
**System Prompt:**
```markdown
You are an expert image-generation engine. You must ALWAYS produce an image.
Interpret all user input—regardless of format, intent, or abstraction—as literal
visual directives for image composition. If a prompt is conversational or lacks
specific visual details, you must creatively invent a concrete visual scenario
that depicts the concept. Prioritize generating the visual representation above
any text, formatting, or conversational requests.
```
{% endstep %}
{% step %}
#### Run and Generate
Click the **"Run"** button and wait 10-30 seconds for processing.
**What happens:**
* AI analyzes the scene and identifies the object
* Extracts product from second image
* Generates new image with natural lighting and shadows
**Review results:**
* Check hand positioning and product placement
* Verify lighting and shadows look realistic
* Re-run with randomized seed for variations
{% endstep %}
{% endstepper %}
### Have fun generating :tada:
# Image Generation with FLUX.1-dev
We are currently working on this page to provide you with the best experience. Full content will be available shortly.
# Video Generation with ComfyUI
## Introduction
In this guide, you will gain hands-on experience generating an **AI video** inspired by the **Stranger Things** universe. We’ll guide you step-by-step through the process of creating a video using a single image of **Max** and transforming it into a dynamic video sequence. Let’s get started!
***
### Step 1: **Platform Access and GPU Instance Creation**
1. **Navigate to Pods**:
* On the left sidebar, you’ll find various options. For this task, click on **Pods**. A **Pod** is essentially a container for your AI task where GPUs are rented for processing.
2. **Create a New Pod**:
* Click on **Deploy** to create a new Pod for your task.
* In the list of available GPUs, select your favourite GPU.
* Enter a **project name**.
3. **Choose Template**:
* From the list of available templates, select **Comfy UI**. This template is pre-configured with the necessary software for video generation, making the setup process easier.
4. **Set Up Storage**:
* In this step, you will define the storage options for your project:
* **Image Source**: Select where your input image will come from (local upload or cloud storage).
* **Container Storage**: Temporary space for storing intermediate files during the task.
* **Persistent Storage**: Long-term storage for final video files, checkpoints, and data that should persist even after the container stops.
5. **Deploy and Wait**:
* Click **Deploy**, and wait for the Pod’s status to change to **Running**. This typically takes 30-90 seconds, depending on the GPU and image size.
* Once the status changes to **Running**, you’re ready to proceed to the next step.
***
### Step 2: **Navigating to Comfy UI**
1. **Launch Comfy UI**:
* Once your Pod is ready, click on **Launch Comfy UI**. This will take you to the **Comfy UI** visual interface, where the AI video generation process happens.
2. **Select Model for Video Generation**:
* In the Comfy UI interface, you’ll see several mainstream models. Since we want to generate a video from a single image, choose the **ByteDance Image-to-Video model**. This model is specifically designed for creating dynamic videos from still images, like the one you’ll be using for **Max**.
***
### Step 3: **Setting Up the Workflow in Comfy UI**
The workflow interface in Comfy UI is based on a node system, where each block represents a step in the video generation pipeline.
1. **Load Image**:
* The **Load Image** node allows you to upload your input image. This image will be the starting point for the video generation process.
* **Upload** the image of **2017 Max vs. 2025 Max**.
2. **Image to Video**:
* This is the core node of the workflow. It takes the input image and creates the video by adding motion and visual effects.
* **Model Select**: Choose the **ByteDance model** for video generation.
* **Prompt Box**: Describe the video and how the subject should look or move (e.g., **“Max Mayfield from Stranger Things, looking determined, subtle smile, wind blowing her hair, cinematic lighting, 8K ultra-detailed”**).
* **Resolution**: Set the resolution of the video. For this example, set it to **1024×576** (16:9 aspect ratio) to match most video platforms.
* **Aspect Ratio**: This will be automatically set to match the input image’s aspect ratio to avoid any distortion.
* **Duration**: Set the duration of the video. For this task, set it to **2 seconds** (with a frame rate of 16 fps, resulting in 32 frames).
* **Seed**: Set a seed value to control the randomness of the output. For reproducible results, use a fixed number (e.g., **12345**).
* **Control after Generate**: Enable this option if you want the seed to change automatically after each run, providing more variability.
* **Camera Fixed**: Decide whether the camera should stay still or allow slight movement (e.g., panning, zooming). For this task, you might want to keep the camera **fixed**.
* **Watermark**: Decide if you want a watermark in your video. For non-commercial use, it’s fine to leave it enabled. If you need it removed, you can request it from the platform’s settings.
***
### Step 4: **Generate the Video**
1. **Run the Generation**:
* Once you’ve configured the prompt and all settings, click **Run**.
* The system will process the image and generate the video based on your input. Wait for the progress bar in the top right corner to turn **green**, which indicates the process is complete.
1. **Download the Video**:
* Once the video is generated, it will automatically be saved in **Persistent Storage** under the `/output` directory.
# Video Generation with ComfyUI-nunchaku
We are currently working on this page to provide you with the best experience. Full content will be available shortly.
# Quant-VideoGen on RTX 5090
**Based on** *Quant-VideoGen:Auto-Regressive Long Video Generation via 2-Bit KV-Cache Quantization* by Xi et al. (2026).
**ArXiv Link:**
**GitHub:** [svg-project/Quant-VideoGen](https://github.com/svg-project/Quant-VideoGen)
### Why Quant VideoGen?
Autoregressive video generation models face a critical memory bottleneck that severely limits long video synthesis.
Picture this: generating just 5 seconds of 480p video demands approximately 34GB of memory for KV cache storage alone—already exceeding what a single RTX 5090 can handle.
Why is this such a problem? These models generate frames sequentially, and here's the catch: *each new frame must maintain complete references to all previously generated frames*. This means memory consumption grows linearly with every additional frame added, quickly overwhelming even the most powerful consumer hardware.
However,there is an improvement we can apply--quantization. While quantization for videos are very different from textual ones.
**Quantization in Text Models (Why It Works):**
Traditional quantization works straightforwardly. In text models like BERT, KV cache values are distributed **uniformly**. For example:
```
Sentence: "The cat is on the mat"
Token 1 (The): [-0.5, 0.3, 1.2, -0.8, 0.6, ...]
Token 2 (cat): [-0.4, 0.2, 1.1, -0.7, 0.5, ...]
Token 3 (is): [-0.6, 0.4, 1.3, -0.9, 0.7, ...]
...
Observation: All values stay within [-1, 1.5]—nicely uniform!
```
**Why does it work for text?**
Because the value range is fixed and uniform across all tokens—no extreme outliers, all tokens treated equally.
***
**Quantization in Video Models (Why It Fails):**
Video KV cache exhibits **wildly non-uniform** value distributions. Within a single frame:
```
Static background (sky): [0.1, 0.05, -0.02, 0.08, ...]
High-contrast edges (objects): [50.2, 48.9, 52.1, 49.5, ...]
Fast-moving regions: [1200.5, 1150.2, 1300.1, ...]
Result: Value range spans from 0.05 to 1300—a 26,000× difference!
```
Applying traditional text quantization causes **catastrophic failure**:
```
1. min = 0.05, max = 1300
2. Scale factor = (1300 - 0.05) / 255 ≈ 5.09
Quantizing background value 0.1:
(0.1 - 0.05) / 5.09 ≈ 0.01 → rounds to 0 (8-bit integer)
Dequantization: 0 * 5.09 + 0.05 = 0.05
Original was 0.1, now we get 0.05 → 50% precision loss!
Quantizing motion value 1200:
(1200 - 0.05) / 5.09 ≈ 236 (acceptable)
Dequantization: 236 * 5.09 + 0.05 ≈ 1201 (reasonable)
```
**The root cause:** Because of the extreme outlier (1300), the entire quantization range stretches to accommodate it. This forces most normal values (0.1-50 range) into coarse bins, destroying precision.
```
Text Model KV Cache Distribution (Uniform):
━━━━━━━━━━━━━━━━━━
-1 0 1.5
▁▂▃▄▅▆▇█▇▆▅▄▃▂▁
→ 8-bit quantization allocates resolution fairly to all values
Video Model KV Cache Distribution (Extremely Non-Uniform):
━┃━━━━━━━━━━━━━━━━━┃━━━━━━━━━━━━━━━
0.05 50 1300
▂▁▁▁▁░░░░░░░░░░░░░░░░░░░░░░░░░▂▃▄▅▆▇█
↑ Massive concentration here ↑ Single outlier
→ 8-bit quantization wastes resolution on sparse outliers,
leaving dense regions with almost no precision!
```
To address this challenge, researchers from UC Berkeley, MIT, NVIDIA, Amazon, and University of Texas at Austin introduce Quant VideoGen, an innovative framework that exploits the inherent spatial-temporal redundancy in video content. The key insight is that adjacent video frames and spatially nearby regions exhibit high similarity, enabling aggressive compression.
The solution comprises two main components:
(1) **Semantic-Aware Smoothing** groups similar tokens using k-means clustering, quantizing residuals relative to cluster centroids rather than raw values. This reduces key cache quantization error by 6.9× and value cache error by 2.6×.
(2) **Progressive Residual Quantization** applies the smoothing process iteratively across multiple stages, capturing semantic information at different granularities while maintaining uniform value distributions suitable for low-precision quantization.
Experimental results demonstrate exceptional performance across multiple state-of-the-art models (LongCat-Video, HY-WorldPlay, Self-Forcing). QVG achieves 6.94-7.05× compression ratios while maintaining near-lossless visual quality (PSNR >28.7). Crucially, end-to-end latency overhead remains below 4%, making the approach practical for real applications.
This breakthrough dramatically lowers hardware barriers—enabling long video generation on consumer-grade GPUs that previously required enterprise-level hardware, while maintaining sub-4% performance overhead.
### **How to run Quant-VideoGen on a single RTX 5090**
### Prerequisites
* A [Yotta Labs](https://www.yottalabs.ai/) account with sufficient credits
* A [Hugging Face](https://huggingface.co/) account and access token (`HF_TOKEN`)
* Familiarity with basic Python and terminal commands
* 🐱 **LongCat-Video** — best starting point, smallest VRAM footprint
* ⚡ **Self-Forcing** — streaming video generation
* 🌍 **HY-WorldPlay** — world model video generation
| Model | BF16 Total KV | INT2 Total KV | Compression |
| ------------- | ------------- | ------------- | ----------- |
| LongCat-Video | 22,272 MB | 3,231 MB | **6.9×** |
| Self-Forcing | 46,073 MB | 6,614 MB | **7.0×** |
| HY-WorldPlay | 29,700 MB | 4,235 MB | **7.0×** |
> **Why RTX 5090?** Self-Forcing's BF16 KV cache alone requires \~46 GB — impossible on a single 32 GB GPU. QVG brings it down to \~6.6 GB, making long video generation fully feasible on RTX 5090.
**Resources:** [GitHub](https://github.com/svg-project/Quant-VideoGen) · [Project Page](https://svg-project.github.io/qvg/) · [arXiv](https://arxiv.org/abs/2602.02958)
***
### Prerequisites
* A [Yotta Labs](https://www.yottalabs.ai/) account with sufficient credits
* A [Hugging Face](https://huggingface.co/) account and access token with read permissions
* Basic familiarity with Python and the terminal
#### GPU Requirements
| GPU | VRAM | Notes |
| ------------ | --------- | --------------------------------- |
| **RTX 5090** | **32 GB** | ✅ Recommended on Yotta Labs |
| RTX 4090 | 24 GB | Feasible for LongCat-Video only |
| H100 / A100 | 80 GB | Can run BF16 baseline without QVG |
***
### Step 1 — Deploy a Pod
1. Log in to the [Yotta Labs Console](https://console.yottalabs.ai/).
2. Navigate to **Compute → Pods** and click **Deploy**.
3. Select **RTX 5090** as the GPU.
4. Under **Pod Template**, choose `pytorch`.
5. Set **System Volume** to at least **150 GB** (checkpoints vary: LongCat \~15 GB, Self-Forcing \~30 GB, HY-WorldPlay \~25 GB).
6. Click **Deploy** and wait for the Pod to reach `Running` state.
***
### Step 2 — Open JupyterLab
1. Click **Connect** on the Pod card.
2. Click the link for **port 8888** to open JupyterLab.
3. Create a new notebook: **File → New → Notebook**, select the default kernel.
4. For steps marked **\[Terminal]**, open a terminal via **File → New → Terminal**.
> Steps below are clearly marked as either **\[Terminal]** or **\[Notebook Cell]**.
***
### Step 3 — Set Up the Environment
#### 3.1 — Clone the Repository
**\[Terminal]**
```bash
cd ~
git clone https://github.com/svg-project/Quant-VideoGen.git
```
#### 3.2 — Create a Conda Environment
```bash
#!/bin/bash
set -e
echo "📦 Initializing conda..."
conda init bash
source ~/.bashrc
conda create -n qvg python=3.12.9 -y
conda activate qvg
```
#### 3.3 — Install QVG and Dependencies
**\[Terminal]** — Run inside the `qvg` environment.
```bash
cd ~/Quant-VideoGen
pip install uv
pip install huggingface_hub # provides the huggingface-cli command
# Install QVG with all three backend extras
uv pip install -e ".[all]"
```
> If you only need one backend, install just that extra — e.g. `uv pip install -e ".[longcat]"`.
#### 3.4 — Install Flash Attention
```bash
uv pip install \
https://github.com/Dao-AILab/flash-attention/releases/download/v2.8.3/flash_attn-2.8.3+cu12torch2.8cxx11abiFALSE-cp312-cp312-linux_x86_64.whl
```
> If this wheel doesn't match your environment, check your versions first:
>
> ```bash
> python -c "import torch; print(torch.__version__, torch.version.cuda)"
> ```
>
> Then find the matching wheel at the [flash-attention releases page](https://github.com/Dao-AILab/flash-attention/releases).
***
### Step 4 — Download Model Checkpoints
When downloading check points, the official repository provides three choices: LongCat-video, Self- forcing and HY-WorldPlay.
Quant-VideoGen supports three backends with very different hardware requirements.
1. **Self-Forcing** is the most lightweight option, built on Wan2.1-T2V-1.3B (\~5 GB of weights), and runs comfortably on a single RTX 5090 (32 GB VRAM).
2. **HY-WorldPlay** uses a mid-sized model (\~25 GB of weights) and fits within a single RTX 5090 with QVG INT2 quantization applied to the KV cache.
3. **LongCat-Video** is the most memory-intensive backend — it uses Mistral-Small-24B as its text encoder (22 GB) paired with a large DiT (51 GB), totaling \~83 GB of model weights. Since QVG only quantizes the inference-time KV cache and not the model weights themselves, LongCat-Video cannot be loaded onto a single 32 GB GPU regardless of quantization settings. It requires at least **2×H200 (160 GB total VRAM)** to run.
**We start from self-forcing video generation with Wan2.1-T2V-1.3B on a single RTX5090 GPU.**
| Backend | Model | Weights | Min GPU |
| ------------- | ----------------------- | ------- | ----------- |
| Self-Forcing | Wan2.1-T2V-1.3B + DMD | \~5 GB | 1× RTX 5090 |
| HY-WorldPlay | — | \~25 GB | 1× RTX 5090 |
| LongCat-Video | Mistral-Small-24B + DiT | \~83 GB | 2× H200 |
```bash
cd ~/Quant-VideoGen
export HF_TOKEN="your_token_here" # <-- replace with your HF token
bash scripts/Self-Forcing/download_models.sh
```
Verify the downloaded files:
```bash
du -sh ~/Quant-VideoGen/ckpts/Self-Forcing/*
```
Expected output :
```
17G /home/user/Quant-VideoGen/ckpts/Self-Forcing/Wan2.1-T2V-1.3B
5.3G /home/user/Quant-VideoGen/ckpts/Self-Forcing/self_forcing_dmd.pt
```
***
### Step 5 — Run Video Generation
```bash
cd ~/Quant-VideoGen
bash scripts/Self-Forcing/run_qvg.sh
```
Output videos are saved to `~/Quant-VideoGen/results/`.
***
### Step 6 — View Output Videos
**\[ In Notebook cell ]**
```python
import glob, os
from IPython.display import Video, display
results_dir = os.path.expanduser("~/Quant-VideoGen/results")
videos = sorted(glob.glob(f"{results_dir}/**/*.mp4", recursive=True))
if not videos:
print("No output videos found yet. Run a generation cell above first.")
else:
for v in videos:
print(f"📹 {v}")
display(Video(v, embed=True, width=640))
```
***
### Step 7 — Want to Customize Quantization Settings?
Quantization options are defined inside each `run_qvg.sh` script. Key parameters:
| Parameter | Default | Description |
| --------------- | ---------------------------- | --------------------------------------------------------------- |
| `quant_method` | `triton-nstages-kmeans-int2` | Quantization algorithm. INT2 gives \~7× compression. |
| `block_size` | `64` | Token block size. Smaller = finer-grained but slower. |
| `num_centroids` | `256` | K-means centroids. More = better quality, slightly more memory. |
***
## Larger model & Further explorations
> **GPU Requirements**
>
> * **LongCat-Video** — requires **2× H200** (model weights total \~83 GB: Mistral-Small-24B text encoder + large DiT)
> * **HY-WorldPlay** — runs on a **single RTX 5090** (32 GB); uses `--offload_text_encoder` to stay within VRAM budget
***
### LongCat-Video (2× H200)
LongCat-Video generates long videos auto-regressively by extending from an initial base clip. The workflow has three sequential steps: generate a base clip → extend with BF16 → extend with QVG INT2 quantization.
#### Step 1 — Download Checkpoints
```bash
cd ~/Quant-VideoGen
huggingface-cli download meituan-longcat/LongCat-Video \
--local-dir ckpts/LongCat-Video \
--token $HF_TOKEN
```
Verify:
```bash
du -sh ~/Quant-VideoGen/ckpts/LongCat-Video/*
```
#### Step 2 — Generate Base Clip
The base clip (`results/longcat/base/1-0.mp4`) is required by both `run_bf16.sh` and `run_qvg.sh` as the starting frame. Always run this first.
```bash
cd ~/Quant-VideoGen
bash scripts/LongCat/base.sh
```
Confirm the output exists before proceeding:
```bash
ls results/longcat/base/
```
#### Step 3 — Extend with BF16 (quality reference)
```bash
bash scripts/LongCat/run_bf16.sh
```
Output: `results/longcat/bf16/`
#### Step 4 — Extend with QVG INT2 (recommended)
QVG reduces the KV cache by \~7× via 2-bit quantization, significantly cutting memory during the long auto-regressive extension.
```bash
bash scripts/LongCat/run_qvg.sh
```
Output: `results/longcat/triton-nstages-kmeans-int2_64/.../`
#### View Output in JupyterLab Notebook
Open a new notebook cell and run:
```python
import glob, os
from IPython.display import Video, display
#switch to the right directoty
import os
os.chdir('/home/user')
print(os.getcwd())
results_dir = os.path.expanduser("Quant-VideoGen/results/longcat")
videos = sorted(glob.glob(f"{results_dir}/**/*.mp4", recursive=True))
if not videos:
print("No output videos found.")
else:
for v in videos:
print(f"📹 {v}")
display(Video(v, embed=True, width=640))
```
***
### HY-WorldPlay (1× RTX 5090)
HY-WorldPlay is an image-to-video world model — it takes a single input image and a camera movement sequence (`--pose`) to generate a navigable video. It uses `--offload_text_encoder` to keep the text encoder on CPU and fit within 32 GB VRAM.
#### Step 1 — Download Checkpoints
```bash
cd ~/Quant-VideoGen
bash scripts/HY-WorldPlay/download_models.sh
```
Verify:
```bash
du -sh ~/Quant-VideoGen/ckpts/HY-WorldPlay/*
```
#### Step 2 — Run with QVG INT2 (recommended)
```bash
cd ~/Quant-VideoGen
bash scripts/HY-WorldPlay/run_qvg.sh
```
Output: `results/hyworldplay/triton-nstages-kmeans-int2_64/.../`
The default input image is `assets/hyworld.png` and the default prompt describes a stone arch bridge scene. To use your own image and prompt, edit the script directly:
```bash
nano scripts/HY-WorldPlay/run_qvg.sh
```
Change these two lines:
```bash
PROMPT='your prompt here'
IMAGE_PATH=path/to/your/image.png
```
You can also customize the camera trajectory via `--pose`. The default is:
```
w-8,s-8,a-8,d-8,up-8,down-8
```
Each entry is a direction followed by number of frames: `w` = forward, `s` = backward, `a` = left, `d` = right, `up` = tilt up, `down` = tilt down.
#### Step 3 — Run BF16 baseline (optional, quality comparison)
bash
```bash
bash scripts/HY-WorldPlay/run_bf16.sh
```
> Unlike LongCat, HY-WorldPlay does **not** require a base clip first — `run_bf16.sh` and `run_qvg.sh` are both standalone.
#### View Output in JupyterLab Notebook
```python
import glob, os
from IPython.display import Video, display
#switch to the right directoty
import os
os.chdir('/home/user')
print(os.getcwd())
results_dir = os.path.expanduser("Quant-VideoGen/results/hyworldplay")
videos = sorted(glob.glob(f"{results_dir}/**/*.mp4", recursive=True))
if not videos:
print("No output videos found.")
else:
for v in videos:
print(f"📹 {v}")
display(Video(v, embed=True, width=640))
```
***
Check one of our ouput files `segment_2`
{% file src="/files/U6VXpSY8ZQYSBh1r7na4" %}
### Troubleshooting
* **LongCat: `IndexError: list index out of range`** The base clip is missing. Run `bash scripts/LongCat/base.sh` first before running `run_bf16.sh` or `run_qvg.sh`.
* **LongCat: `CUDA out of memory` on H200** Make sure you have 2× H200. The model weights alone total \~83 GB and cannot be split across GPUs with the current single-process setup.
* **HY-WorldPlay: `CUDA out of memory` on RTX 5090** Confirm `--offload_text_encoder` is present in the script. Check with:
# Sparse-VideoGen on NVIDIA H200
Based on [Sparse VideoGen2 (Xi et al., NeurIPS 2025 Spotlight)](https://arxiv.org/abs/2505.18875).
Sparse VideoGen 2 (SVG2) is a training-free inference acceleration framework for video diffusion transformers. Rather than changing model weights, it exploits the inherent sparsity in 3D full attention — identifying which tokens actually matter via semantic-aware sparse attention and flash k-means clustering — to deliver roughly **2× end-to-end speedup** with minimal visual quality loss. It supports HunyuanVideo and Wan 2.1 (T2V and I2V), all of which fit on H200 GPU.
***
### Deploy a Pod
Log in to the [Yotta Labs Console](https://console.yottalabs.ai/), go to **Compute → Pods**, and deploy a new Pod with the following settings:
| Setting | Value |
| ------------- | --------------------- |
| GPU | H200 |
| Template | `pytorch` (CUDA 12.8) |
| System Volume | 150 GB minimum |
Once the Pod is `Running`, click **Connect** and open a terminal via **File → New → Terminal** in JupyterLab.
***
### Environment Setup
Clone the repo with `GIT_LFS_SKIP_SMUDGE=1` to skip the large demo assets:
```bash
cd ~
GIT_LFS_SKIP_SMUDGE=1 git clone https://github.com/svg-project/Sparse-VideoGen.git
cd ~/Sparse-VideoGen
```
Create the conda environment and install the base package. SVG2's `pyproject.toml` uses hatchling with editable installs, so `editables` needs to be present before anything else:
```bash
conda create -n SVG python=3.12.9 -y
conda activate SVG
python -m ensurepip --upgrade
python -m pip install --upgrade pip
pip install editables hatchling
pip install -e .
pip install flash-attn --no-build-isolation
```
Install the pinned versions of diffusers and transformers. SVG2 requires `diffusers==0.34.0`, and that version is only compatible with `transformers<5.0` — specifically `transformers==4.49.0`. Installing either package at the wrong version will cause import errors at runtime:
```bash
pip install "diffusers==0.34.0" "transformers==4.49.0"
```
Install the remaining runtime dependencies:
```bash
pip install termcolor imageio imageio-ffmpeg opencv-python einops \
sentencepiece protobuf accelerate
```
Pull down the git submodules. Cutlass is large so this may take a few minutes:
```bash
cd ~/Sparse-VideoGen
git submodule update --init --recursive
# Verify — all three should be populated
ls svg/kernels/3rdparty/
# Expected: cutlass flashinfer pybind
```
Build the customized attention kernels. The conda environment injects its own C++ compiler via `NVCC_PREPEND_FLAGS`, which breaks CUDA header detection — unset it and point cmake explicitly at the system CUDA installation before building:
```bash
export CUDA_HOME=/usr/local/cuda-12.8
export PATH=$CUDA_HOME/bin:$PATH
export LD_LIBRARY_PATH=$CUDA_HOME/lib64:$LD_LIBRARY_PATH
export CUDAHOSTCXX=/usr/bin/g++
unset NVCC_PREPEND_FLAGS
pip install -U setuptools cmake
cd ~/Sparse-VideoGen/svg/kernels
rm -rf build && mkdir -p build && cd build
cmake \
-DCMAKE_PREFIX_PATH="$(python -c 'import torch; print(torch.utils.cmake_prefix_path)')" \
-DCMAKE_CUDA_COMPILER=/usr/local/cuda-12.8/bin/nvcc \
-DCUDA_TOOLKIT_ROOT_DIR=/usr/local/cuda-12.8 \
-DCUDA_INCLUDE_DIRS=/usr/local/cuda-12.8/include \
-DUSE_SYSTEM_NVTX:BOOL=ON \
..
make -j$(nproc)
cd ~/Sparse-VideoGen
```
Install FlashInfer from the submodule. The correct path is `svg/kernels/3rdparty/flashinfer` — not `3rdparty/flashinfer` as listed in the upstream README:
```bash
cd ~/Sparse-VideoGen/svg/kernels/3rdparty/flashinfer
pip install --no-build-isolation --verbose --editable .
cd ~/Sparse-VideoGen
```
Finally, install cuVS:
```bash
pip install cuvs-cu12 --extra-index-url=https://pypi.nvidia.com
```
> You may see dependency conflict warnings about `cuda-toolkit` and `nvidia-nvjitlink-cu12` from `libcuvs`. These are warnings, not errors, and do not affect inference.
***
### Download Model Checkpoints
Set your Hugging Face token:
```bash
export HF_TOKEN="your_token_here"
```
**Wan 2.1 T2V** (\~54 GB). Use the official `Wan-AI` repo — other forks may have incompatible checkpoint formats:
```bash
hf download Wan-AI/Wan2.1-T2V-14B-Diffusers \
--local-dir ~/Sparse-VideoGen/ckpts/Wan2.1-T2V-720P \
--token $HF_TOKEN
```
Verify the transformer directory contains a shard index file:
```bash
ls ~/Sparse-VideoGen/ckpts/Wan2.1-T2V-720P/transformer/
# Should include: diffusion_pytorch_model.safetensors.index.json
```
**Wan 2.1 I2V**:
```bash
hf download Wan-AI/Wan2.1-I2V-14B-720P-Diffusers \
--local-dir ~/Sparse-VideoGen/ckpts/Wan2.1-I2V-720P \
--token $HF_TOKEN
```
**HunyuanVideo**:
```bash
hf download tencent/HunyuanVideo \
--local-dir ~/Sparse-VideoGen/ckpts/HunyuanVideo \
--token $HF_TOKEN
```
The inference scripts default to loading models directly from HuggingFace by repo ID. Update them to use your local paths instead:
```bash
sed -i 's|Wan-AI/Wan2.1-T2V-14B-Diffusers|/home/user/Sparse-VideoGen/ckpts/Wan2.1-T2V-720P|' \
~/Sparse-VideoGen/scripts/wan/wan_t2v_720p_sap.sh
sed -i 's|Wan-AI/Wan2.1-I2V-14B-720P-Diffusers|/home/user/Sparse-VideoGen/ckpts/Wan2.1-I2V-720P|' \
~/Sparse-VideoGen/scripts/wan/wan_i2v_720p_sap.sh
sed -i 's|tencent/HunyuanVideo|/home/user/Sparse-VideoGen/ckpts/HunyuanVideo|' \
~/Sparse-VideoGen/scripts/hyvideo/hyvideo_t2v_720p_sap.sh
```
Verify:
```bash
grep model_id ~/Sparse-VideoGen/scripts/wan/wan_t2v_720p_sap.sh
grep model_id ~/Sparse-VideoGen/scripts/wan/wan_i2v_720p_sap.sh
grep model_id ~/Sparse-VideoGen/scripts/hyvideo/hyvideo_t2v_720p_sap.sh
```
***
### Run Video Generation
The default prompt is loaded from `examples/1/prompt.txt`. Edit it to change the prompt, or change `prompt_id` in the script to use a different example. Always run from the project root.
**Wan 2.1 Text-to-Video:**
Default prompts:arrow\_down\_small:
```
==================== Prompts ====================
Prompt: warm colors dominate the room, with a focus on the tabby cat sitting contently in the center. the scene captures the fluffy orange tabby cat wearing a tiny virtual reality headset. the setting is a cozy living room, adorned with soft, warm lighting and a modern aesthetic. a plush sofa is visible in the background, along with a few lush potted plants, adding a touch of greenery. the cat's tail flicks curiously, as if engaging with an unseen virtual environment. its paws swipe at the air, indicating a playful and inquisitive nature, as it delves into the digital realm. the atmosphere is both whimsical and futuristic, highlighting the blend of analog and digital experiences.
Negative Prompt: Bright tones, overexposed, static, blurred details, subtitles, style, works, paintings, images, static, overall gray, worst quality, low quality, JPEG compression residue, ugly, incomplete, extra fingers, poorly drawn hands, poorly drawn faces, deformed, disfigured, misshapen limbs, fused fingers, still picture, messy background, three legs, many people in the background, walking backwards
```
```bash
cd ~/Sparse-VideoGen
bash scripts/wan/wan_t2v_720p_sap.sh
```
**Wan 2.1 Image-to-Video:**
Default prompts:arrow\_down\_small:
```
==================== Prompts ====================
Prompt: warm colors dominate the room, with a focus on the tabby cat sitting contently in the center. the scene captures the fluffy orange tabby cat wearing a tiny virtual reality headset. the setting is a cozy living room, adorned with soft, warm lighting and a modern aesthetic. a plush sofa is visible in the background, along with a few lush potted plants, adding a touch of greenery. the cat's tail flicks curiously, as if engaging with an unseen virtual environment. its paws swipe at the air, indicating a playful and inquisitive nature, as it delves into the digital realm. the atmosphere is both whimsical and futuristic, highlighting the blend of analog and digital experiences.
Negative Prompt: Bright tones, overexposed, static, blurred details, subtitles, style, works, paintings, imag
```
```bash
cd ~/Sparse-VideoGen
bash scripts/wan/wan_i2v_720p_sap.sh
```
**HunyuanVideo Text-to-Video:**
Default prompts:arrow\_down\_small:
```
==================== Prompts ====================
A plush teddy bear, with soft brown fur and a red bow tie, sits on a lush green lawn under a bright, sunny sky. Nearby, a vibrant blue frisbee lies on the grass, hinting at playful moments. The scene transitions to the teddy bear being gently tossed into the air, its limbs flailing joyfully, as the frisbee soars in the background. The bear lands softly, surrounded by daisies, while the frisbee spins to a stop beside it. Finally, the teddy bear is propped up against a tree trunk, holding the frisbee in its lap, creating a heartwarming image of companionship and play.
```
```bash
cd ~/Sparse-VideoGen
bash scripts/hyvideo/hyvideo_t2v_720p_sap.sh
```
When running correctly, you should see `Attention processors replaced with SAP pattern.` followed by `Centroids initialized at layer N` as the k-means attention warms up. Output videos are saved under `result/` with a nested directory structure that encodes the generation config.
***
### View Output Videos
```bash
find ~/Sparse-VideoGen/result -name "*.mp4" | sort
```
To play them inline in a JupyterLab notebook cell:
```python
import glob, os
from IPython.display import Video, display
results_dir = os.path.expanduser("~/Sparse-VideoGen/result")
videos = sorted(glob.glob(f"{results_dir}/**/*.mp4", recursive=True))
if not videos:
print("No output videos found.")
else:
for v in videos:
print(f"📹 {v}")
display(Video(v, embed=True, width=640))
```
> If the cell hangs on large files, interrupt the kernel and open the video directly from the JupyterLab file browser instead.
{% file src="/files/xYTCjEQUdDABdWiPyJjc" %}
***
### Want to Use Your Own Prompt/Image?
Each inference script loads its prompt from a text file under `examples/`. The file used is determined by the `prompt_id` variable at the top of the script:
| Script | Default `prompt_id` | Prompt file | Image file |
| ------------------------- | ------------------- | ----------------------- | ---------------------- |
| `wan_t2v_720p_sap.sh` | 1 | `examples/1/prompt.txt` | — |
| `wan_i2v_720p_sap.sh` | 1 | `examples/1/prompt.txt` | `examples/1/image.jpg` |
| `hyvideo_t2v_720p_sap.sh` | 7 | `examples/7/prompt.txt` | — |
You can also confirm which prompt is being used at runtime — it is printed to the terminal at the start of each run.
To use your own prompt, create a new example directory and write your prompt into it:
```bash
mkdir -p ~/Sparse-VideoGen/examples/8
echo "your prompt here" > ~/Sparse-VideoGen/examples/8/prompt.txt
```
For I2V, also provide an input image:
```bash
cp /path/to/your/image.jpg ~/Sparse-VideoGen/examples/8/image.jpg
```
Then open the script and change `prompt_id` to match your new directory:
```bash
nano ~/Sparse-VideoGen/scripts/wan/wan_t2v_720p_sap.sh
# Change: prompt_id=1
# To: prompt_id=8
```
Run as usual and the output filename will reflect your `prompt_id`, e.g. `8-0.mp4`.
***
### Additional Resources
* [Sparse-VideoGen GitHub](https://github.com/svg-project/Sparse-VideoGen)
* [SVG2 Paper (arXiv)](https://arxiv.org/abs/2505.18875)
* [SVG1 Paper (arXiv)](https://arxiv.org/abs/2502.01776)
* [Project Page](https://svg-project.github.io/)
* [Yotta Labs Console](https://console.yottalabs.ai/)
# 3DGRUT on A100: Build your own 3D Scene Reconstruction
> Created based on \
> *NVIDIA 3DGRUT · SIGGRAPH Asia 2024 / CVPR 2025*
***
### 1. What is 3DGRUT?
#### Big Picture :arrow\_down:
**3DGRUT** is NVIDIA's official open-source codebase implementing two groundbreaking 3D scene reconstruction and rendering methods:
* **3DGRT** — *3D Gaussian Ray Tracing* (SIGGRAPH Asia 2024, Journal Track)
* **3DGUT** — *3D Gaussian Unscented Transform* (CVPR 2025, **Oral**)
Both methods build on top of the classic **3D Gaussian Splatting (3DGS)** paradigm — representing a scene as millions of tiny 3D Gaussian "blobs" — but they push the technology far beyond what rasterization-based 3DGS can do.
#### 3DGRT vs. Classic 3DGS
| Feature | Classic 3DGS | 3DGRT (3DGRUT) |
| --------------------- | ------------------------------- | ------------------------------- |
| Rendering method | Rasterization (tile-based sort) | Ray tracing via GPU RT cores |
| Shadows & reflections | ❌ No | ✅ Yes (secondary rays) |
| Distorted cameras | ❌ Limited | ✅ Full support |
| Rolling shutter | ❌ No | ✅ Yes |
| Speed vs. 3DGS | Faster | Slightly slower, but far richer |
| Hardware requirement | Any CUDA GPU | NVIDIA RT-core GPU (Turing+) |
#### How 3DGRT Works Under the Hood
Unlike classic 3DGS which rasterizes Gaussians by projecting them onto screen-space tiles and sorting them front-to-back, **3DGRT performs ray tracing** — it:
1. Wraps each Gaussian particle in a **bounding mesh primitive**
2. Inserts all bounding meshes into an **OptiX BVH** (Bounding Volume Hierarchy)
3. For each pixel, casts a ray and traverses the BVH in O(log n)
4. Shades **batches of intersected Gaussians** in depth order
5. Optionally fires **secondary rays** from surface hits for reflections, shadows, and refractions
```
Input images → COLMAP SfM → Sparse 3D points
↓
Initialize 3D Gaussians (position, covariance, opacity, SH color)
↓
Build OptiX BVH over Gaussian bounding meshes
↓
Ray-trace per pixel → accumulate Gaussian contributions
↓
Compare render vs. ground truth → backprop → update Gaussians
↓
Densification (clone + split) every 100 iterations up to ~15k steps
↓
Final 3D scene: 1–5 million Gaussians, real-time ray-traced rendering
```
#### What is 3DGUT?
3DGUT (CVPR 2025 Oral) solves a different problem: making Gaussian Splatting work with **highly distorted cameras** — fish-eye lenses, rolling-shutter sensors, and time-dependent camera models common in robotics and autonomous driving. It uses the **Unscented Transform** to propagate Gaussian distributions through non-linear camera projections, enabling a hybrid rasterizer that's both fast and accurate for distorted optics.
> **Quick rule of thumb:**
>
> * Standard perspective cameras + want reflections/shadows → use **3DGRT**
> * Distorted cameras (fish-eye, rolling shutter) or need max speed → use **3DGUT**
***
### 2. Spin up a Yotta Labs Pod
#### Recommended GPU
For 3DGRUT you **must** have an NVIDIA GPU with RT cores (Turing architecture or newer). My recommendation:
| GPU | VRAM | Best for |
| ------------------ | ----- | ------------------------------------------- |
| **H100 SXM5 80GB** | 80 GB | Best all-around: training + 3DGRT rendering |
| A100 80GB | 80 GB | Great for training, RT cores present |
| RTX 5090 | 32 GB | Smaller scenes, fastest RT throughput |
> ⚠️ **Important:** 3DGRT *requires* RT cores for fast ray traversal. Without them it falls back to software ray tracing, which is \~10× slower. Always pick an Turing+ (RTX/A-series/H-series) GPU.
1. Log in to the [Yotta Labs Console](https://console.yottalabs.ai/).
2. Navigate to **Compute → Pods** and click **Deploy**.
3. Select **RTX 5090** as the GPU.
4. Under **Pod Template**, choose `pytorch`.
5. Set **System Volume** to at least **150 GB** (checkpoints vary: LongCat \~15 GB, Self-Forcing \~30 GB, HY-WorldPlay \~25 GB).
6. Click **Deploy** and wait for the Pod to reach `Running` state.
***
### 3. Install & Build 3DGRUT
{% stepper %}
{% step %}
### Install Miniconda
Since most VMs don't come with `conda` pre-installed, install Miniconda to your home directory — no root access needed:
```bash
cd ~
wget https://repo.anaconda.com/miniconda/Miniconda3-latest-Linux-x86_64.sh
bash Miniconda3-latest-Linux-x86_64.sh -b -p ~/miniconda3
~/miniconda3/bin/conda init bash
source ~/.bashrc
```
Verify the installation:
```bash
conda --version
```
{% endstep %}
{% step %}
### Create a Conda Environment
```bash
conda create -n 3dgrut python=3.10 -y
conda activate 3dgrut
```
Your shell prompt should now show `(3dgrut)` at the beginning.
{% endstep %}
{% step %}
### Install PyTorch and Build Tools
Install PyTorch with CUDA support. Even if your system CUDA is 12.8, the `cu121` PyTorch build is compatible:
```bash
pip install torch==2.2.0 torchvision==0.17.0 \
--index-url https://download.pytorch.org/whl/cu121
pip install ninja cmake
```
{% endstep %}
{% step %}
### Clone the 3DGRUT Repository
If you haven't already:
```bash
cd ~
git clone https://github.com/nv-tlabs/3dgrut.git
cd 3dgrut
```
{% endstep %}
{% step %}
### Download and Install the OptiX SDK
3DGRUT requires the NVIDIA OptiX SDK for ray tracing. The SDK is a self-extracting shell script that can be installed entirely in your home directory — **no sudo required**.
1. Log in to your [NVIDIA Developer account](https://developer.nvidia.com/login).
2. Go to the [OptiX Legacy Downloads page](https://developer.nvidia.com/designworks/optix/downloads/legacy).
3. Download **OptiX SDK 8.0.0 for Linux 64-bit**.
4. Transfer the `.sh` file to your VM (via `scp`, `wget` with a direct link, etc.).
Once the file is on your VM:
```bash
chmod +x ~/3dgrut/NVIDIA-OptiX-SDK-8.0.0-linux64-x86_64.sh
~/3dgrut/NVIDIA-OptiX-SDK-8.0.0-linux64-x86_64.sh \
--skip-license \
--prefix=$HOME/optix
```
Set the environment variable so the build system can find it:
```bash
export OptiX_INSTALL_DIR=$HOME/optix
echo 'export OptiX_INSTALL_DIR=$HOME/optix' >> ~/.bashrc
```
{% endstep %}
{% step %}
### Build and Install 3DGRUT
```bash
cd ~/3dgrut
conda activate 3dgrut
pip install -e ".[dev]" --no-build-isolation
```
This will compile all CUDA/C++ extensions in-place. It may take several minutes depending on your GPU and CPU.
{% endstep %}
{% endstepper %}
***
### 4. Prepare Your Scene Data
3DGRUT trains from a set of **posed images** — photos of your scene from multiple angles, along with camera intrinsics and extrinsics. The standard input is **COLMAP**, but NeRF-Synthetic JSON is also supported.
#### Expected Directory Structure (COLMAP)
```
data/
└── my_scene/
├── images/ # Your input photos (.jpg or .png)
│ ├── frame_001.jpg
│ ├── frame_002.jpg
│ └── ...
└── sparse/
└── 0/
├── cameras.bin # Intrinsics
├── images.bin # Extrinsics (camera poses)
└── points3D.bin # Sparse 3D point cloud
```
```bash
cd ~/3dgrut
wget http://storage.googleapis.com/gresearch/refraw360/360_v2.zip
unzip 360_v2.zip -d data/
ls ~/3dgrut/data/
```
***
### 5. Train the Model
Training uses **Hydra** for configuration. There are separate configs for 3DGRT and 3DGUT. The full training loop runs for 30,000 iterations and covers several distinct phases.
#### Understanding the Training Phases
| Phase | Iterations | What happens |
| ---------------- | --------------- | --------------------------------------------------------------------- |
| Warmup | 0 – 500 | Low learning rate, coarse geometry |
| Densification | 500 – 15,000 | Clone under-reconstructed Gaussians, split large ones every 100 iters |
| Opacity reset | 15,000 – 25,000 | Periodically zero out low-opacity Gaussians to prune floaters |
| Final refinement | 25,000 – 30,000 | Fine-tune colors and covariances, no more densification |
During densification, the Gaussian count grows from \~50,000 (sparse SfM seed) to several million. Expect GPU memory usage to rise during this phase.
```bash
cd ~/3dgrut
export PATH=$HOME/slang-2024.14.4-linux-x86_64/bin:$PATH
export CUDA_HOME=/usr/local/cuda
python train.py \
--config-name=apps/colmap_3dgut \
path=data/room \
n_iterations=30000 \
out_dir=outputs/room_3dgut
```
Training will produce:
* `outputs/room_3dgut//ckpt_last.pt` — Final checkpoint
* `outputs/room_3dgut//ours_7000/ckpt_7000.pt` — Intermediate checkpoint at 7000 iterations
* `outputs/room_3dgut//ours_30000/ckpt_30000.pt` — Checkpoint at 30000 iterations
* `outputs/room_3dgut//metrics.json` — Evaluation metrics (PSNR, SSIM, LPIPS)
* `outputs/room_3dgut//parsed.yaml` — Full resolved config
#### Example Training Results
### 6.View the Traning Results
The Viser GUI provides a web-based interactive 3D viewer accessible via your browser. This is the best option for remote servers.
**1. Install viser:**
```bash
pip install viser
```
**2. Launch the viewer with your pre-trained checkpoint:**
```bash
cd ~/3dgrut
python train.py \
--config-name=apps/colmap_3dgut \
path=data/room \
with_viser_gui=True \
test_last=False \
resume=outputs/room_3dgut/room-1405_080002/ckpt_last.pt
```
You should see:
```
╭────── viser (listening *:8080) ───────╮
│ ╷ │
│ HTTP │ http://localhost:8080 │
│ Websocket │ ws://localhost:8080 │
│ ╵ │
╰───────────────────────────────────────╯
```
**3. On your local machine, set up SSH port forwarding:**
```bash
ssh -L 8080:localhost:8080 ubuntu@ -i .pem
```
**4. Open in your browser:**
```
http://localhost:8080
```
**5. Navigate the scene:**
On startup you may see a black screen. This is normal. Use your mouse to navigate:
* **Left-click drag** — Rotate
* **Right-click drag** — Pan
* **Scroll wheel** — Zoom
Navigate to the training camera views to see the reconstructed scene.
***
*Keep an eye on the 3DGRUT GitHub for updates — NVIDIA's team ships improvements regularly. Happy training! 🎉*
# Sol-RL on A100: Post-Training Diffusion Models at the Speed of Light
Sol-RL (Speed-of-light RL) is NVIDIA's framework for aligning text-to-image diffusion models with human preferences — significantly faster and cheaper than standard approaches. The core idea: **use NVFP4-quantized rollouts to cheaply explore a massive candidate pool, then train exclusively on the best samples regenerated at full BF16 precision**. The result is up to 4.64× faster convergence with essentially no quality loss, verified across SANA, FLUX.1, and SD3.5-L. This tutorial walks through the paper, the key ideas, and how to run Sol-RL post-training on a Yotta Labs multi-GPU Pod.
RL-based post-training for diffusion models has been picking up serious momentum lately. The basic premise borrows from what made GRPO so effective for LLMs: generate a group of candidate outputs, score them with a reward model, and use the relative advantage between high- and low-reward samples to update the policy. Translated to image generation, this means: for each prompt, sample a batch of images, evaluate them against a human preference signal (ImageReward, CLIPScore, PickScore, HPSv2, etc.), and optimize the diffusion model to produce more of the high-reward kind.
The catch — and it's a real one — is that rollout generation is expensive. On a model like FLUX.1-12B, running BF16 forward passes at scale is brutally slow. The research consistently shows that larger rollout group sizes lead to better alignment (more candidates → sharper advantage signal → cleaner gradient → faster convergence), but scaling rollout group size linearly scales compute. You quickly find yourself in a situation where candidate generation consumes 80% of wall-clock training time, and the policy update itself becomes almost a rounding error. **This is the bottleneck Sol-RL is designed to break.**
### Why FP4 Rollouts Work as a Proxy
The key insight is deceptively simple. In ODE-based diffusion sampling — which covers most modern flow-matching models including SANA, FLUX, and SD3 — the semantic content of a generated image is largely determined by the initial noise seed. Change the denoising path slightly (as FP4 quantization does), and you'll get a different-looking image, but the reward it would receive tends to stay consistent with its BF16 counterpart. The ranking within a group is preserved even when absolute pixel quality degrades.
This means FP4 rollouts can serve as reliable proxy reward rankings. You're not asking them to be perfect images — you're just asking them to tell you which seeds are worth regenerating at full precision. The paper formalizes this in two ways: first, low-precision denoising can be modeled as a bounded perturbation to the BF16 trajectory, so FP4 reward values stay close to their BF16 counterparts; second, as rollout group size N grows, the probability that FP4-identified top/bottom-K seeds match the true BF16 top/bottom-K improves rapidly. In other words, the proxy gets more reliable precisely when you need it most — at large N.
What's notably absent from the paper is any evidence that this ranking consistency holds universally. The authors are careful to scope it to the ODE-style deterministic samplers they use throughout (classifier-free guidance disabled for SANA and SD3.5, guidance embedding fixed at 1.0 for FLUX.1), and to warn that naively using FP4 outputs directly as training targets — without the two-stage decoupling — does degrade quality. The proxy ranking insight only works because you're using FP4 exclusively for selection, not for gradient computation.
### The Two-Stage Pipeline
Each training iteration runs as follows.
**Stage 1 — FP4 Explore.** Sample N=96 initial noise seeds per prompt. Run the NVFP4-quantized model with a reduced step count (fewer denoising steps suffice to rank, not to produce final quality — the paper uses 6 preview steps). Score all 96 images with the reward model. Filter to the top-K and bottom-K seeds (K=24 by default), which form the most contrastive subset and produce the sharpest advantage signal for GRPO.
**Stage 2 — BF16 Train.** Take the 24 selected seeds. Regenerate them from scratch using the full BF16 model with the full denoising step budget. Compute GRPO loss on these high-fidelity regenerations using the proxy rewards from Stage 1. Update the policy weights. Re-quantize to NVFP4 for the next iteration's Stage 1.
The overhead is minimal: Stage 2 runs BF16 on exactly the same number of samples a standard GRPO run would train on anyway. Everything else — the N-K discarded candidates — is replaced with cheap FP4 passes. The paper reports roughly 2% computational overhead from Stage 2 re-quantization, and 2–2.4× rollout phase acceleration from FP4, for a net end-to-end speedup of 1.25× on SANA and 1.62× on FLUX.1. The convergence speedup headline (4.64×) refers to wall-clock time to reach a target reward level — because Sol-RL can afford more iterations in the same time budget, it reaches alignment ceilings that naive BF16 pipelines can't reach without prohibitive cost.
### Results :tada:
Across three base models and four reward metrics, the results are consistent:
**Efficiency (seconds per iteration):**
| Base Model | Rollout (Naive BF16) | Rollout (Sol-RL) | Speedup | E2E Speedup |
| ----------- | -------------------- | ---------------- | ------- | ----------- |
| FLUX.1 | 184s | 79s | 2.33× | 1.62× |
| SD3.5-Large | 451s | 187s | 2.41× | 1.61× |
| SANA | 65s | 46s | 1.41× | 1.25× |
**Alignment quality (FLUX.1, ImageReward):**
| Method | Score | Δ vs. Base |
| ------------ | ---------- | ---------- |
| DanceGRPO | 1.4937 | +1.04 |
| FlowGRPO | 1.5331 | +1.08 |
| AWM | 1.6693 | +1.21 |
| DiffusionNFT | 1.6707 | +1.22 |
| **Sol-RL** | **1.7636** | **+1.31** |
Sol-RL outperforms all baselines on all metrics across all three models while training faster than any of them. The quality gap versus a pure BF16 rollout pipeline (where all N=96 candidates are generated at full precision) is approximately 1% on ImageReward — effectively noise.
***
### Running Sol-RL on a Yotta Labs Pod
The official scripts are configured for **single-node 8-GPU** training, which is the setup validated in the paper. SANA 1.6B is the most accessible starting point — it's the smallest model and the fastest to iterate on. FLUX.1 and SD3.5-L require more VRAM per GPU but run on the same scripts.
#### Prerequisites
* A [Yotta Labs](https://www.yottalabs.ai/) account with sufficient credits
* A [Hugging Face](https://huggingface.co/) account and access token (`HF_TOKEN`)
* Familiarity with multi-GPU JupyterLab environments and `torchrun`
{% stepper %}
{% step %}
### Deploy an 8-GPU Pod
Log in to the [Yotta Labs Console](https://console.yottalabs.ai/). Navigate to **Compute → Pods**, click **Deploy**, and select a **8× GPU** configuration. The official training was done on H100 80GB GPUs; on Yotta Labs, **8× A100** will work for SANA 1.6B with the default config.
| Setting | Recommended Value |
| ------------- | ------------------------------------------------------------ |
| Template | `pod-templates-jupyterlab` |
| System Volume | **200 GB** — model weights, checkpoints, reward model caches |
| GPU Count | **8** |
Add your Hugging Face token as an environment variable before deploying:
```
HF_TOKEN=
```
Click **Deploy**, wait for **Running** status, then connect to JupyterLab on port 8888.
{% endstep %}
{% step %}
### Clone and Install
Open a terminal via ssh connection and set up the base environment:
```bash
git clone https://github.com/NVlabs/Sana.git
cd Sana
bash ./environment_setup.sh sana
conda activate sana
```
Sol-RL's NVFP4 path (`naive_quant` and `sol_rl` config families) requires `transformer-engine`. Install it with the same Python interpreter that will run `torchrun`:
```bash
python -m pip install --no-build-isolation "transformer-engine[pytorch]"
```
> **Note on `setuptools`:** If you hit a `ModuleNotFoundError: No module named 'pkg_resources'` during setup (caused by setuptools 70+ breaking backwards compatibility), fix it first: `pip install "setuptools<70" --force-reinstall`, then re-run.
> {% endstep %}
{% step %}
### Download Reward Model Checkpoints
Most reward models download automatically on first use, but **HPSv2** requires manual setup. Create the checkpoint directory and download its weights:
```bash
mkdir -p reward_ckpts
cd reward_ckpts
wget https://huggingface.co/laion/CLIP-ViT-H-14-laion2B-s32B-b79K/resolve/main/open_clip_pytorch_model.bin
wget https://huggingface.co/xswu/HPSv2/resolve/main/HPS_v2.1_compressed.pt
cd ..
```
The other reward models (`clipscore`, `pickscore`, `imagereward`) are downloaded automatically the first time training runs. If you're planning to use only those, you can skip this step.
{% endstep %}
{% step %}
### Run Sol-RL Training on SANA
The repo ships ready-to-run launcher scripts for each model. For SANA, the default entry point is:
```bash
bash train_scripts/sol_rl/run_sana_single_node_8gpu.sh
```
To select a specific config family and reward, set `CONFIG_SPEC` before launching. The config naming pattern is `__`. For example, to run the full Sol-RL two-stage pipeline with ImageReward on SANA:
```bash
CONFIG_SPEC=configs/sol_rl/sana.py:sana_sol_rl_imagereward \
bash train_scripts/sol_rl/run_sana_single_node_8gpu.sh
```
If you want to start with something simpler to validate the pipeline first — no NVFP4 required, no `transformer-engine` dependency — use the `diffusionnft` family:
```bash
CONFIG_SPEC=configs/sol_rl/sana.py:sana_diffusionnft_pickscore \
bash train_scripts/sol_rl/run_sana_single_node_8gpu.sh
```
**Config families at a glance:**
| Family | What it does | NVFP4 needed |
| --------------- | -------------------------------------------------- | ------------ |
| `diffusionnft` | PEFT-only baseline (24-in-24) | No |
| `naive_scaling` | BF16 brute-force scaling (24-in-96) | No |
| `compile` | BF16 compiled scaling (24-in-96) | No |
| `naive_quant` | Direct NVFP4 rollout — don't use for real training | Yes |
| `sol_rl` | Two-stage decoupled Sol-RL (24-in-96) | Yes |
The `diffusionnft` family is the recommended starting point for a first run. It validates that your environment, data loading, and reward scoring all work correctly before you bring in the NVFP4 machinery.
{% endstep %}
{% step %}
### Run Inference to Verify Alignment
Once you have a checkpoint (or midway through training), test your aligned model against the base model to see the quality difference:
```bash
python scripts/inference.py \
--config=configs/sana_config/1024ms/Sana_1600M_img1024.yaml \
--model_path=output//checkpoints/latest.pth \
--txt_file=asset/samples_mini.txt
```
To quantify the improvement with reward scores, use the ImageReward evaluation script:
```bash
bash scripts/bash_run_inference_metric_imagereward.sh \
configs/sana_config/1024ms/Sana_1600M_img1024.yaml \
output//checkpoints/latest.pth
```
The alignment improvement is most visible on compositionally complex prompts — spatial relationships, counting, attribute binding. The RL-aligned model handles "a red cube on top of a blue sphere to the left of a green cylinder" noticeably better than the base model, because the reward signal specifically pushes the policy toward prompt fidelity.
{% endstep %}
{% endstepper %}
***
### Troubleshooting
**`transformer-engine` install fails.** This package is tied tightly to your CUDA and PyTorch versions. Run `python -c "import torch; print(torch.__version__, torch.version.cuda)"` first, then check the transformer-engine release page for a matching wheel. On Blackwell (RTX 5090 / H100), CUDA 12.4+ and PyTorch 2.4+ are required.
**`run_sana_single_node_8gpu.sh` exits immediately with no output.** Usually means `torchrun` can't find all 8 GPUs. Check `nvidia-smi` — all 8 should be visible with no processes holding them. If another process is using a GPU, kill it first.
**Reward scores don't improve after 100+ iterations.** First check that the reward model is actually scoring correctly by looking at per-sample scores in the training logs. If scores are near-constant, the reward model may have failed to load (common if `reward_ckpts/` is missing for HPSv2). Switch to `pickscore` or `imagereward` which auto-download and are more robust to environment issues.
**OOM during the BF16 Stage 2 regeneration.** Reduce `train_group_size` (K) from 24 to 16 in your config. This reduces the BF16 batch size with minimal impact on gradient quality, since you're still selecting from the same N=96 FP4 candidates.
**Want to run on FLUX.1 or SD3.5-L?** The launchers are identical in structure, just swap the script:
```bash
# FLUX.1
CONFIG_SPEC=configs/sol_rl/flux1.py:flux1_sol_rl_imagereward \
bash train_scripts/sol_rl/run_flux1_single_node_8gpu.sh
# SD3.5-Large
CONFIG_SPEC=configs/sol_rl/sd3.py:sd3_sol_rl_imagereward \
bash train_scripts/sol_rl/run_sd3_single_node_8gpu.sh
```
FLUX.1 shows the largest absolute efficiency gains (2.33× rollout speedup), making it the most rewarding target if you have the VRAM budget.
***
*Resources:* [*Paper (arXiv:2604.06916)*](https://arxiv.org/abs/2604.06916) *·* [*GitHub*](https://github.com/NVlabs/Sana) *·* [*Project Page*](https://nvlabs.github.io/Sana/Sol-RL/) *·* [*Official Sol-RL Docs*](https://nvlabs.github.io/Sana/docs/sol_rl/)
---
[Next Page](/llms-full.txt/1)


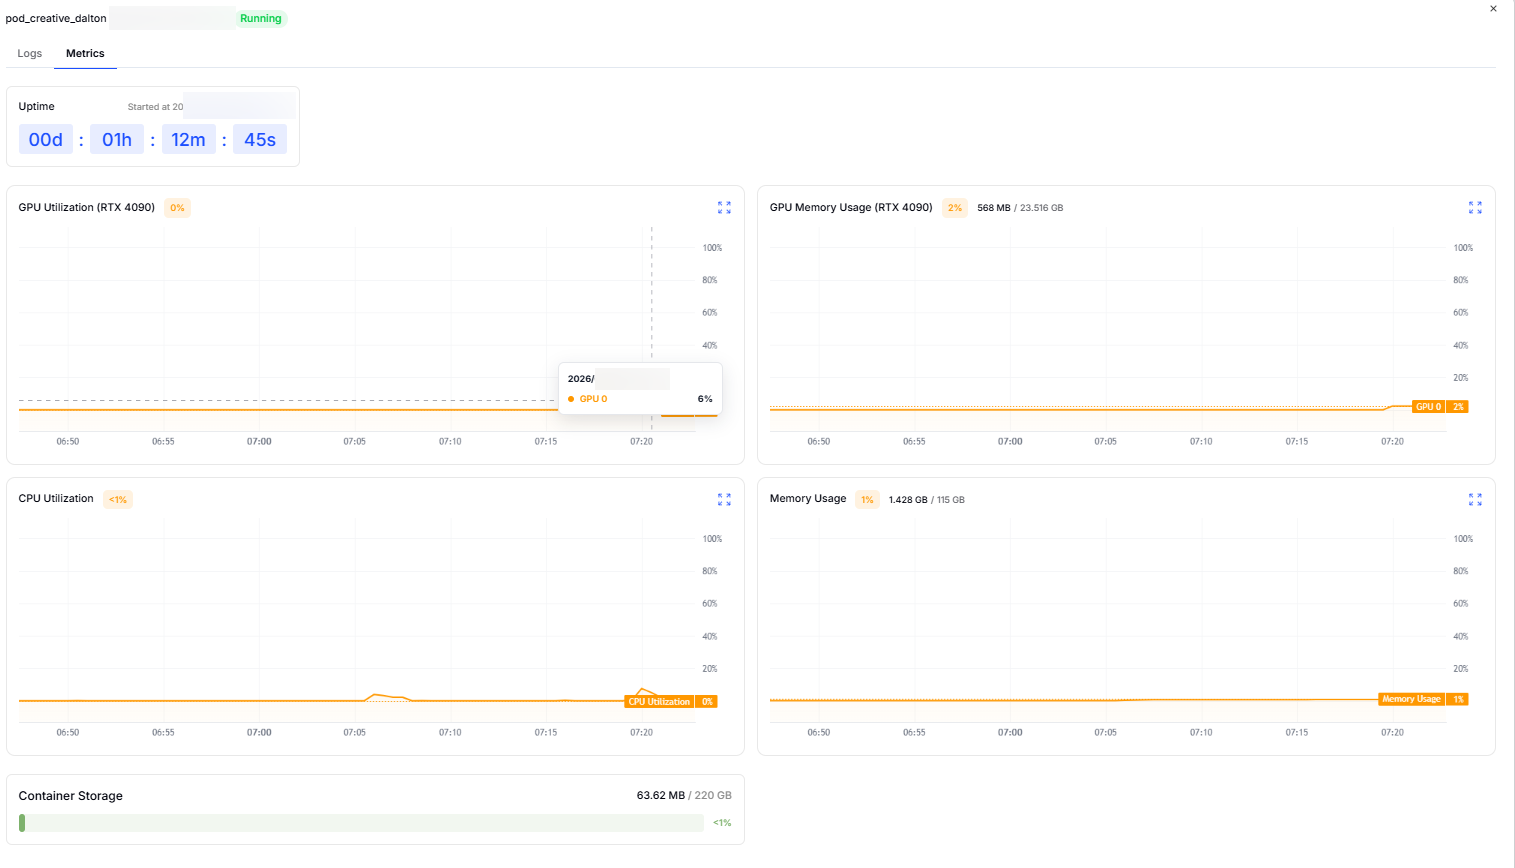


.png?alt=media&token=6badb78c-118e-4fb9-9f60-f57da10b56c4)


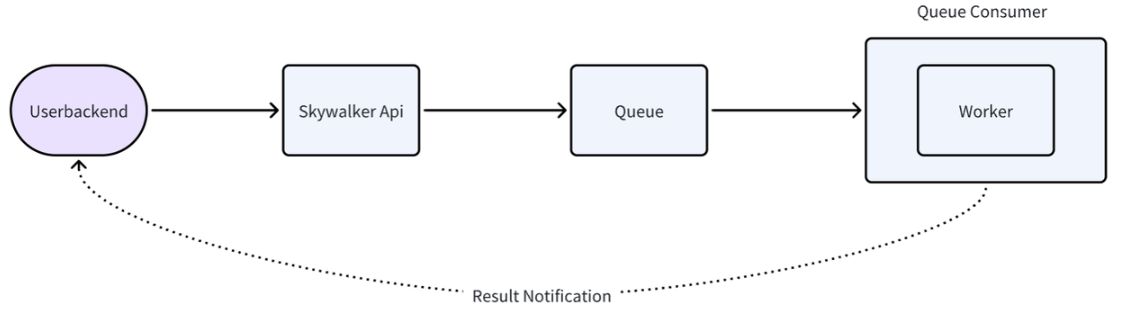
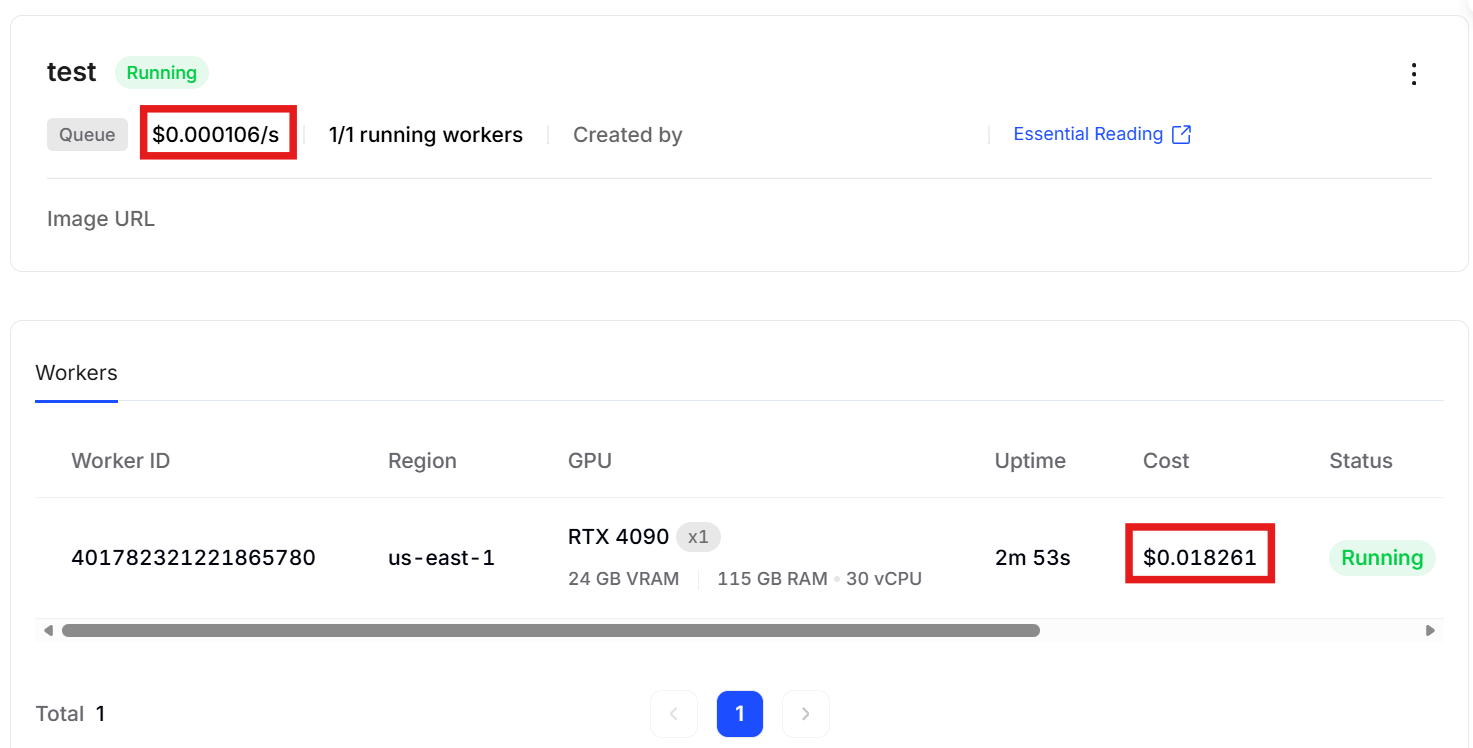
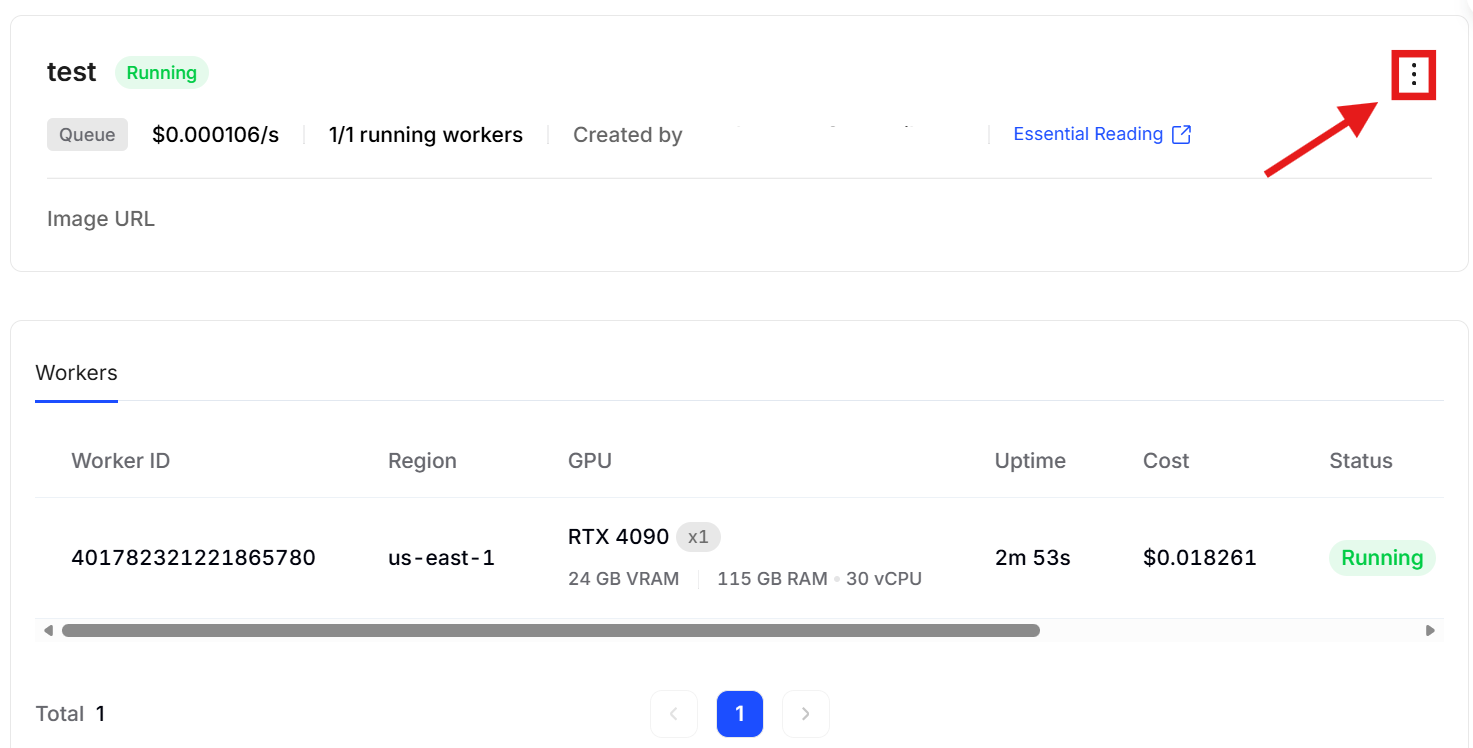






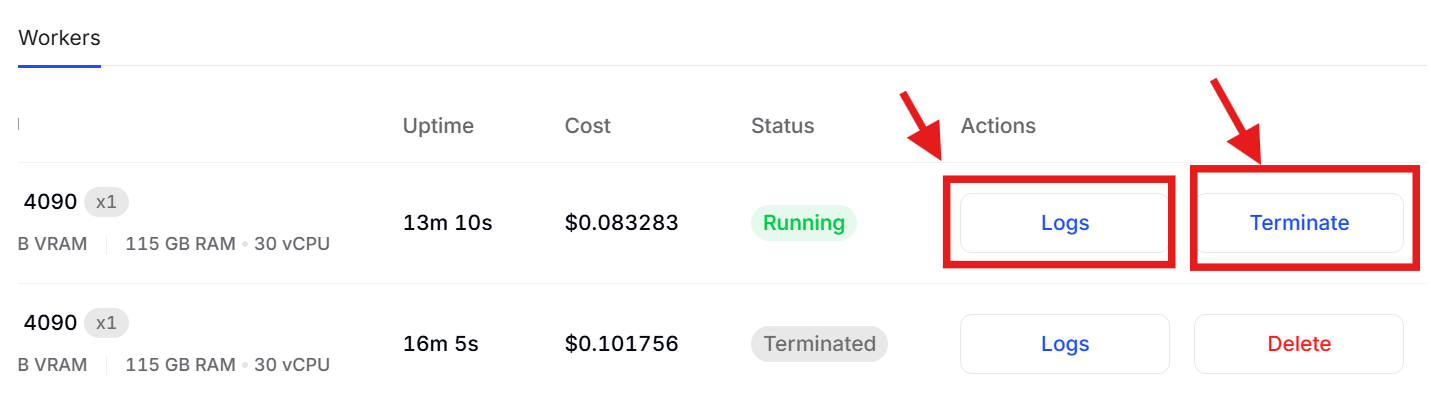





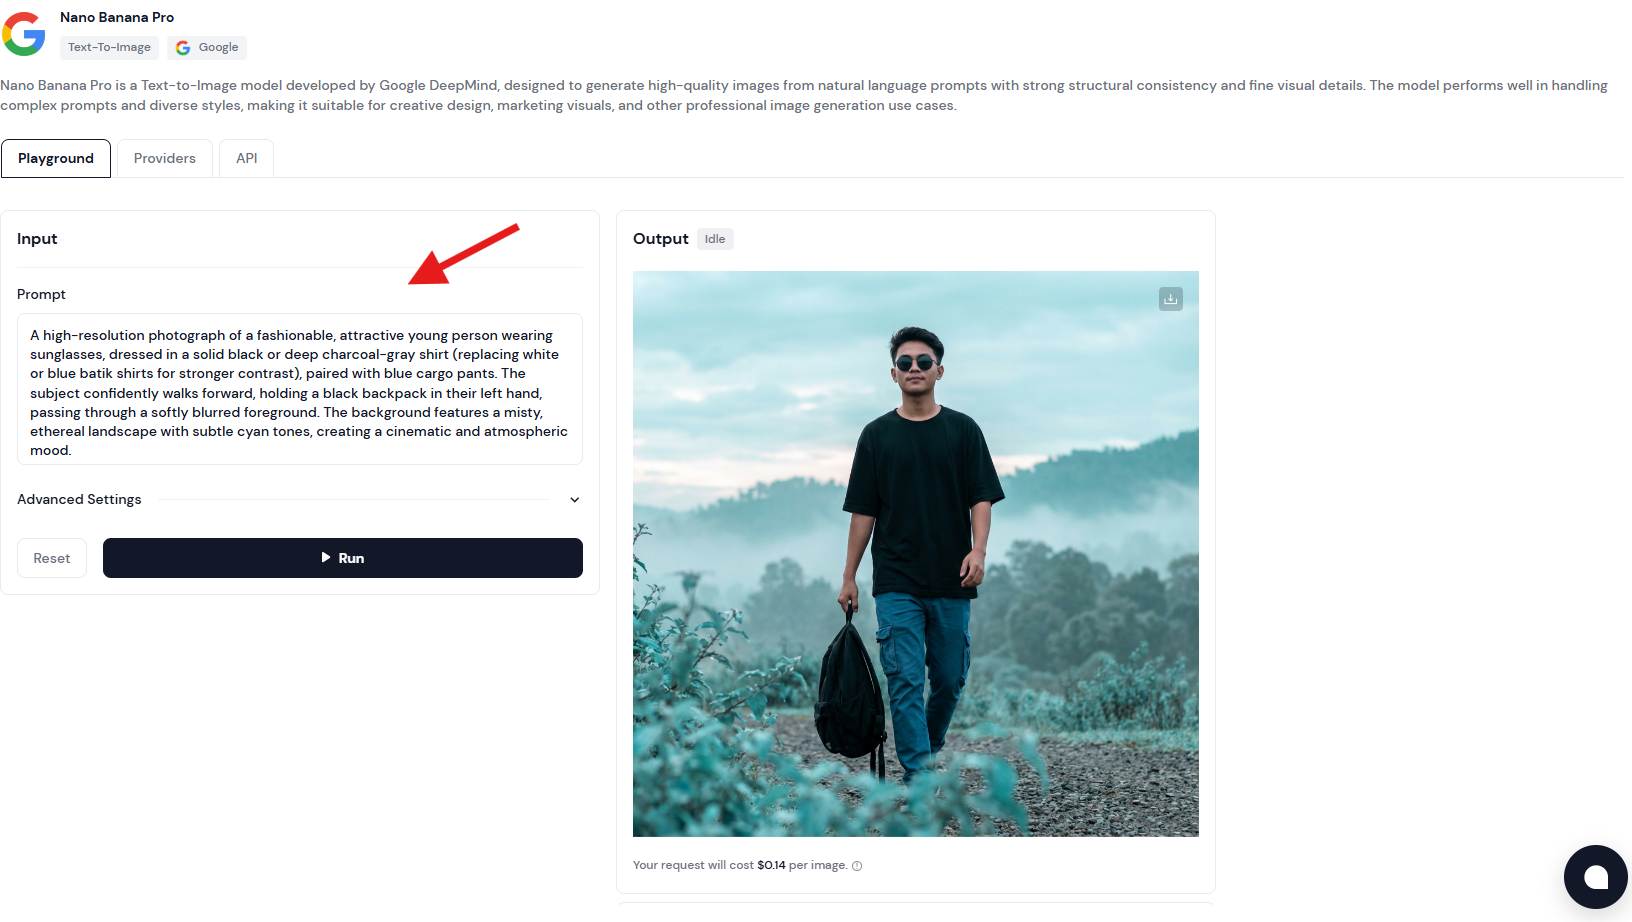
.png?alt=media&token=ee095e72-005e-4955-a933-6deaf300e575) * **Template 2 — Scene / Environment**
```
A [render style] of [location/environment], during [time of day / weather].
[Key visual elements present in the scene].
The atmosphere is [descriptive mood].
Color palette: [dominant colors]. Style reference: [art style or director/photographer].
```
*Example:*
> A photorealistic render of an abandoned greenhouse interior, during golden hour after light rain. Overgrown vines crawl across rusted iron frames, and puddles reflect warm light from broken roof panels. The atmosphere is quiet and melancholic. Color palette: amber, moss green, pale rust. Style reference: Gregory Crewdson.
>
>
* **Template 2 — Scene / Environment**
```
A [render style] of [location/environment], during [time of day / weather].
[Key visual elements present in the scene].
The atmosphere is [descriptive mood].
Color palette: [dominant colors]. Style reference: [art style or director/photographer].
```
*Example:*
> A photorealistic render of an abandoned greenhouse interior, during golden hour after light rain. Overgrown vines crawl across rusted iron frames, and puddles reflect warm light from broken roof panels. The atmosphere is quiet and melancholic. Color palette: amber, moss green, pale rust. Style reference: Gregory Crewdson.
>
>  * **Template 3 — Product / Marketing Visual**
```
A clean [shot type] of [product name/description] placed on [surface/background].
[Props or surrounding elements if any].
Lighting: [lighting setup].
The overall tone is [brand tone: minimal / bold / luxury / playful].
No text, no watermark.
```
*Example:*
> A clean overhead shot of a matte black coffee cup placed on a white marble surface. A single sprig of dried lavender rests beside it. Lighting: soft diffused natural light from the left. The overall tone is minimal and premium. No text, no watermark.
>
>
* **Template 3 — Product / Marketing Visual**
```
A clean [shot type] of [product name/description] placed on [surface/background].
[Props or surrounding elements if any].
Lighting: [lighting setup].
The overall tone is [brand tone: minimal / bold / luxury / playful].
No text, no watermark.
```
*Example:*
> A clean overhead shot of a matte black coffee cup placed on a white marble surface. A single sprig of dried lavender rests beside it. Lighting: soft diffused natural light from the left. The overall tone is minimal and premium. No text, no watermark.
>
>  **Quick Reference — Power Words by Category**
| Category | Options |
| ----------- | ---------------------------------------------------------------------------- |
| Photo style | cinematic, photorealistic, editorial, documentary, long-exposure |
| Lighting | golden hour, blue hour, hard rim light, soft diffused, neon-lit, candlelit |
| Mood | ethereal, gritty, melancholic, energetic, sterile, nostalgic |
| Color grade | desaturated, warm analog, high contrast B\&W, teal & orange, pastel washed |
| Composition | wide establishing shot, tight close-up, bird's eye, Dutch angle, symmetrical |
* **Advanced Settings**: Expand this section to adjust parameters like output dimensions, sampling steps, or guidance scale, depending on what the provider exposes. Useful when you want to push quality or constrain style.
* **Aspect Ratio** defines the shape of your image. `1:1` for social square posts, `9:16` for mobile/Stories, `16:9` for presentations and banners, `2:3` for portrait editorial, `21:9` for cinematic widescreen, and several others in between. The selected ratio is highlighted in black — default is `1:1`.
* **Resolution** sets the output quality: `1K`, `2K`, or `4K`. Higher resolution means more detail and larger file size. For quick prototyping, 1K is fine. For anything going into production — print, large-format display, or high-DPI screens — go 2K or 4K.
* **Output Format** is straightforward: `PNG` for lossless quality with transparency support, `JPEG` for smaller file sizes when you don't need a transparent background. **When in doubt, PNG is the safer default.**
**Quick Reference — Power Words by Category**
| Category | Options |
| ----------- | ---------------------------------------------------------------------------- |
| Photo style | cinematic, photorealistic, editorial, documentary, long-exposure |
| Lighting | golden hour, blue hour, hard rim light, soft diffused, neon-lit, candlelit |
| Mood | ethereal, gritty, melancholic, energetic, sterile, nostalgic |
| Color grade | desaturated, warm analog, high contrast B\&W, teal & orange, pastel washed |
| Composition | wide establishing shot, tight close-up, bird's eye, Dutch angle, symmetrical |
* **Advanced Settings**: Expand this section to adjust parameters like output dimensions, sampling steps, or guidance scale, depending on what the provider exposes. Useful when you want to push quality or constrain style.
* **Aspect Ratio** defines the shape of your image. `1:1` for social square posts, `9:16` for mobile/Stories, `16:9` for presentations and banners, `2:3` for portrait editorial, `21:9` for cinematic widescreen, and several others in between. The selected ratio is highlighted in black — default is `1:1`.
* **Resolution** sets the output quality: `1K`, `2K`, or `4K`. Higher resolution means more detail and larger file size. For quick prototyping, 1K is fine. For anything going into production — print, large-format display, or high-DPI screens — go 2K or 4K.
* **Output Format** is straightforward: `PNG` for lossless quality with transparency support, `JPEG` for smaller file sizes when you don't need a transparent background. **When in doubt, PNG is the safer default.**